1. Введение
This manual provides detailed instructions for the installation, configuration, and operation of your NETGEAR ProSAFE XS712T 12-Port 10GBase-T Gigabit Smart Managed Switch. Designed for small to medium-sized businesses (SMBs), this switch offers high-performance 10-Gigabit connectivity, advanced Layer 2 features, and easy web-based management to meet diverse networking needs.
2.Основные характеристики
- Advanced VLAN features such as MAC (Media Access Control), protocol-based VLAN and guest VLAN.
- Advanced QoS (Quality of Service) including Q-in-Q.
- Dynamic VLAN assignment - Increases security by imposing consistent policy and user credentials across the network, regardless of where users connect.
- MLD snooping - Increases network efficiency by forwarding multicast traffic to designated hosts only, rather than flooding multicast packets across all ports.
- Security management.
- IPv6 for management, QoS and ACL.
- Простота использования Web-основанное управление.
3. Содержимое упаковки
Убедитесь, что ваш пакет содержит следующие предметы:
- NETGEAR ProSAFE XS712T 12-Port 10GBase-T Gigabit Smart Managed Switch
- Шнур питания
- Комплект для монтажа в стойку (если применимо)
- Руководство по установке
4. Продукт закончилсяview
The NETGEAR ProSAFE XS712T switch features a robust design with multiple ports and indicators for efficient network management.
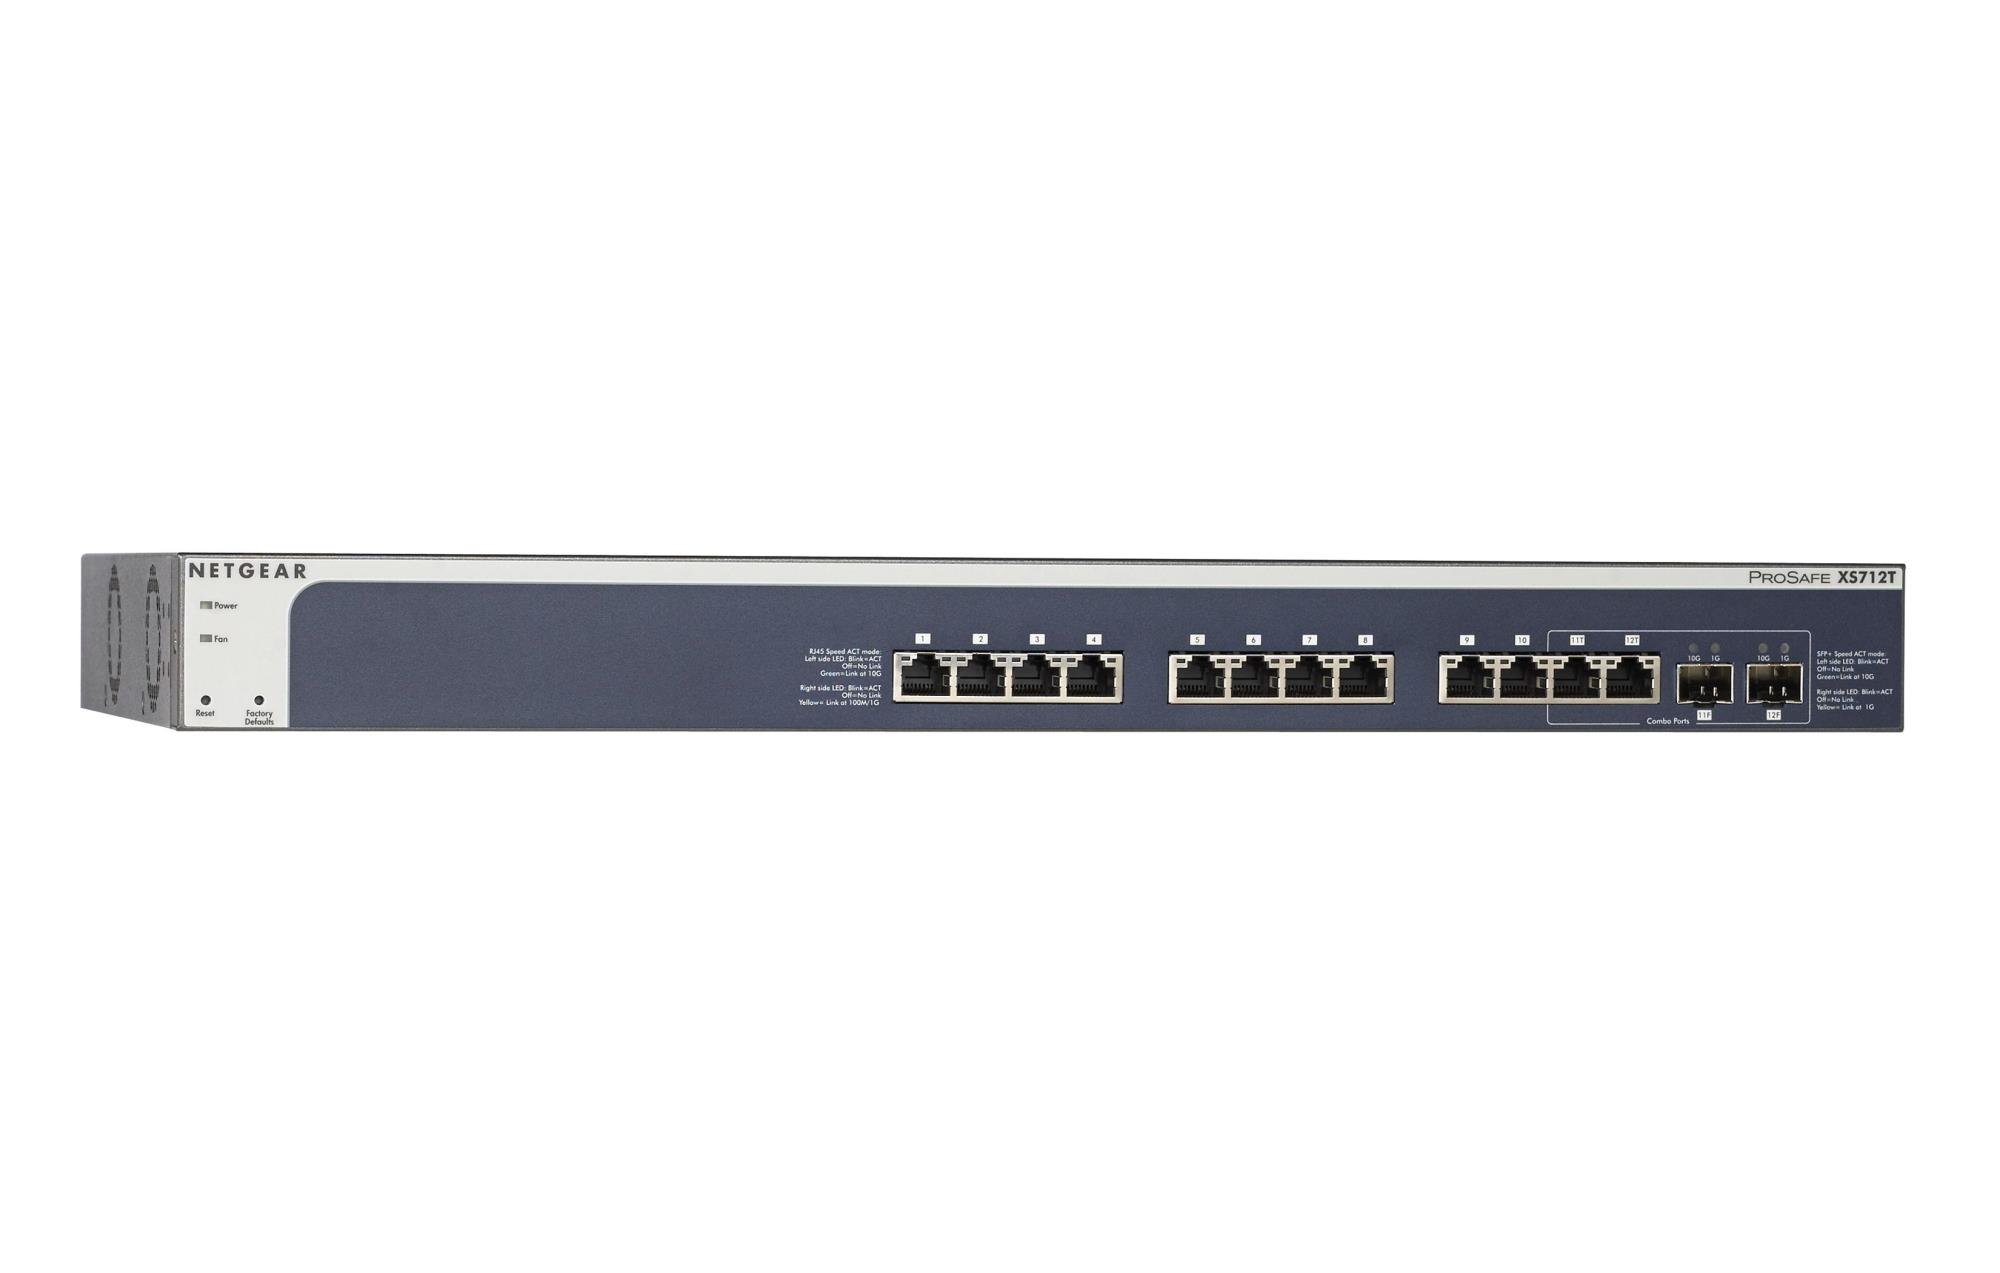
Figure 1: Front Panel of NETGEAR ProSAFE XS712T Switch
This image displays the front panel of the NETGEAR ProSAFE XS712T switch, showing the 12 10GBase-T ports, two combo SFP+ ports, and LED indicators for power, fan status, and port activity. The reset and factory defaults buttons are also visible on the left side.
Компоненты передней панели:
- Светодиод питания: Указывает состояние питания устройства.
- Светодиод вентилятора: Indicates the operational status of the cooling fan.
- Кнопка сброса: Used to restart the switch.
- Factory Defaults Button: Used to restore the switch to its factory default settings.
- Порты RJ45 (1-10): 10GBase-T Ethernet ports for high-speed network connections. Each port has associated Link/Act LEDs (Left side LED: Blink=ACT, Off=No Link, Green=Link at 100M/1G; Right side LED: Blink=ACT, Off=No Link, Yellow=Link at 10G).
- Combo Ports (11, 12): These ports can function as either 10GBase-T RJ45 ports or SFP+ fiber ports. Each combo port has associated SFP+ Speed/ACT LEDs (Left side LED: Blink=ACT, Off=No Link, Green=Link at 10G; Right side LED: Blink=ACT, Off=No Link, Yellow=Link at 1G).
5. Настройка
5.1 Монтаж в стойку (опционально)
If you intend to install the switch in a standard 19-inch equipment rack, use the provided rack-mount kit. Secure the mounting brackets to the sides of the switch using the screws provided. Then, attach the switch to the rack using appropriate rack screws.
5.2 Размещение на рабочем столе
For desktop use, ensure the switch is placed on a flat, stable surface. Allow adequate ventilation around the device to prevent overheating.
5.3 Подключение питания
- Подключите один конец прилагаемого шнура питания к разъему питания переменного тока на задней панели коммутатора.
- Вставьте другой конец шнура питания в заземленную электрическую розетку.
- Убедитесь, что светодиод питания на передней панели загорается, указывая на то, что коммутатор получает питание.
5.4 Сетевые подключения
- Connect your network devices (servers, workstations, other switches) to the RJ45 ports (1-10) using appropriate Ethernet cables (Cat6a or higher for 10G speeds).
- For fiber optic connections, insert compatible SFP+ transceivers into the combo SFP+ ports (11F, 12F) and connect fiber optic cables.
- Observe the Link/Act LEDs for each connected port. A solid green or yellow light indicates a successful link, and blinking indicates activity.
6. Инструкция по эксплуатации
6.1 Основные операции
The NETGEAR ProSAFE XS712T is a plug-and-play device for basic connectivity. Once powered on and connected, it will automatically detect and configure connected devices for optimal performance.
6.2 Web-Основанное управление
For advanced configuration and management, access the switch's webна основе интерфейса:
- Убедитесь, что ваш компьютер подключен к коммутатору.
- Откройте web browser and enter the default IP address of the switch (refer to the Quick Start Guide or NETGEAR support for the specific default IP).
- Log in using the default username and password (typically "admin" and "password" or similar, check documentation).
- Из web interface, you can configure VLANs, QoS settings, security features, and monitor network status.
7. Техническое обслуживание
- Обновления прошивки: Регулярно проверяйте службу поддержки NETGEAR. webсайт для получения последних обновлений прошивки, обеспечивающих оптимальную производительность и безопасность.
- Уборка: Содержите переключатель в чистоте и не допускайте попадания пыли. Используйте для чистки мягкую сухую ткань. Не используйте жидкие или аэрозольные чистящие средства.
- Вентиляция: Во избежание перегрева убедитесь, что вентиляционные отверстия не заблокированы.
- Управление кабелями: Organize network cables to prevent strain on ports and improve airflow.
8. Поиск Неисправностей
- Нет питания: If the Power LED is off, ensure the power cord is securely connected to both the switch and the electrical outlet. Try a different outlet or power cord.
- Нет ссылки на порт: Проверьте подключение кабеля Ethernet на обоих концах. Попробуйте использовать другой кабель или порт. Убедитесь, что подключенное устройство включено и работает правильно.
- Низкая скорость сети: Verify that you are using appropriate cables (Cat6a or higher for 10G). Check for network congestion or misconfigurations in the switch's settings (e.g., QoS).
- Невозможно получить доступ Web Интерфейс: Ensure your computer's IP address is in the same subnet as the switch's IP address. Verify the switch's IP address and login credentials. Try resetting the switch to factory defaults if necessary (this will erase all custom configurations).
- Шум вентилятора: The switch may generate fan noise during operation, especially under heavy load or in warmer environments. This is normal. Ensure proper ventilation.
9. Технические характеристики
| Особенность | Деталь |
|---|---|
| Бренд | NETGEAR |
| Номер модели | XS712T-100NES |
| Количество портов | 12 (10GBase-T RJ45, 2 Combo SFP+) |
| Скорость передачи данных | 10000 мегабит в секунду (10 гигабит) |
| Тип интерфейса | RJ45, SFP+ |
| Материал корпуса | Пластик |
| Вес товара | 1.32 фунта |
| Размеры продукта | 22.44 x 3.54 x 13.74 дюйма |
| Верхний температурный рейтинг | 40 градусов по Цельсию |
| БАРАН | 2 МБ |
| Язык | Английский |
10. Гарантия и поддержка
For warranty information, technical support, and product registration, please visit the official NETGEAR support website or refer to the warranty card included in your product package. Keep your purchase receipt for warranty claims.
Интернет-ресурсы: