1. Introducere
This manual provides detailed instructions for the proper installation, operation, and maintenance of your Spider SR-W122D 12-inch Dual Voice Coil Subwoofer. To ensure optimal performance and longevity of your product, please read this manual thoroughly before use and retain it for future reference.
2. Informații de siguranță
- Deconectați întotdeauna borna negativă a bateriei vehiculului înainte de a începe orice lucrare electrică.
- Asigurați-vă că toate cablurile sunt izolate corespunzător pentru a preveni scurtcircuitele.
- Use appropriate gauge wiring for power and speaker connections to handle the subwoofer's power requirements.
- Mount the subwoofer securely to prevent movement during vehicle operation, which could cause damage or injury.
- Evitați expunerea subwooferului la umiditate excesivă sau temperaturi extreme.
- Do not operate the subwoofer beyond its rated power specifications to prevent damage.
3. Conținutul pachetului
La despachetare, vă rugăm să verificați dacă sunt incluse următoarele articole:
- 1x Spider SR-W122D 12-inch Dual Voice Coil Subwoofer
4. Produs terminatview
The Spider SR-W122D is a high-performance 12-inch subwoofer designed for car audio applications, featuring a dual voice coil for flexible wiring options and robust power handling.

Figure 4.1: Spider SR-W122D 12-inch Subwoofer shown with its retail packaging.

Figura 4.2: Sus view of the subwoofer, highlighting the cone and surround.

Figura 4.3: lateral view of the subwoofer, illustrating the voice coil wiring and basket structure.
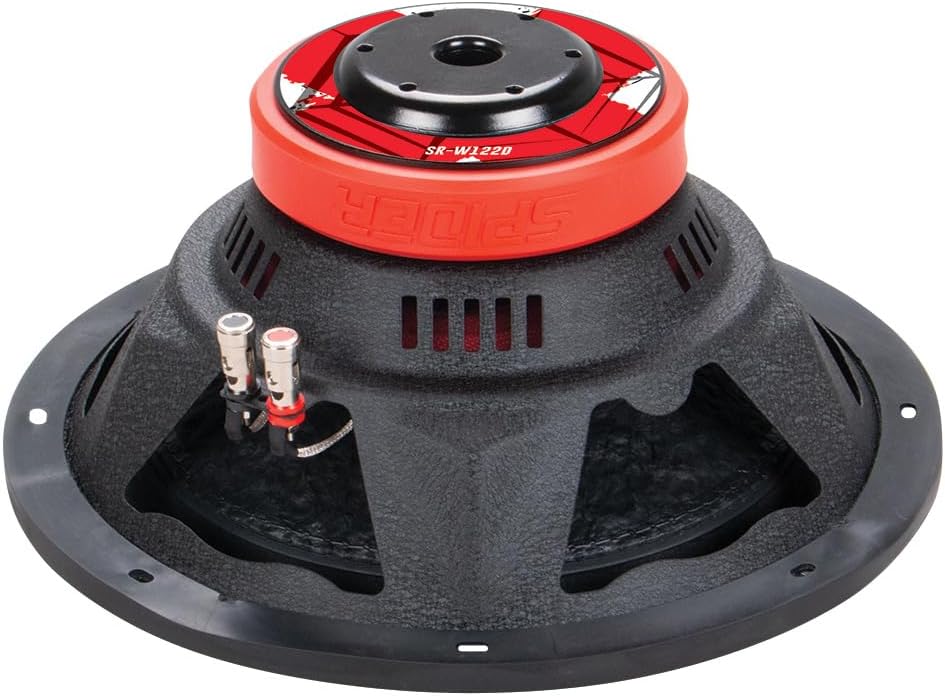
Figura 4.4: De jos view of the subwoofer, displaying the magnet assembly and speaker terminals.
5. Configurare și instalare
5.1 Verificări prealabile instalării
- Asigurați-vă amplifier is compatible with a 4 Ohm load (or 2 Ohm/8 Ohm depending on wiring configuration).
- Verify that the mounting location and enclosure are suitable for a 12-inch subwoofer.
- Gather all necessary tools and wiring materials.
5.2 Wiring Configurations (Dual 4 Ohm Voice Coils)
The SR-W122D features dual 4 Ohm voice coils, offering flexibility in wiring to achieve different impedance loads for your ampmai în viață.
- Cablare paralelă (sarcină de 2 ohm): Connect the positive terminals of both voice coils together, and the negative terminals of both voice coils together. Then connect the combined positive to the amprezultatul pozitiv al lifier-ului și rezultatul negativ combinat al amplifier's negative output. This configuration presents a 2 Ohm load to the ampmai în viață.
- Cablare în serie (sarcină de 8 ohmi): Connect the positive terminal of one voice coil to the negative terminal of the other voice coil. Then connect the remaining positive terminal to the ampieșirea pozitivă a transformatorului și terminalul negativ rămas la amplifier's negative output. This configuration presents an 8 Ohm load to the ampmai în viață.
Asigurați-vă întotdeauna amplifier is stable at the chosen impedance load. Consult your amplifier's manual for compatibility.
5.3 Enclosure and Mounting
- Install the subwoofer into a suitable enclosure (sealed or ported) designed for a 12-inch driver.
- Ensure the enclosure is robust and free from air leaks.
- Secure the subwoofer to the enclosure using appropriate screws, ensuring a tight seal.
5.4 Conectarea la Ampmai în viață
- Connect the subwoofer's wired output (from your chosen impedance configuration) to the amplifier's subwoofer output terminals.
- Ensure correct polarity (+ to + and - to -) to avoid phase issues.
- Verificați de două ori toate conexiunile înainte de a porni sistemul.
6. Instrucțiuni de utilizare
6.1 Initial Power-Up and Settings
- Începe cu ampcontrolul câștigului lificatorului este setat la minim.
- Turn on your audio system and play music with a good bass range.
- Creșteți încet ampamplificatorul până când nivelul de bas dorit este atins fără distorsiuni.
- Reglați filtrul trece-jos (LPF) de pe amplifier to blend the subwoofer's output with your main speakers (typically between 80Hz and 120Hz).
- Adjust the phase control (if available on your amplifier) to ensure optimal bass response.
6.2 Perioada de rodaj
Allow a break-in period of approximately 10-20 hours of moderate listening before operating the subwoofer at high volumes. This allows the suspension components to loosen up, leading to improved performance and longevity.
7. Întreținere
- curatenie: Use a soft, dry cloth to wipe down the subwoofer cone and surround. Avoid using harsh chemicals or excessive moisture.
- Inspecţie: Periodically check all wiring connections for tightness and signs of corrosion. Inspect the subwoofer's cone and surround for any tears or damage.
- Depozitare: If storing the subwoofer for an extended period, ensure it is kept in a cool, dry place, away from direct sunlight and extreme temperatures.
8. Depanare
| Problemă | Cauza posibila | Soluţie |
|---|---|---|
| Niciun sunet de la subwoofer |
|
|
| Bas distorsionat sau neclar |
|
|
| Subwooferul se încălzește |
|
|
9. Specificații
| Caracteristică | Detaliu |
|---|---|
| Numele modelului | SR-W122D |
| Tip difuzor | Subwoofer |
| Diametrul subwooferului | 12 inchi |
| Impedanta | Dual Voice Coil 4 Ohms (can be wired to 2 or 8 Ohms) |
| Putere maximă de ieșire | 1500W |
| Puterea RMS | 750W |
| Dimensiunea bobinei vocale | 2.5 inci |
| Voice Coil Winding | 15mm |
| Greutatea magnetului | 40 oz |
| Material | Metalic |
| Culoare | Roşu |
| Dimensiunile produsului | 35.5cm (Depth) x 35.5cm (Width) x 21.3cm (Height) |
| Greutatea produsului | 6 kilograme |
| Utilizare recomandată | Audio auto |
| Dispozitive compatibile | Ampmai în viață |
| Tehnologia de conectivitate | RCA (pentru amplifier input, not subwoofer direct) |
| AmpTipul de lificare | Pasiv |
10. Informații despre garanție
This product is covered by a standard manufacturer's warranty against defects in materials and workmanship. The duration and terms of the warranty may vary by region and retailer. Please retain your proof of purchase for any warranty claims. Damage resulting from improper installation, abuse, or unauthorized modifications is not covered under warranty.
11. Suport
For technical assistance, troubleshooting beyond this manual, or warranty inquiries, please contact your retailer or the manufacturer's customer support. Refer to your purchase documentation for specific contact details.


