1. Introducere
The Weber Genesis Smart SX-335 LP SS Liquid Propane Grill is designed to provide a comprehensive outdoor cooking experience. This manual provides essential information for the safe and efficient operation, maintenance, and troubleshooting of your new grill.

Figura 1: Cel/Cea/Cei/Cele Weber Genesis Smart SX-335 LP SS Liquid Propane Grill. This image shows the full grill unit with its stainless steel finish and black cabinet.
2. Informații importante privind siguranța
AVERTIZARE: Nerespectarea acestor instrucțiuni poate duce la incendiu, explozie sau arsuri, care pot provoca daune materiale, vătămări corporale sau deces.
- Folosiți întotdeauna grătarul în aer liber, într-o zonă bine ventilată.
- Nu depozitați și nu folosiți benzină sau alți vapori și lichide inflamabile în apropierea acestui aparat sau a oricărui alt aparat.
- Păstrați zona aparatului liber și fără materiale combustibile, benzină și alți vapori și lichide inflamabile.
- Nu obstrucționați fluxul de aer de ardere și ventilație.
- Keep any electrical supply cord and fuel supply hose away from heated surfaces.
- Verificați întotdeauna dacă există scurgeri de gaz înainte de fiecare utilizare.
- Nu lăsați niciodată grătarul nesupravegheat în timp ce gătiți.
- Țineți copiii și animalele de companie departe de grătar în orice moment.
- Purtați mănuși de protecție atunci când manipulați componente fierbinți.
3. Ce se află în cutie
Dvs Weber Genesis Smart SX-335 LP SS grill package includes the following components:
- Weber Genesis Smart SX-335 LP SS Gas Grill Unit
- Cooking Grates (porcelain-enameled cast iron)
- Flavorizer Bars
- Grease Management System (including drip tray and catch pan)
- Side Burner (integrated)
- Weber Connect Smart Grilling Hub (integrated)
- Propane Tank (sold separately, but required for operation)
- Manual de instructiuni

Figura 2: Cel/Cea/Cei/Cele Weber Genesis Smart SX-335 LP SS grill with its lid closed, showcasinfinisajul din oțel inoxidabil și panoul de control.
4. Configurare
4.1 Asamblare
Adunarea dumneavoastră Weber Genesis Smart SX-335 LP SS grill is required. For detailed, step-by-step interactive 3D instructions, download the free BILT app on your mobile device. This app provides visual guidance for each step of the assembly process.
Video 1: BILT App - Step by Step Interactive Assembly Instructions. This video demonstrates the interactive 3D assembly guide available through the BILT app for the Webăăă grătar Genesis.
Ensure all parts are accounted for before beginning assembly. It is recommended to have a second person assist with assembly due to the size and weight of some components.
4.2 Connecting the Liquid Propane Tank
- Asigurați-vă că toate butoanele de comandă arzătorului sunt în poziția OPRIT.
- Open the cabinet doors located beneath the grill.
- Place the liquid propane tank securely in the designated tank holder.
- Connect the regulator hose from the grill to the propane tank valve. Hand-tighten the connection firmly.
- Deschideți încet și complet robinetul rezervorului de propan.
- Check for any gas leaks using a soapy water solution on all connections. Bubbles indicate a leak. If a leak is detected, close the tank valve, tighten connections, and re-test. If the leak persists, do not use the grill and contact customer service.

Figure 3: A hand connecting the liquid propane tank to the grill's regulator hose inside the cabinet.
The grill cabinet features a hook that indicates the propane level by weight, helping you monitor remaining fuel.
4.3 Pornirea inițială
Before first use, operate the grill on high heat for 15 minutes with the lid closed to burn off any manufacturing residues. This process is called "seasoning" the grill.
5. Instrucțiuni de utilizare
5.1 Aprinderea arzătoarelor principale
- Deschideți capacul grătarului.
- Asigurați-vă că robinetul buteliei de propan este complet deschis.
- Turn the leftmost main burner control knob to the START/HIGH position.
- Apăsați imediat și țineți apăsat butonul de aprindere electronică până când arzătorul se aprinde.
- Once the first burner is lit, turn on adjacent burners to the desired heat setting.
- If ignition does not occur within 5 seconds, turn the burner control(s) OFF, wait 5 minutes, and repeat the lighting procedure.

Figura 4: Prim-plan al Weber Genesis grill's control knobs, showing the ignition button and burner controls.
5.2 Temperature Control and Smart Features
The Weber Genesis Smart SX-335 LP SS features integrated Weber Connect smart technology for precise temperature monitoring. The digital display on the side table shows real-time food temperatures from connected probes.
- Weber Connect App: Descărcați Weber Connect app to your smartphone for remote monitoring, temperature alerts, and flip & serve notifications.
- Capacitatea sondei: The grill supports up to 2 temperature probes for monitoring different food items simultaneously.
- Powering the Display: The grill display can be powered by plugging it into an electrical outlet or by using a USB-certified, 10,000mAh rechargeable power bank (sold separately) clipped under the side table.

Figura 5: Cel/Cea/Cei/Cele Weber Connect smart display on the grill's side table, showing temperature readings, alongside a smartphone displaying the Weber Connect app with temperature alerts.
5.3 Using the Sear Zone
The extra-large sear zone is designed for high-heat searing to achieve perfect grill marks and lock in juices. To activate the sear zone, turn the dedicated sear zone burner knob to the HIGH position. Allow it to preheat for 5-10 minutes before placing food directly over it.
5.4 Utilizarea arzătorului lateral
The integrated side burner allows you to sauté vegetables, boil corn, or heat up sauces while grilling. To light the side burner, open its cover, turn the control knob to the START/HIGH position, and press the electronic ignition button until it ignites.

Figura 6: Cel/Cea/Cei/Cele Weber Genesis grill with the side burner cover open, revealing the burner grate.
5.5 Weber Crafted Outdoor Kitchen Collection
Expand your culinary possibilities with the Weber Crafted Outdoor Kitchen Collection. By replacing a cooking grate with custom-fit grillware (sold separately), you can sear, roast, bake, steam, and stir-fry. The grill locker provides convenient storage for these accessories.

Figura 7: Cel/Cea/Cei/Cele Weber Crafted grillware frame installed in the grill, ready to accommodate various inserts.

Figure 8: A person stir-frying vegetables and rice in a wok insert on the Webăăă grătar Genesis.
5.6 Cooking Techniques
- Căldură directă: Use direct heat for searing, grilling smaller items, or cooking foods that require quick cooking.
- Căldură indirectă: For larger cuts of meat, poultry, or delicate items, use indirect heat. Turn off the burners directly beneath the food and use adjacent burners to maintain the desired temperature. The expandable top cooking grate provides additional space for indirect cooking.

Figure 9: Two whole chickens cooking on the main grates, with temperature probes inserted, demonstrating indirect cooking.

Figure 10: Grilled shrimp, mixed vegetables in a basket, and toasted bread on the upper warming rack, illustrating diverse cooking options.
6. Întreținere
6.1 Curățarea grătarelor de gătit
After each use, while the grates are still warm, use a grill brush to scrape off any food residue. For a deeper clean, remove the grates and wash them with warm, soapy water.
6.2 Sistem de management al grăsimilor
The improved grease management system simplifies cleaning. Simply pull the grease tray out from the front of the grill and scrape away accumulated grease and debris. Replace the disposable catch pan as needed.
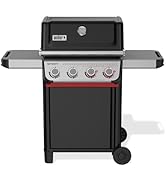
Figure 11: A hand demonstrating the removal and cleaning of the grease management system's pull-out tray.
6.3 Capac grătar
Protect your grill from the elements by using a weather-resistant grill cover when not in use. This helps prolong the life and appearance of your grill.
7. Depanare
| Problemă | Cauza posibila | Soluţie |
|---|---|---|
| Arzătorul nu se aprinde | Fără debit de gaz, arzător înfundat, aprinzător defect. | Check propane tank connection and fuel level. Clean burner ports. Check igniter electrode. |
| Încălzire neuniformă | Clogged burner ports, low fuel, wind. | Clean burner ports. Ensure adequate fuel. Position grill away from strong winds. |
| Low flame or no flame | Low fuel, regulator bypass, gas leak. | Check fuel level. Reset regulator by turning off all gas, disconnecting, waiting 1 minute, and reconnecting. Check for leaks. |
| Weber Connect display not working | No power, battery low (if using power bank). | Ensure plugged into outlet or power bank is charged and connected. |
For further assistance, refer to the full troubleshooting guide in your printed manual or contact WebServiciul Clienți.
8. Specificații
| Caracteristică | Detaliu |
|---|---|
| Marca | Weber |
| Numele modelului | Genesis Smart SX-335 LP SS |
| Numărul de model al articolului | 35600001 |
| Dimensiunile produsului | 35.5" D x 31" L x 30.75" H |
| Greutatea articolului | 209 lire sterline |
| Culoare | Oţel inoxidabil |
| Tip de combustibil | Propan lichid (LP) |
| Numărul arzătorului principal | 3 |
| Putere de încălzire | 13000 de unități termice britanice (BTU) |
| Suprafata de gatit | 787 inci pătrați |
| Caracteristica specială | Grease Management System, Weber Connect Smart Technology, Sear Zone, Side Burner, Expandable Top Cooking Grate, Grill Locker |
| Material | Oţel inoxidabil |
| Asamblare necesară | Da |
9. Garanție și asistență
The Weber Genesis Smart SX-335 LP SS Liquid Propane Grill comes with a Garanție limitată de 12 an. For detailed warranty information, please refer to the warranty card included with your product or visit the official Weber website-ul.
For customer support, technical assistance, or to order replacement parts, please visit the WebMagazinul tău pe Amazon sau contact Weber directly through their official channels.
Documente conexe - SX-335
 |
WebGhid de asamblare a grătarului pe gaz Genesis S-335 LP Instrucțiuni complete de asamblare pentru WebGrătar cu gaz propan lichid Genesis S-335 LP. Acest ghid oferă pași detaliați, liste de piese, cerințe de unelte și informații importante privind siguranța, întregul conținut fiind prezentat în limba engleză pentru claritate și accesibilitate. |
 |
WebGhid de pornire rapidă Genesis E-325, E-335, EP-335: Instrucțiuni de gătit la grătar Acest ghid de pornire rapidă oferă instrucțiuni esențiale pentru WebGrătare Genesis E-325, E-335 și EP-335. Învățați metodele de gătit directe și indirecte, înțelegeți setările arzătorului și utilizați accesoriile pentru rezultate optime la grătar și friptură. Include legende cu pictograme și tabele de gătit. |
 |
WebGhid de asamblare Genesis II EX-335 SX-335 Ghid complet de asamblare pentru Weber Genesis II EX-335 and SX-335 LP gas grills, providing step-by-step instructions, safety tips, and essential setup information for a successful build. |
 |
WebGhid de asamblare Genesis II EX-335 SX-335 Ghid complet de asamblare pentru WebGrătare pe gaz propan Genesis II EX-335 și SX-335. Include instrucțiuni pas cu pas și liste de piese. |
 |
Weber Genesis II EX-335 / SX-335 Manual de utilizare - Ghid pentru grill Manual de utilizare complet pentru Webgrătarele pe gaz Genesis II EX-335 și SX-335. Aflați despre sistemul de grătar GS4, WEBTehnologie ER CONNECT, siguranță, instalare, operare, întreținere și depanare pentru gătit optim în aer liber. |
 |
WebGhid de asamblare Genesis E-315/E-415 LP Instrucțiuni complete de asamblare pas cu pas pentru WebGrătarele pe gaz LP Genesis E-315 și E-415, inclusiv identificarea pieselor, procedurile de asamblare și informații importante înainte și după asamblare. |