1. Introducere
Thank you for choosing an Indesit appliance. This user manual provides essential information for the safe and efficient operation, installation, and maintenance of your Indesit TWE 71252 S EU front-loading washing machine. Please read these instructions carefully before using the appliance and keep them for future reference. Proper use and maintenance will ensure optimal performance and extend the lifespan of your washing machine.
2. Informații de siguranță
Siguranta generala:
- Acest aparat este destinat numai pentru uz casnic.
- Do not allow children to play with the appliance. Supervise children to ensure they do not climb into the drum.
- Deconectați întotdeauna aparatul de la priză înainte de curățare sau de efectuarea oricărei operațiuni de întreținere.
- Do not operate the washing machine if the power cord or plug is damaged, or if the appliance itself is faulty. Contact qualified service personnel.
- Asigurați-vă că aparatul este împământat corespunzător.
Siguranța instalării:
- Remove all transit bolts and packaging materials before use. Failure to do so can cause severe damage.
- Install the appliance on a firm, level floor. Adjust the feet to ensure stability.
- Asigurați o ventilație adecvată în jurul aparatului.
- Conectați furtunul de alimentare cu apă la un robinet de apă rece. Asigurați-vă că toate conexiunile sunt strânse pentru a preveni scurgerile.
- The drain hose must be securely fixed to prevent displacement during operation.
3. Produs terminatview
Your Indesit TWE 71252 S EU washing machine features a user-friendly design with essential components for efficient laundry care.

Figura 3.1: Faţă view of the Indesit TWE 71252 S EU washing machine. This image shows the overall design, including the control panel at the top, the detergent dispenser on the left, and the main loading door in the center.
Componente cheie:
- Panou de control: Located at the top, featuring digital touch controls, push buttons, and a rotary knob for program selection.
- Dozator de detergent: A pull-out drawer for adding detergent and fabric softener.
- Ușă de încărcare: Ușă de încărcare frontală pentru adăugarea și scoaterea rufelor.
- Tambur: Stainless steel interior where laundry is washed.
- Filtru de scurgere: Situat în partea de jos din față, accesibil pentru curățare.

Figura 3.2: Close-up of the detergent dispenser and control panel. This view highlights the various compartments within the dispenser for pre-wash, main wash, and softener, along with the program selection knob and digital display.

Figura 3.3: Interior view of the stainless steel drum. This image shows the perforated surface of the drum, designed for effective washing and rinsing, and the agitator paddles.
4. Instalare și configurare
Instalarea corectă este crucială pentru performanța și longevitatea mașinii de spălat.
4.1 Despachetarea:
- Îndepărtați cu grijă toate materialele de ambalare, inclusiv baza de polistiren și orice folie de protecție.
- Remove the transit bolts located at the rear of the machine. These bolts secure the drum during transport and must be removed before operation. Keep them for future transport if needed.
4.2 Poziționare:
- Place the washing machine on a flat, stable surface, away from direct sunlight or heat sources.
- Adjust the adjustable feet at the bottom of the machine to ensure it is perfectly level. Use a spirit level to verify.
- Ensure there is sufficient space around the machine for ventilation and ease of access.
4.3 Conexiune la apă:
- Connect the supplied water inlet hose to the cold water tap. Hand-tighten the connection, then use a wrench for a quarter turn.
- Connect the other end of the inlet hose to the water inlet valve at the back of the washing machine.
- Position the drain hose into a standpipe or over the edge of a sink, ensuring it is securely fixed to prevent it from falling out during draining. The height of the drain point should be between 65 cm and 100 cm from the floor.
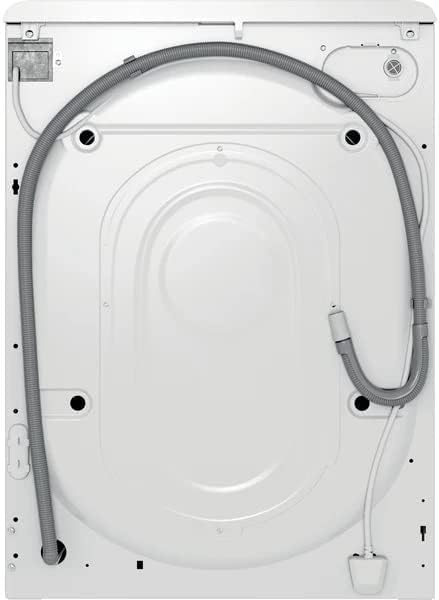
Figura 4.1: Spate view of the washing machine. This image illustrates the connections for the water inlet hose (typically blue or white) and the drain hose, along with the power cable.
4.4 Conexiune electrică:
- Plug the power cord into a properly earthed electrical socket.
- Nu utilizați prelungitoare sau prize multiple.
4.5 First Wash Cycle:
- Before washing clothes, run an empty wash cycle to clean the drum and remove any manufacturing residues.
- Add a small amount of detergent to the main wash compartment.
- Select a short, hot wash program (e.g., 60°C cotton cycle) and start the machine.
5. Instrucțiuni de utilizare
Urmați acești pași pentru o funcționare eficientă și sigură a mașinii de spălat.
5.1 Loading Laundry:
- Deschide ușa de încărcare.
- Sortează rufele după tipul de țesătură, culoare și gradul de murdărire.
- Load laundry loosely into the drum, ensuring not to overload. The 7kg capacity refers to dry laundry weight.
- Închideți ușa ferm până când se aude un clic.
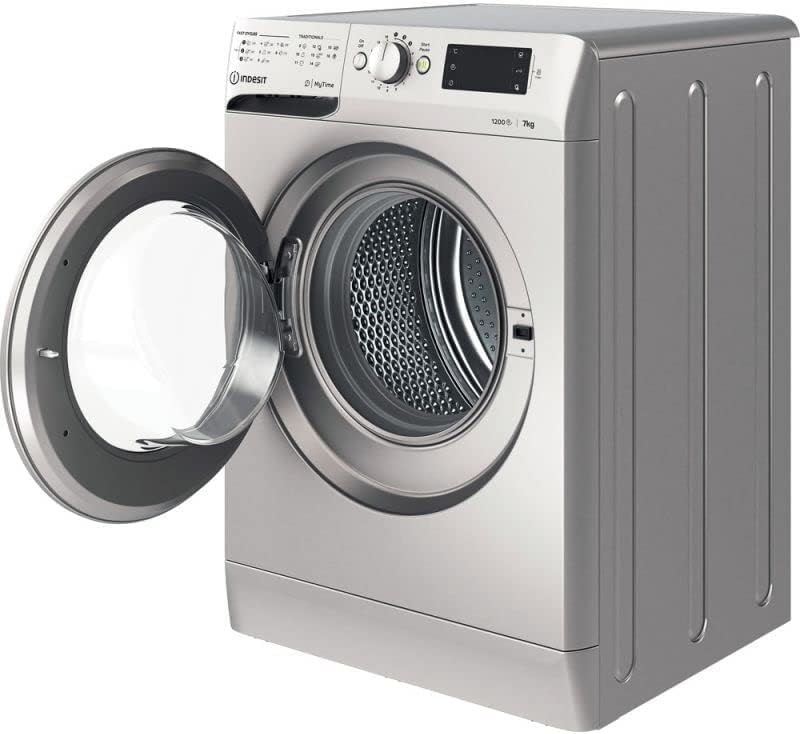
Figura 5.1: Faţă view of the washing machine with the door open. This image shows the wide opening for easy loading and unloading of laundry into the drum.
5.2 Adding Detergent and Additives:
- Trageți sertarul dozatorului de detergent.
- Add the appropriate amount of detergent to the main wash compartment (usually marked 'II' or 'Main Wash').
- If using fabric softener, pour it into the designated compartment (usually marked with a flower symbol or 'Softener'). Do not exceed the 'MAX' level.
- Închideți ușor sertarul dozatorului.
5.3 Selecting a Program:
- Turn the rotary knob on the control panel to select the desired wash program. The machine offers various programs for different fabric types and soil levels, including a 'Quick Wash' option.
- Use the digital touch controls and push buttons to adjust additional settings such as temperature, spin speed (up to 1200 RPM), or delay start, if available for the selected program.
5.4 Starting a Cycle:
- Apăsați butonul „Start/Pauză” pentru a începe ciclul de spălare. Indicatorul luminos se va aprinde.
5.5 Pausing/Canceling a Cycle:
- To pause a cycle, press the 'Start/Pause' button. The indicator light will flash.
- To cancel a cycle, press and hold the 'Start/Pause' button for a few seconds, or turn the program selector knob to 'Off' and then back to a new program.
5.6 End of Cycle:
- The machine will signal the end of the cycle (e.g., with an audible alert or a specific display message).
- Open the door and remove the laundry promptly to prevent creasing and odors.
- Lăsați ușa ușor întredeschisă pentru a permite tamburului să se usuce la aer.
6. Întreținere și curățare
Întreținerea regulată asigură performanțe și igienă optime.
6.1 Cleaning the Detergent Dispenser:
- Trageți complet sertarul dozatorului.
- Scoateți toate piesele detașabile și clătiți-le sub jet de apă.
- Curățați carcasa sertarului cu o perie.
- Reasamblați și introduceți la loc sertarul.
6.2 Cleaning the Drum:
- Run a maintenance wash cycle (e.g., a hot cycle with a drum cleaning agent or white vinegar) every few months to prevent odor and residue buildup.
6.3 Cleaning the Door Seal:
- Wipe the rubber door seal after each wash to remove lint, dirt, and moisture. This prevents mold and odors.
6.4 Cleaning the Drain Filter:
- Periodically clean the drain filter to prevent blockages and ensure proper drainage.
- Deschideți capacul din partea frontală inferioară a mașinii.
- Așezați un recipient puțin adânc dedesubt pentru a colecta apa reziduală.
- Deșurubați încet filtrul, permițând apei să se scurgă.
- Îndepărtați orice scame, monede sau obiecte străine din filtru și din carcasa acestuia.
- Rinse the filter under running water and screw it back in firmly. Close the cover.

Figura 6.1: Close-up of the drain filter access. This image shows the removable cap that covers the drain filter, which needs to be regularly cleaned to prevent blockages.
6.5 External Cleaning:
- Ștergeți exteriorul mașinii cu un material moale, damp pânză. Nu utilizați agenți de curățare abrazivi sau solvenți.
7. Depanare
Before contacting customer service, try these simple solutions for common issues.
| Problemă | Cauza posibila | Soluţie |
|---|---|---|
| Mașina nu pornește | Lipsă de curent; Ușa nu este închisă; Programul nu este selectat; Butonul Start/Pauză nu este apăsat. | Verificați alimentarea cu energie electrică; Asigurați-vă că ușa este închisă ferm; Selectați un program; Apăsați Start/Pauză. |
| Apa nu umple | Robinet de apă închis; Furtun de alimentare îndoit; Presiune a apei prea mică. | Deschideți robinetul de apă; Îndreptați furtunul; Verificați presiunea apei din gospodărie. |
| Apa nu se scurge | Drain hose kinked or blocked; Drain filter blocked. | Straighten or clear drain hose; Clean the drain filter (see Section 6.4). |
| Vibrații / zgomot excesiv | Suporturile de transport nu au fost îndepărtate; Mașina nu este nivelată; Sarcină neuniformă. | Remove transit bolts (if not already); Adjust feet to level machine; Redistribute laundry evenly. |
| Reziduuri de detergent pe haine | Too much detergent; Detergent dispenser blocked; Insufficient rinse. | Reduce detergent amount; Clean dispenser; Select an extra rinse option if available. |
8. Specificații
Detailed technical specifications for the Indesit TWE 71252 S EU washing machine.
| Caracteristică | Caietul de sarcini |
|---|---|
| Model | TWE 71252 S EU |
| Marca | Indesit |
| Capacitate | 7 kg |
| Viteza maximă de centrifugare | 1200 RPM |
| Dimensiuni (Îl x l x A) | 85 cm x 59.5 cm x 54 cm |
| Greutate | 66.5 kg |
| Eficiență energetică | A+++ 90% |
| Materialul tamburului | Oţel inoxidabil |
| Tip control | Digital Touch, Push Button, Rotary Knob |
| Tip de instalare | Freestanding |
| Culoare | Argint |
| Caracteristici speciale | Durable, Quick Wash Option |
| Componente incluse | Maşină de spălat |
9. Garanție și asistență
For warranty information, please refer to the warranty card provided with your appliance or contact your retailer. Keep your proof of purchase (receipt or invoice) as it will be required for any warranty claims.
If you encounter issues that cannot be resolved using the troubleshooting guide, please contact Indesit customer service or an authorized service center. Do not attempt to repair the appliance yourself, as this may void your warranty and pose safety risks.


