1. Introducere
The SparkFun Weather Meter Kit provides the essential components for measuring key weather parameters: wind speed, wind direction, and rainfall. This kit is designed for users interested in building their own weather station and requires external electronics for data acquisition. The sensors are passive, utilizing sealed magnetic reed switches and magnets, necessitating a voltage source for measurement.
2. Conținutul trusei
The SparkFun Weather Meter Kit includes the following components:
- Wind Vane (for wind direction)
- Cup Anemometer (for wind speed)
- Tipping Bucket Rain Gauge (for rainfall measurement)
- Two-part Mounting Mast
- Rain Gauge Mounting Arm
- Wind Meter Mounting Bar
- 2x Clește de montareamps
- 4x cravate cu fermoar
- RJ11 terminated cables for all sensors
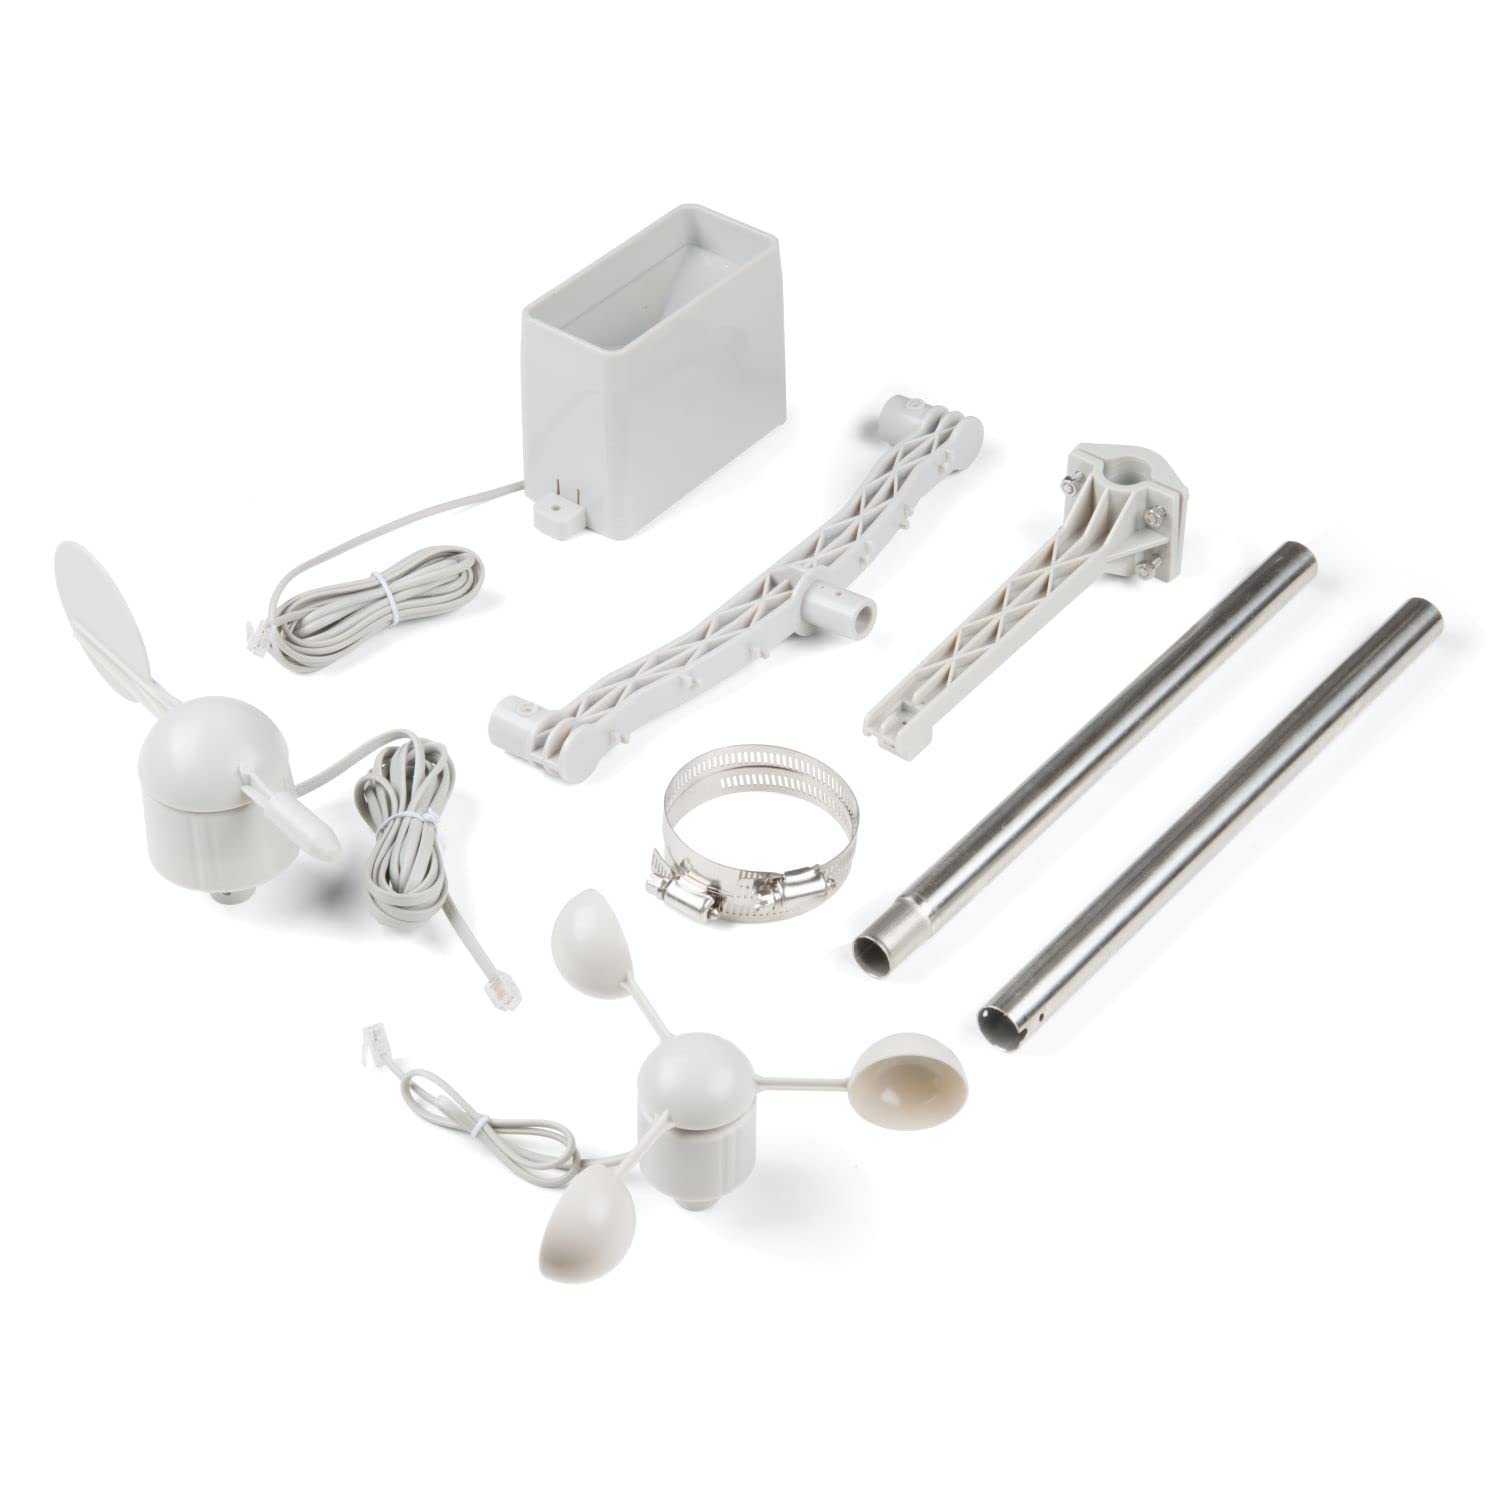
Figure 2.1: All components included in the SparkFun Weather Meter Kit.
3. Configurare și asamblare
Follow these steps to assemble your SparkFun Weather Meter Kit:
3.1. Assemble Wind Sensors
- Attach the cup anemometer to the wind meter mounting bar. Ensure it is securely fastened.
- Attach the wind vane to the other end of the wind meter mounting bar.

Figure 3.1: Attaching the anemometer to the mounting bar.
3.2. Mount Rain Gauge
Secure the tipping bucket rain gauge to its dedicated mounting arm.

Figure 3.2: The tipping bucket rain gauge.
3.3. Assemble Mounting Mast
Connect the two parts of the mounting mast. Attach the assembled wind meter bar and rain gauge arm to the mounting mast using the provided clamps and zip ties. Ensure the mast is stable and vertically aligned.

Figure 3.3: Securing components to the mounting mast.

Figure 3.4: Fully assembled weather meter kit.
3.4. Sensor Connections
All sensors are supplied with RJ11 terminated cables. These cables connect the passive sensors to your data acquisition system. Refer to the pin-out information for proper connection to your control board.

Figure 3.5: RJ11 pin-out for anemometer and wind vane.
4. Funcționare
The sensors in this kit are passive and require an external voltage source and a microcontroller or data logger to interpret their signals. They operate using sealed magnetic reed switches and magnets.
4.1. Pluviometru
The rain gauge is a self-emptying tipping bucket type. Each time the bucket tips, it activates a momentary switch closure. Each closure represents 0.011 inches of collected rain. Your system should count these closures over time to calculate total rainfall.
4.2. Anemometer (Wind Speed)
The anemometer measures wind speed by closing a switch with each rotation. A wind speed of 1.492 MPH produces one switch closure per second. By counting the number of closures over a specific time period, you can determine the wind speed.

Figure 4.1: The cup anemometer.
4.3. Wind Vane (Wind Direction)
The wind vane reports wind direction as a voltage output, generated by a combination of resistors inside the sensor. The vane's magnet may close one or two switches simultaneously, allowing for up to 16 different directional positions to be indicated. You will need to measure the voltage and map it to a specific direction based on the resistance values.

Figure 4.2: The wind vane.
Wind Vane Resistance Values:
The following table provides the resistance values for different wind directions. These values are crucial for calibrating your system to accurately read wind direction from the voltagieșire.

Figure 4.3: Wind Vane Resistance Table.
5. Întreținere
The SparkFun Weather Meter Kit is designed for outdoor use. Regular inspection of the sensors and mounting hardware is recommended to ensure optimal performance and longevity. Check for any obstructions to the anemometer or wind vane, and ensure the rain gauge is free of debris. No specific routine maintenance beyond visual inspection and cleaning is typically required for these passive components.
6. Depanare
- Inaccurate Wind Direction Readings: If using with a SparkFun weather shield, verify the calibration parameters in the associated library. Some shields may require specific adjustments to the
vaneADCValuesin the library's source file (de exemplu,SparkFun_Weather_Meter_Kit_Arduino_Library.cpp) to match the shield's circuit. Consult the weather shield's documentation or SparkFun's support resources for specific calibration details. - No Sensor Readings: Ensure all RJ11 cables are securely connected and that your data acquisition system is providing the necessary voltage source for the passive sensors. Verify your code or data logger configuration is correctly interpreting the switch closures (for rain and wind speed) or voltage outputs (for wind direction).
- Mounting Pole Twisting: If the mounting pole consists of multiple sections and twists, affecting wind direction accuracy, ensure that mounting clamps are secured across the joint between sections. For example, secure the top two screws of a clamp on the upper pipe and the bottom two screws on the lower pipe to prevent rotation.
7. Specificații
| Caracteristică | Caietul de sarcini |
|---|---|
| Dimensiunile produsului | 14.96 x 16.14 x 5.71 inci |
| Greutate | 3.5 lire sterline |
| Numărul de model | 15901 |
| Marca | SparkFun |
| Sursa de alimentare | External Powered (sensors are passive) |
| Caracteristica specială | Rezistent la intemperii |
| Material | Multiple (Plastic, Metal) |
| Tehnologia de conectivitate | Analog (RJ11 terminated cables) |
| Componente incluse | Cable, Stand, Wind vane, Cup anemometer, Tipping bucket rain gauge, Mounting Hardware |
8. Garanție și asistență
Information regarding specific warranty terms and direct support contacts for the SparkFun Weather Meter Kit is not available in the provided product data. Please refer to the official SparkFun website or your point of purchase for warranty details and technical support resources.


