Reolink D340B Video Doorbell
Instruction Manual

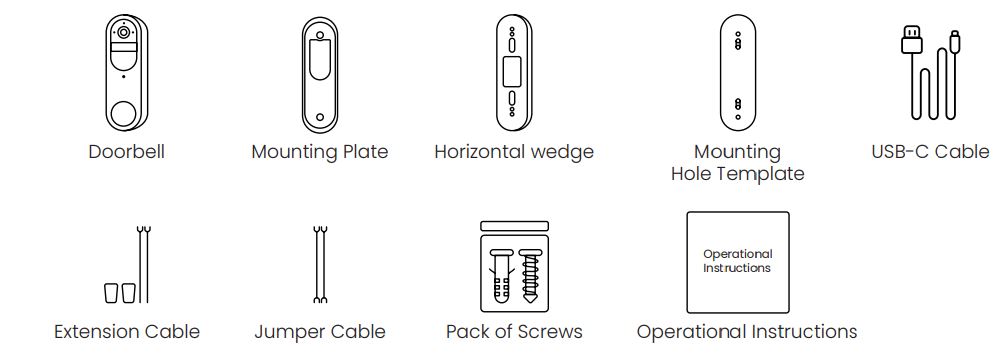
What’s in the Box
Doorbell Introduction
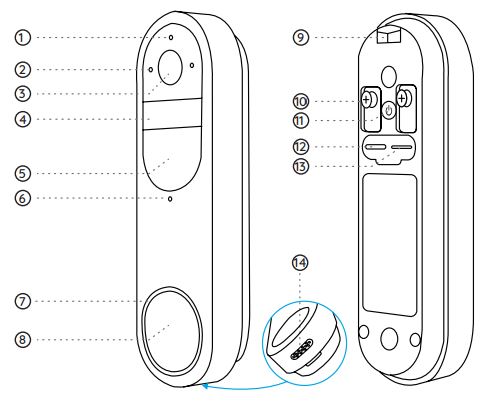
- Indicator Light
- Microphone
- Lens
- PIR Sensor
- Infrared Light
- Daylight Sensor
- Button Ring Light
- Button
- Lock Mounting Hole
- Terminal Block
- Power Button
- Type-C Charging Port
- microSD Card
- Speaker
Power Switch Instruction:
Power On/Off: Press and hold the Power Button for 5s. Reset to Factory Settings: Press the Power Button 3 times in a row while the camera is on.
Set up the Doorbell
Set up the Doorbell on Phone
Step 1 Scan to download the Reolink App from the App Store or Google Play Store.
Note: If you already have the Reolink App installed, please ensure it is the latest version. If not, please update it to ensure optimal performance.
Step 2
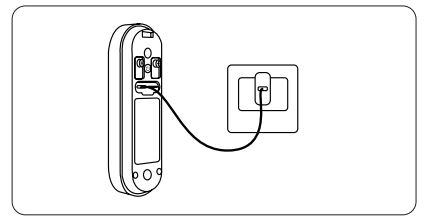
Charging Video Doorbell. Use type-C cable in the package to charge the video doorbell. Once it’s fully charged, the Button Ring Light turns greens.

It’s recommended to fully charge the camera before installing it.
Button Ring Light status while charging
Orange LED: Charging
Green LED: Fully charged
Charge the doorbell with a 5V power adapter (not included). 5 English
Step 3
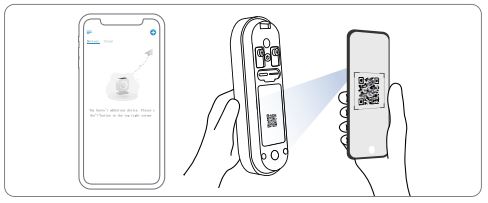
Launch the Reolink App. Click the “+” button in the top right corner and scan the QR code on the doorbell and follow the onscreen instructions to finish the initial setup.
Set up the Doorbell on PC (Optional)
Step 1 Download and install the Reolink Client. Go to https://reolink.com > Support > App & Client
Step 2 Power on the video doorbell.
Step 3 Launch the Reolink Client. Click the “+” button and input the UID number of the doorbell to add it. Step 4 Follow the onscreen instructions to finish the initial setup.
Install the Doorbell
Please choose the installation method of the battery doorbell according to your needs, wired connection or wireless connection.
Option 1: Wired Connection
Reolink Doorbell Battery supports connection to an existing wired mechanical or digital doorbell system. Make sure that the voltage is between 8-24VAC. If not, please upgrade or replace the transformer to ensure it falls within the 8-24V range.
Step 1 Find your chime (Optional)
If you already have a doorbell, press the existing doorbell button and listen for any sound. If it rings, follow the sound to locate the chime. Many chimes are simple box-shaped devices, but some may be attached to metal pipes. You can check around your front door, they are typically mounted on the wall.
Tips: If you see wires leading out from the doorbell, you can follow them to find the transformer. Transformers can typically be found in the following locations: around the circuit breaker box, behind the doorbell, in utility rooms, basements, attics, garages, or in confined spaces beneath your house.

Once you’ve located the chime, open the cover. Please use a multimeter to read the voltage of the transformer. This battery-powered doorbell only supports wired mechanical or digital chimes. Danger: Do not touch any wires until the power is turned off to avoid the risk of electric shock.
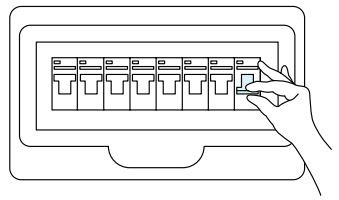
Step 2 Remove the existing Doorbell ( Optional )
If you need to replace the existing doorbell, please turn off the power at the circuit breaker, and then use a screwdriver (not provided) to remove the existing doorbell.
When removing the existing doorbell button, carefully pull out its two wires.
Step 3 Install Doorbell
If you need adjust the field of view, you can choose a horizontal wedge as an additional mounting bracket.

You can refer to the diagram below for connection. Connect the wires of the existing doorbell to the screws at the back of the doorbell, then tighten the screws while ensuring that the wires of the existing doorbell is separated from each other.
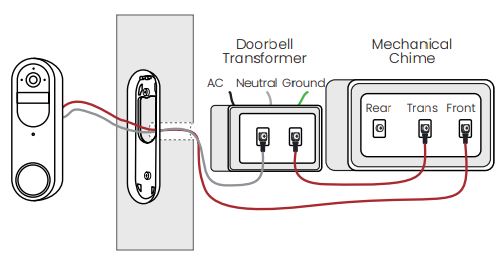
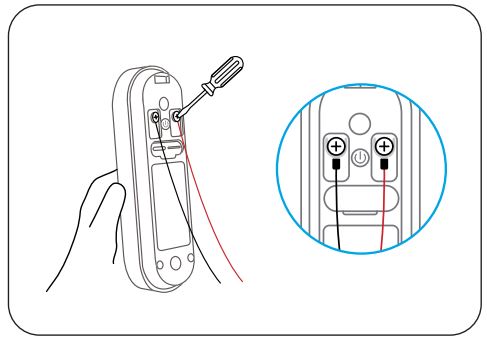
If the existing doorbell wires are not long enough, you can use the provided Extension Cable and nuts, as shown in the diagram below, to extend them.

Step 4: Power On
After installation is complete, please power on the device. turn on the power switch of the circuit breaker.
Step 5: Automatic Detection of Wired Chime
Launch Reolink app, go to Chime > Existing Chime Settings > Automatic Detection of Chime. Follow the on-screen instructions, and the system will automatically detect the wired chime. Then, press the doorbell button and observe if the chime rings. If the chime does not ring, please enter “Existing Chime Settings > Advanced” to configure the chime.
Option 2: Wire-Free Connection
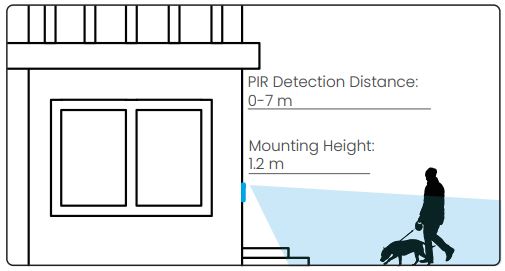
If there is no existing wired mechanical or digital chime, you can choose wireless installation. You can choose the installation location based on your needs. It’s recommended to install the doorbell 1.2m above the ground.
Step 1 Select a mounting spot
If you want to install the new doorbell in an existing mounting hole, please check if the holes and anchors on the wall or door are suitable. If this is your first time drilling mounting holes, it’s recommended to install the video doorbell at a height of approximately 48 inches (1.2 meters) from the ground for optimal performance. 11 English
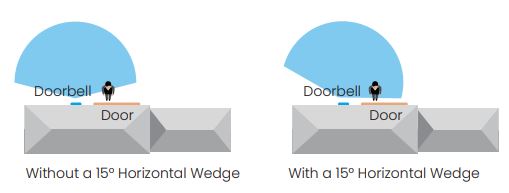
After selecting a suitable location, enter Live View to check the angle of view. If you need to adjust the field of view, you can choose a 15° Horizontal Wedge as an additional mounting bracket.
Note: It’s recommended to install the doorbell at a position with some cross-angle to the expected direction of most people’s movements.
Mounting Height 1.2m
PIR Detection Distance 0-7m
Step 2 Install a Wedge (optional)
If you need to adjust the angle of the doorbell to optimize the captured view, you can use the provided horizontal wedge. If you don’t, please go to next step.
- Place the mounting hole template on the wall and drill holes as shown in the diagram.
Note: The holes for wall anchors differ between the use of the horizontal wedge and not using the horizontal wedge. - Use the provided screws to pass through the two holes of the angle bracket, ensuring that the concave side of the horizontal wedge faces outward.
- Snap the Mounting Plate onto the horizontal wedge.
- Place the doorbell at the bottom, then snap it into place at the top.

Step 3 Mounting the bracket
- Place the mounting hole template on the wall next to the door and drill the holes as follows.
- Insert the provided wall anchors and use the two long screws provided to install the mounting bracket.
Note: The holes for wall anchors differ between the use of the wedge angle bracket and not using the wedge angle bracket. If the wall is a hard surface composed of materials such as bricks, concrete, plaster, etc., wall anchors are needed. If it’s a soft surface like a wooden wall, wall anchors are not needed; you can directly screw the mounting bracket onto the wall.

3.Place the doorbell at the bottom, then snap it into place at the top.

Chime options for your Doorbell
Reolink Doorbell Battery offers a variety of Chime choices and can be compatible with the existing wired mechanical or digital chime, Reolink Chime, Reolink Home Hub. You can choose your preferred method of connection.
Option 1: Mechanical Chime/Digital Chime
The battery-powered doorbell is compatible with your home’s wired mechanical /digital chime. For detailed instructions, please refer to the “Wired Connection” section in the “Install the Doorbell” guide.
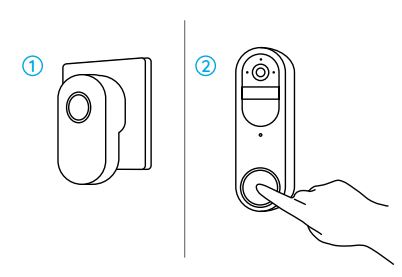
Option 2: Reolink Chime (Sold Separately)
Plug the chime into a power outlet, then pair the chime with the doorbell using the Reolink App. For detailed instructions, please refer to the manual provided with the chime.
Option 3: Reolink Home Hub (Sold Separately)
The Reolink Home Hub features a low-power standby mode specifically designed for the doorbell. It not only serves as a chime, allowing for different ringtones to be set for different Reolink Doorbells but also stores doorbell recordings in its internal storage space (no subscription fee required).
Step 1: Connect the Reolink Home Hub to power, then use the provided Ethernet cable to connect the Reolink Home Hub to your home router.
Step 2: Connect your phone to the router connected to the Home Hub.
Step 3: When the Reolink Home Hub is ready for installation, the LED indicator will turn blue.
Step 4: Connect the battery-powered doorbell to the Reolink Home Hub, refer to the specific steps in the Hub’s manual for details.


Detach the Doorbell
If you want to remove the doorbell from the mounting plate, you may use the needle key to poke the top.

Troubleshooting
If your camera is not turning on, please apply the following solutions: Charge the battery with a DC 5V/2A power adapter. When the green light is on, the battery is fully charged. If the problem is not solved, please contact Reolink Support.
Failed to Connect to Wi-Fi During Initial Setup Process
If the camera fails to connect to Wi-Fi, please try the following solutions:
- Ensure that you have entered the correct Wi-Fi password.
- Put the camera closer to your router to ensure a strong Wi-Fi signal.
- Change the encryption method of the Wi-Fi network to WPA2-PSK/WPA-PSK (safer encryption) on your router interface.
- Change your Wi-Fi SSID or password and make sure that SSID is within 31 characters and password is within 64 characters.
- Set your password using only the characters available on the keyboard. If the problem is not solved, please contact Reolink Support.
Specifications
Hardware Features
Field of View: 150° Horizontal, 150° Vertical Dimension: 160.0 x 48.0 x 29.5 mm Weight( Battery included ): 231g
Important Safety Instructions (For Battery-Powered Cameras)
Please read the instructions carefully before using the camera. For tips on extending battery life, visit our support post: https://support.reolink.com/hc/en-us/articles/360006991893
- Charge the battery with a standard and high-quality DC 5V battery charger or Reolink solar panel. It is not compatible with solar panels from any other brands.
- Replace only with the same or equivalent type of equipment and accessories recommended by the manufacturer. Using an incorrect type poses an explosion risk.
- Do not remove a built-in battery from the camera.
- Charge the battery only in temperatures between 0 and 45 . And use it only in temperatures ranging from -10 and 55 .
- Do not charge, use or store a battery camera near heat sources, such as space heaters, cooking surfaces, cooking appliances, irons, radiators, or fireplaces. Extreme heat may cause an explosion.
- Do not expose the camera with a battery to extremely low air pressure environments, as this may cause an explosion.
- Do not place the camera with a battery in hot wilderness areas or expose it to lightning, as this poses a risk of fire.
- Do not hit or heavily compress the camera with a battery, as this poses a risk of fire or explosion.
- Do not use the battery if it appears damaged, swollen, or compromised in any way (e.g., leaking, emitting odors, dented, corroded, rusted, cracked, swollen, melted, or scratched).
- Keep the camera and battery away from children.
- Do not ingest or swallow battery. If the battery is ingested or swallowed, it can cause severe internal burns and damage. Seek immediate medical attention if you suspect the battery has been ingested or placed inside any part of the body.
- Do not attempt to disassemble, repair, or alter the camera or battery by yourself.
- Keep the charging port dry, clean and free of any debris. Cover it with the rubber plug after the battery is fully charged.
- Always follow the local safety laws and regulations when using the camera.
- Always follow the local waste and recycling laws to dispose of used batteries.
Legal Disclaimer
To the maximum extent permitted by applicable law, this document and the product described, with its hardware, software, firmware, and services, are delivered on an “as-is” and “as-available” basis, with all faults and without warranty of any kind. Reolink disclaims all warranties, express or implied, including but not limited to, warranties of merchantability, satisfactory quality, fitness for a particular purpose, accuracy, and noninfringement of third-party rights. In no event will Reolink, its directors, officers, employees, or agents be liable to you for any special, consequential, incidental or indirect damages, including but not limited to damages for loss of business profits, business interruption, or loss of data or documentation, in connection with the use of this product, even if Reolink has been advised of the possibility of such damages.
To the extent permitted by applicable law, your use of the Reolink products and services is at your sole risk and you assume all risks associated with internet access. Reolink does not take any responsibilities for abnormal operation, privacy leakage or other damages resulting from cyber attacks, hacker attacks, virus inspections, or other internet security risks. However, Reolink will provide timely technical support if required.
The laws and regulations related to this product vary by jurisdiction. Please check all relevant laws and regulations in your jurisdiction before using this product to ensure that your use conforms to the applicable law and regulation. During the use of the product, you must comply with relevant local laws and regulations. Reolink is not responsible for any illegal or improper use and its consequences. Reolink is not liable in the event that this product is used with illegitimate purposes, such as third-party rights infringement, medical treatment, safety equipment, or other situations where the product failure could lead to death or personal injury, or for weapons of mass destruction, chemical and biological weapons, nuclear explosion, and any unsafe nuclear energy uses or ant humanity purposes. In the event of any conflicts between this manual and the applicable law, the latter prevails.
Notification of Compliance
FCC Statement
This device complies with Part 15 of the FCC Rules. Operation is subject to the following two conditions:
(1) This device may not cause harmful interference, and
(2) This device must accept any interference received, including interference that may cause undesired operation. Changes 23 or modifications not expressly approved by the party responsible for compliance could void the user’s authority to operate the equipment. This equipment has been tested and found to comply with the limits for a Class B digital device, pursuant to Part 15 of the FCC Rules. These limits are designed to provide reasonable protection against harmful interference in a residential installation. This equipment generates uses and can radiate radio frequency energy and, if not installed and used in accordance with the instructions, may cause harmful interference to radio communications. However, there is no guarantee that interference will not occur in a particular installation. If this equipment does cause harmful interference to radio or television reception, which can be determined by turning the equipment off and on, the user is encouraged to try to correct the interference by one or more of the following measures:
- Reorient or relocate the receiving antenna.
- Increase the separation between the equipment and receiver.
- Connect the equipment into an outlet on a circuit different from that to which the receiver is connected.
- Consult the dealer or an experienced radio/TV technician for help.
FCC Radiation Exposure Statement
This equipment complies with FCC radiation exposure limits set forth for an uncontrolled environment. This equipment should be installed and operated with minimum distance 20cm between the radiator & your body.
ISED Statement
This device complies with Industry Canada licence-exempt RSS standard(s). Operation is subject to the following two conditions: (1) this device may not cause interference, and (2) this device must accept any interference, including interference that may cause undesired operation of the device.” This equipment should be installed and operated with a minumum distance of 20 cm between the radiator and your body.
![]() SIMPLIFIED EU AND UK DECLARATION OF CONFORMITY
SIMPLIFIED EU AND UK DECLARATION OF CONFORMITY
Hereby, REOLINK INNOVATION LIMITED declares that the radio equipment type [refer to the cover of the Operational Instructions] is in compliance with Directive 2014/53/EU. The full text of the EU and UK declaration of conformity is available at the following internet address:https://support.reolink.com/hc/en-us/articles/36788378727065/ RF exposure information: The Maximum Permissible Exposure (MPE) level has been calculated based on a distance of 20cm between the device and the human body. To maintain compliance with RF exposure requirement, use product that maintain a 20cm distance between the device and human body.
Wi-Fi Operating Frequency
Operating Frequency :
2412~2472MHz RF Power:≤20dBm(EIRP)
5150~5250MHz RF Power:≤23dBm(EIRP)
5250~5350MHz RF Power:≤23dBm(EIRP)
5470~5725MHz RF Power:≤23dBm(EIRP)
5725~5875MHz RF Power:≤14dBm(EIRP)
868MHz RF Power:≤13.9dBm(EIRP)
![]() The functions of Wireless Access Systems including Radio Local Area Networks(WAS/RLANs) within the band 5150-5350 MHz for this device are restricted to indoor use only within all European Union countries (BE/BG/CZ/DK/DE/EE/IE/EL/ES/FR/HR/IT/CY/LV/LT/LU/HU/MT/NL/AT/PL/PT/RO/SI/SK/FI/SE/TR/NO/CH/IS/LI/UK(NI)
The functions of Wireless Access Systems including Radio Local Area Networks(WAS/RLANs) within the band 5150-5350 MHz for this device are restricted to indoor use only within all European Union countries (BE/BG/CZ/DK/DE/EE/IE/EL/ES/FR/HR/IT/CY/LV/LT/LU/HU/MT/NL/AT/PL/PT/RO/SI/SK/FI/SE/TR/NO/CH/IS/LI/UK(NI)
![]() Correct Disposal of This Product
Correct Disposal of This Product
This marking indicates that this product should not be disposed with other household wastes throughout the EU. To prevent possible harm to the environment or human health from uncontrolled waste disposal, recycle it responsibly to promote the sustainable reuse of material resources. To return your used device, please use the return and collection systems or contact the retailer where the product was purchased. They can take this product for environmentally safe recycling.
Limited Warranty
This product comes with a 2-year limited warranty that is valid only if purchased from Reolink Official Store or a Reolink authorized reseller. Learn more: https://reolink.com/warranty-and-return/.
NOTE: We hope that you enjoy the new purchase. But if you are not satisfied with the product and plan to return, we strongly suggest that you reset the camera to factory default settings and take out the inserted SD card before returning.
Terms and Privacy
Use of the product is subject to your agreement to the Terms of Service and Privacy Policy at reolink.com
Technical Service
By using the Product Software that is embedded on the Reolink product, you agree to the terms & conditions between you and Reolink. Learn more: https://reolink.com/terms-conditions/
Technical Support
If you need any technical help, please visit our official support site and contact our support team before returning the products, https://support.reolink.com.
Trademarks Acknowledgement
“Reolink” and other Reolink’s trademarks and logos are the properties of Reolink. Other trademarks and logos mentioned are the properties of their respective owners.
Documents / Resources
 |
Reolink D340B Video Doorbell [pdf] Instruction Manual 2BN5S-2503T, 2BN5S2503T, 2503t, D340B Video Doorbell, D340B, Video Doorbell, Doorbell |