
Video function Operation Guide
![]()
1 Before Start
1.1 Before getting started
This manual explains the Video functions for rekordbox ver.7.
For instructions on rekordbox in general, see the Instruction Manual of rekordbox.
rekordbox Instruction Manual rekordbox.com
1.2 Overview of Video functions
You can start DJ performance using videos by activating Video functions.
For overview of Video functions, please refer to rekordbox.com.
1.3 System requirements
The latest information (supported OS, required operating environment, etc.) is available on the rekordbox website.
rekordbox.com/en/download/#system
1.4 Supported Formats
Supported file formats are as follows:
Video:
Extension: mpg, mp4, m4v, mov, avi (Windows)
mpg, mp4, m4v, mov (Mac)
- Video format
Codec: h.264, mpeg-4, mpeg-2
Resolution: up to 1920 x 1080 - Audio format
Lpcm (aiff), aac, mp3
Note: Some contents may not be reproduced or imported on certain OS.
2 Subscription Plan
To use the video function without limit, you need to subscribe to a subscription plan that supports the video function.
The functions available are limited for the Free Plan and subscription plans that do not support video functions, and caution messages are displayed on the external monitor.
The video functions supported by each subscription plan are as follows.
| Plan | Video function |
| Free Plan * | Video output is limited. |
| Core Plan * | |
| Creative Plan * | All video functions are available. |
| Professional Plan |
*You can add Cloud Option.
For more information about the plans, please see the plan page on rekordbox.com.
rekordbox.com/en/plan/
3 Use the video function
To use the Video function, first go to [Preferences] > [Extensions] category > [Video] tab, then turn on [Enable Video Function].
4 Part names
4.1 Global section
- Video button

Show/Hide video panel.
4.2 Browse section
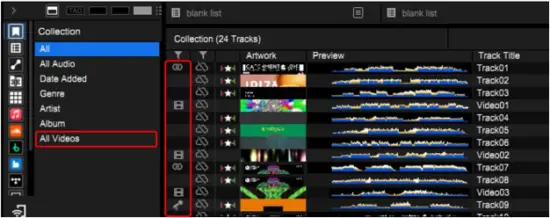
The following icons are shown on video, LINK and karaoke files.
![]() : Video file
: Video file
![]() : LINK file (an audio file linked to a video file)
: LINK file (an audio file linked to a video file)
![]() : Karaoke file
: Karaoke file
- All Videos (Tree View)

Imported video files are displayed.
4.3 Video panel

DECK1 DECK2

You can load and preview video files. [2] Preview (MASTER)

This is the Video preview for Output Window. [46] Full screen button
Click this button to make the Output Window full size. [3] LINK button
Links an audio file and a video file on the same numbered DECKs. When the audio file is loaded next time, the linked video will also be loaded. [4] VIDEO CROSSFADER
Crossfades VIDEO DECK1 and DECK2. [5] AUTO TRANSITION
Moves the VIDEO CROSSFADER automatically. [6] RANDOM button
Selects TRANSITION FX randomly. [7] NEXT button
Selects next TRANSITION FX in the drop-down menu. [8] FAVORITE button
Directly calls Transition FX in the FAVORITE set at the Preferences. [9] TRANSITION FX drop-down menu
Selects a TRANSITION FX. [10] AV SYNC(CROSSFADER) button
Syncs the VIDEO CROSSFADER and the audio CROSSFADER. [11] TOUCH FX On/Off button
Turns on/off GRID, parameter and name of selected TOUCH FX. [12] TOUCH FX drop-down menu (X)
Selects a TOUCH FX. [44] TOUCH FX drop-down menu(Y)
Turns on/off the HOLD button for TOUCH FX.
OFF: FX is turned on only when pressing and holding the mouse on the screen.
ON: Selected FX continues even after the mouse is released. Click HOLD again to cancel the FX. [45] AV SYNC button (Effect)
Turns on/off relations between TOUCH FX and audio effects. [14] TEXT button
Displays TEXT section. [25] IMAGE button
Displays IMAGE section. [36] CAMERA button
Displays CAMERA section.
*Output Window
This is a window to display video. Double-click Preview (MASTER) window to display it.
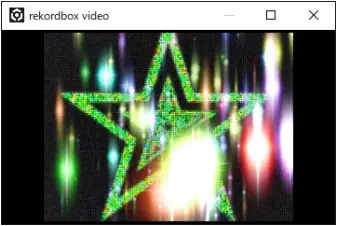
4.4 TEXT section
You can overlay a text on the video. (Preview (MASTER) only).
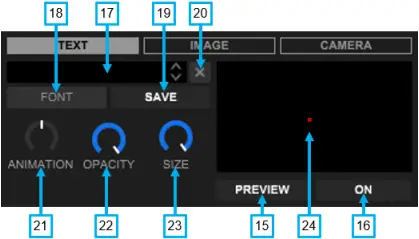
Displays the text on the output video and the Preview (MASTER) screen. [16] TEXT output button
Displays the text on the outputted video. [17] TEXT field
Inputs a text. [18] FONT button
Selects text font, and color. *Use the TEXT size knob to adjust text size. [19] SAVE button
Saves the text to a list. [20] CLEAR button
Clears the inputted text in the field. [21] TEXT animation knob

Adjusts text animation speed. [22] TEXT opacity knob

Adjusts text opacity. [23] TEXT size knob
Adjusts text size. [24] Text alignment field
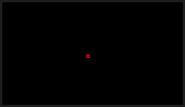
Adjusts the position of the text.
4.5 IMAGE section
You can overlay an image on the video. (Preview (MASTER) only).
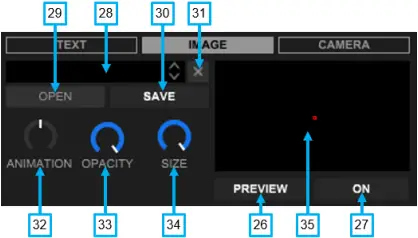
Displays the image on Preview (MASTER). [27] IMAGE output button
Displays the image on the output video and the Preview (MASTER) screen. [28] IMAGE field
Displays the name of the selected image file. [29] OPEN button
Opens a folder to select an image. [30] IMAGE save button
Saves the image displayed in the IMAGE field to a list. [31] IMAGE clear button
Clears the image displayed in the IMAGE field. [32] IMAGE animation knob

Adjusts image animation speed. [33] IMAGE opacity knob

Adjusts image opacity. [34] IMAGE size knob
Adjusts image size. [35] IMAGE alignment field

Adjusts position of the image.
4.6 CAMERA section
You can overlay output from camera (Available only for Preview (MASTER)).
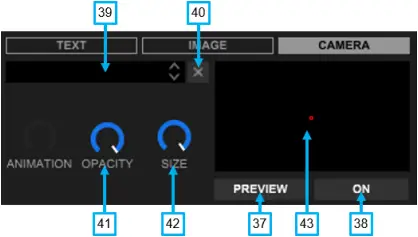
Displays output from a camera on Preview (MASTER). [38] CAMERA output button
Displays output from the camera on the output video and the Preview (MASTER) screen. [39] CAMERA DEVICE field
How to use: Click the
Select one to use. The selected CAMERA DEVICE will be shown in the field.
(Please connect a UVC (USB Video Class) type camera. Otherwise, it is not recognized.) [40] CAMERA DEVICE clear button
Clears the name of the camera device displayed in the CAMERA DEVICE field. [41] CAMERA opacity knob

Adjusts opacity of live feed from the camera. [42] CAMERA size knob
Adjusts size of live feed from the camera. [43] CAMERA alignment field

Adjusts position of the live feed from the camera in the output video.
5 Basic operation
5.1 Display the video panel
Click the Video button in the Global Section.
![]()
Video Panel will appear as bellow.

*If it does not appear, open [Preferences] > [Extensions] category > [Video] tab and turn on [Enable Video Function] and the Panel will appear on the screen.
5.2 Importing video
5.2.1 Import of video files
Drag and drop video files from outside the rekordbox screen to one of the following on rekordbox:
- Drag and drop to [Collection] or [Playlists] of TreeView
![]()
- Video File
* You can also drag and drop a folder with video files to the [Playlists] folder to add it as a playlist.
- Drag and drop to the track list of [Collection] or [Playlists]

- Video File
*You can also drag and drop a folder including video files.
The video files will be imported and appear in [Collection] or [Playlists].
*Video files will also be imported by dragging and dropping them to the deck. In this case, the video files will be displayed in [Collection].
(If you drag and drop a video file to the Video Deck, it will be loaded but not imported.)
5.3 Loading a video
1 Select [All] or [All Videos] in the [Collection] in TreeView.
2 Select video files from [All] or [All Videos], and drag and drop them to Deck 1 or Deck 2.
The video is loaded.
If you wish to load a video file without audio or only the video part of a video file including audio, drag and drop it to VDEO DECK1 or VIDEO DECK2.
5.4 Playing a video
1 Turn on the PLAY/PAUSE button ![]() on the DECK you loaded a video.
on the DECK you loaded a video.
The loaded video starts.
You cannot play only a video file without audio or only video part of a video file including audio. Load an audio file on to the same DECK.
5.5 TOUCH FX

When you turn on the TOUCH FX in each DECK, GRID is displayed on the deck.
If you also turn on AV SYNC, the parameter and name of the selected TOUCH FX are displayed.
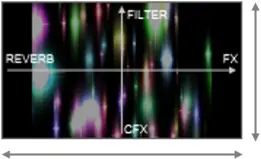
When swipe horizontally, the effect of TOUCH FX is changed.
You can select the following TOUCH FX from the TOUCH FX drop-down menu (X) ![]() to apply the effect on the video.
to apply the effect on the video.
ZOOM: Zooms in and out the image.
KALEIDO: Applies kaleidoscope effect.
STROBE: Applies strobe effect.
EDGES: Applies edge effect.
BLUR: Applies blur effect.
BLOCK: Splits into blocks.
SPLIT SCROLL: Splits into blocks, and scrolls right to left.
LIGHTBEAM: Increases the brightness, giving light beam effect like god rays.
EXPOSE: Increases exposure, with dark areas appear light or light areas appear dark.
FEEDBACK: Creates numeric concentric layers twisting from the center to the fringe of the screen.
STRIPE: Replaces pixels at the edge of the video with colored strips.
FLOOD: Distorts and blurs the image to horizontal direction.
BEN DAY: Splits the image into small dots.
INCREMENT: Displays the video multiple times in fragments.
DOT: Displays the video as a grid of dots.
RGB TRIP: Repeats zooming in and out while changing red, green and blue (RGB) color component of the video.
RGB LOOP: Changes the color of the video to red, green and blue (RGB).
LUMINOUS: Becomes luminous periodically.
NEON: Highlights the outline of visual images, applying neon-sign effects.
SMUDGE: Applies ink-smudging effect to make the image dissolving with residual image.
THERMO: Applies thermal camera effect.
MOSAIC: Reduces resolution of the video, applying mosaic effects.
SPIN: Spins the image horizontally.
TWIST: Splits the image vertically and twisting spirally.
When AV SYNC is turned on, you can change the effect of BEAT FX by touching the screen and moving the point horizontally.
* You cannot use TOUCH FX with BEAT FX on the FX panel at the same time. (While TOUCH FX is turned on, BEAT FX on the FX panel is turned off.)
You can change the combination of TOUCH FX and BEAT FX at the Preferences.
When you move the point vertically by touching the screen, video effects will change.
You can select one of the below video effects at the TOUCH FX drop-down menu (Y) ![]() .
.
BRIGHTNESS: Adjusts brightness.
CONTRAST: Controls contrast.
COLOR EXTRACTOR: Makes the video monochrome with some colors remaining.
FILTER: Adjusts filter.
SATURATION: Adjusts saturation.
SHARPEN: Sharpens the image.
When you move the point vertically by touching the screen, the effect of CFX is also changed.
* You cannot use TOUCH FX with CFX on the CFX panel at the same time. (While TOUCH FX is turned on, CFX on the CFX panel is turned off.)
You can change the combination of TOUCH FX and CFX at the Preferences.
5.6 LINK
1 Load a video file and an audio file on the same numbered DECK. Click the LINK button ![]() to link the audio file and the video file. When the audio file is loaded next time, the linked video will also be loaded.
to link the audio file and the video file. When the audio file is loaded next time, the linked video will also be loaded.
2 To cancel the LINK, click again the LINK button.
5.7 TRANSITION FX
You can apply TRANSITION FX using the video CROSSFADER ![]() when crossfading the videos.
when crossfading the videos.
Select the following TRANSITION FXs from the TRANSITION FX drop-down menu ![]() to apply while crossfading the two videos.
to apply while crossfading the two videos.
ADDITIVE: Switches the two videos while maintaining lighter part of the two.
FADE: Switches the two videos while mixing them.
DIFFERENCE: Switches the two videos while displaying the differences of them.
LUMA KEY DARK: Gradually changes the videos from the portion where luminance level is low in the outgoing image.
LUMA KEY BRIGHT: Gradually changes the videos from the portion where luminance level is high in the outgoing image.
RGB: Switches the two videos as RGB changes.
PUSH: Switches the two with the incoming video pushing the outgoing video horizontally off screen.
WIPE H: The incoming video wipes the outgoing video horizontally off screen.
WIPE V: The incoming video wipes the outgoing video vertically off screen.
SQUEEZE H: The incoming video squeezes the outgoing video horizontally off screen.
SQUEEZE V: The incoming video squeezes the outgoing video vertically off screen.
GRID: Splits the videos into blocks and switching the two videos.
CUBE: Switches the two videos while projecting them onto horizontally adjacent face of a cube.
SPIN H: Turns over the two videos projected onto front and back sides of a sheet (horizontally).
SPIN V: Turns over the two videos projected onto front and back sides of a sheet (vertically).
SWITCH: Instantly switches the two videos at the center of the CROSSFADER.
EXTREME CUT: Instantly switches the two videos immediately when the fader starts moving from the edge of the CROSSFADER.
EXTREME HOLD: Instantly switches the two videos when the CROSSFADER finally reaches the opposite side.
SWAP: Switches the two videos horizontally while changing the size and opacity.
FLIP: Switches the two videos with one projected onto a smaller window while changing its size and the horizontal to vertical ratio of it.
BLINK: Blinks transition of the two videos in a short time like strobe lights.
ELLIPSE: Transition of the two videos with an expanding ellipse from the center to the fringe of the screen, just like an opening iris.
GRID 2: Random transition of small grid pieces of the two videos one after another.
PIXEL FADE: Transition of the two videos with mosaic effects.
DOOR: Transition of the two videos as follows: the active (outgoing) video splits in two like a door and folds it away, whilst presenting the next (incoming) video in the middle.
BLINDS: Switches the two videos just as vertical blinds sliding horizontally.
DROP: Switches the two videos as the outgoing video dropping down.
LATTICE: Switches the two videos as both displayed in small lattice pieces.
WAVE: Switches the two videos as they wave.
BURST: Switches the two videos bursting from the center.
DISPLACE: Switches the two videos with the outgoing video blurring.
GLOW FADE: Switches the two videos with the outgoing video glowing.
5.8 TEXT
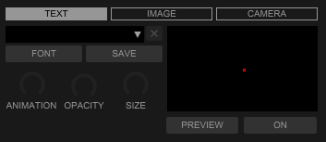
1 Input a text on the TEXT field ![]() .
.
2 Click the CLEAR button ![]() to clear the field.
to clear the field.
3 Click the SAVE button ![]() to save the input text to a list.
to save the input text to a list.
4 Click the PREVIEW button ![]() to display the text in the Preview (MASTER) window.
to display the text in the Preview (MASTER) window.
5 Click the FONT button ![]() to select text font, size, color, etc.
to select text font, size, color, etc.
6 Use the SIZE knob ![]() to adjust the size.
to adjust the size.
7 Use the OPACITY knob  to adjust the opacity.
8 Use the ANIMATION knob  to adjust the animation speed. (You can change the type of the animation at [Preferences].)
9 To stop animation, double-click the ANIMATION knob  . (The knob position is automatically set to 12 o’clock.)
10 Click the alignment field  to adjust position of the text.
11 Click the output button ![]() (“ON”) to display the text on the output video (Output Window) and the Preview (MASTER) screen.
(“ON”) to display the text on the output video (Output Window) and the Preview (MASTER) screen.
5.9 IMAGE
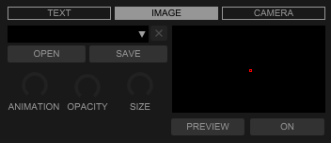
1 Click the OPEN button ![]() to open an image file in the computer.
to open an image file in the computer.
Select an image from it. The name of the selected image file is shown on IMAGE field.
![]()
2 Click the CLEAR ![]() button to clear the field.
button to clear the field.
3 Click the SAVE button ![]() to save the image file to a list.
to save the image file to a list.
4 Click the PREVIEW button ![]() to display the text in the Preview (MASTER) window.
to display the text in the Preview (MASTER) window.
5 Use the SIZE knob ![]() to adjust the size.
to adjust the size.
6 Use the OPACITY knob  to adjust the opacity.
7 Use the ANIMATION knob  to adjust the text animation speed. (You can change the type of the animation at [Preferences].)
8 To stop animation, double-click the ANIMATION knob.  (The knob position is automatically set to 12 o’clock.)
9 Click the alignment field  to adjust position of the image.
10 Click the output button ![]() (“ON”) to display the image on the output video (Output Window) and the Preview (MASTER) screen.
(“ON”) to display the image on the output video (Output Window) and the Preview (MASTER) screen.
5.10 CAMERA
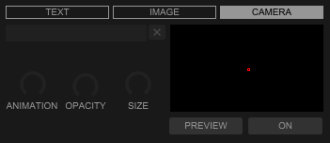
1 Click the button ![]() next to the CAMERA DEVICE field.
next to the CAMERA DEVICE field.
A drop-down menu appears to show camera device(s) connected using USB cable(s).
Select one from the drop-down menu.
The name of the selected camera is shown in the CAMERA DEVICE field.
(To use a camera for Video functions, connect it using a USB cable.)
2 Click the CLEAR button ![]() to clear the field.
to clear the field.
3 Click the PREVIEW button ![]() to display live feed from the camera on the Preview (MASTER).
to display live feed from the camera on the Preview (MASTER).
4 Use the SIZE knob ![]() to adjust the size.
to adjust the size.
5 Use the OPACITY knob  to adjust the opacity.
6 Click the alignment field  to adjust position of the live feed from the camera.
7 Click the CAMERA output button ![]() (“ON”) to display the live feed from the camera on the output video (Output Window) and the Preview (MASTER) screen.
(“ON”) to display the live feed from the camera on the output video (Output Window) and the Preview (MASTER) screen.
6 Other features
6.1 Delay Compensation
You can adjust and compensate for the delay between audio (MASTER) and video (MASTER) at the Preferences.
Move the slider to + direction to move the video forward.
Move the slider to – direction to move the video backward.
The compensation range is from – 500 msec to + 500 msec.
6.2 Video Mute
You can mute video (MASTER) when you are not playing audio (e.g. during pause).
You can switch Enable/Disable at the Preferences.
6.3 Karaoke
You can play karaoke files consisting of two files: a music file (extension: mp3) and a separate file (extension: cdg).
1 Locate the two files in the same folder on your computer: an mp3 file and a cdg file.
*The two files must have the same file name.
2 Load the mp3 file to DECK1 or DECK2.
3 Play the mp3 file on DECK1 or DECK2.
The cdg file will be displayed on VIDEO DECK1 or VIDEO DECK2.
*Some files may not be played successfully depending on the contents.
6.4 Syphon Out
You can output video (MASTER) to applications that support Syphon.
*Mac users only.
You can switch Enable/Disable output at the Preferences.
7 Preferences
Open [Preferences] > [Extensions] category > [Video] tab in rekordbox PERFORMANCE mode.
- Enable Video Function
Turn on when using video function.
When not using video function, turn off.
This helps reduce CPU load. - Output Setting
Video Quality: Set the video quality to [High/Middle/Low]. - TRANSITION FX Setting
FAVORITE: Select up to five TRANSITION FX options from [ALL] and register them by clicking [ADD].
Click [DEL] to delete a selection.
AUTO TRANSITION: Set [Speed]. - TEXT Setting
Animation: Set the TEXT animation to [Scroll/Rotate]. - IMAGE Setting
Animation: Set the IMAGE animation to [Scroll/Rotate/Box*].
*BOX: Images are shown onto the surfaces of a horizontally rotating box.
- Camera Setting
USB Camera Connection Monitoring: Set USB Camera Connection monitoring to [On/Off]. - SLIDESHOW Setting
Slide Order: Set the display to [Preset Order/Shuffle].
Repeat: Set the SLIDESHOW repeat setting to [On/Off].
Display Duration: Set the display duration for each image. - Delay Compensation
You can adjust the value to prevent audio and video from becoming out of sync. - Video Mute
Deck 1, Deck 2: Select whether video mute is Enable or Disable for each deck when audio is not played. - Channel Fader
Deck1, Deck2: Set [Video brightness changes along with the channel fader] depending on the deck. - TOUCH FX X-axis settings: You can relate TOUCH FX to BEAT FX.
- TOUCH FX Y-axis settings: You can relate TOUCH FX to CFX.
- TOUCH FX X-axis direction settings: You can select either of them: [FX effect is stronger to the right./FX effect is stronger to the left.]
- Linked video setting for tracks with no video: When loading a track without video to DECK1 or DECK2, you can choose a Linked video to display on the VIDEO DECK
Folders to save Linked videos: You can set the folder where the Linked videos are saved.
DECK1 / DECK2: You can choose from the following.
[Display the Linked video selection window /
Randomly display Linked videos /
Display the specified Linked video /
Display artwork of the track. /
Do nothing.] - Download Sample Video:
You can download sample video from our website.
*”visualizer.zip” file is downloaded to the download folder (the folder name may defer depending on OS).
After the download, you can use it as a Linked video by copying it to the specified folder below.
<Specified folder (default)>
Windows: /video/PioneerDJ
Mac: /movie/PioneerDJ
*When you copy the downloaded file ”visualizer.zip” as is, the application will unzip the file automatically when opening [Preferences] > [Extensions] category > [Video] tab, and delete the file after unzip.
*When the downloaded file ”visualizer.zip” is unzipped by the browser, etc., please copy each file to a specified folder. (Sub-folders will not be recognized.)
- Syphon Out Setting: You can select to switch [Enable/Disable].
8 Using the online support site
Before making inquiries on rekordbox operating procedures or technical issues, read the rekordbox manual and check the FAQ provided on the rekordbox website (rekordbox.com).
- rekordbox™ is a trademark or registered trademark of AlphaTheta Corporation.
- Windows is a trademark or registered trademark of Microsoft Corporation in the U.S. and other countries.
- Mac is a trademark of Apple Inc., registered in the U.S. and other countries and regions.
- Other product, technology and company names, etc. mentioned herein are trademarks or registered trademarks of their respective owners.
© AlphaTheta Corporation.
Documents / Resources
 |
rekordbox AlphaTheta Video Functions Software [pdf] User Guide AlphaTheta Video Functions Software, Video Functions Software, Software |


