RAD Cam RADCam Security App

Package Contents
What you get with your RADCam
You should have:
- RADCam (1)
- Power adapter (2)
- Mounting hardware (3)

Download App
! Attention:
You can only download the app if your email is registered as a beta-tester, and the same e-mail must be used to register the app.

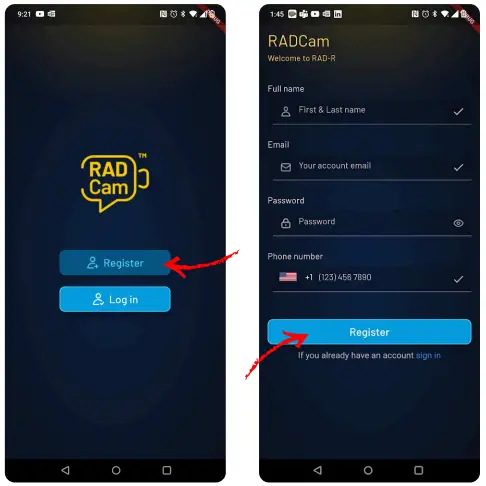
Register user
Open the app on your smartphone.
Read and accept start up information, and terms & conditions. If you’re a new user, tap on “Register” to create an account.
Enter your full name, email address associated with the beta-testing list, password and phone number.
Click on “Register” to submit the information and follow the instructions to verify your account through a confirmation email.
Log in
After registering, open the app tap “Log in” and enter your login credentials (email and password) to access your account through our secured authentication page.
Checking “Stay signed in” will avoid having to enter your credentials each time.

If you ever forget your password, use the “Forgot Password?” link to reset it via your registered email.
You can always change your password later from User Settings.
Add camera
Clicking “Add camera” brings up a short instruction screen. Click “Next”. Find the QR code sticker on the body of the camera, scan it with the app by placing the QR code in the reading target at the center of the screen.

If the camera is not registered to anyone, it will now be registered to your account. If it has already been registered by another user, the app will show an error message:

You are now ready to provide your Wi-Fi information to the camera in order to connect to it.
Wi-Fi pairing
After the camera is added, and if it’s not yet connected to the local Wi-Fi, it will ask for network information.
! The camera is listening to Wi-Fi credentials for the first 10 minutes after it has initialized following a restart.
If the camera is not responding to the SoundWave pairing, please restart the camera, wait for 2 minutes and try again.
Select a 2.4Ghz (or 2.4/5Ghz) network from the dropdown list and providing the correct password for the network and press “Sonar pairing”.

The camera should say “Successfully connected to WiFi” Wait for the 60 second countdown to finish, and the camera stream should be shown in place.
If the camera says “DHCP timeout”, that means that the camera received the network information, but could not connect. Make sure the selected network name, type (2.4Ghz) and password are correct and please try again.
Camera modes
The Autonomous Intelligent Response (AiR) can be set up through the Ai Agent screen.
The mode in which the camera responds

User Settings
Customize settings that are specific to the user, such as password, subscription information, push notifications and voice passphrase.
This menu is also where you can log out of your current user account.
The application version number is also displayed on this screen.

Passphrase
Voice passphrase can be set up from the Settings menu.
Passphrase is assigned to all of the user’s cameras.
To see how well RADCam understands your passphrase, you can speak into the phone after pressing the “Test” button, and seeing if the system recognizes it.

Events
View recorded events directly from the app. Each event is summarized and saved when there’s an interaction. Clicking on the event will bring up a clip associated with the interaction. You can filter events by type, camera and date.

Customer Support
RADCam Quick Start Guide
support: testing@radcam.ai
Documents / Resources
 |
RAD Cam RADCam Security App [pdf] User Guide RADCam, RADCam Security, RADCam Security App, App |


