PYRAMID SEA3AALDRS TimeTrax Sync PoE IP Network Wireless Analog Clock

OVERVIEW
- Thank you for choosing a TimeTrax™ Sync PoE Clock System. The TimeTrax™ PoE clock System is capable of receiving both its time and power from a cost-effective and reliable Power over Ethernet source.
- The POE Analog Clock is powered by PoE Switch (not included) and CAT5 RJ45 cable (not included). See PoE Switch Method on pg. 2.
- Alternate method is to use a PoE Port Injector. See AC-DC Adapter Method on pg. 3.
IMPORTANT: Prior to clock installation, install TimeTrax™ Sync Software (part# SASDLCWDXX sold separately).
For more information, visit pyramidtimesystems.com or call our support team at 888 479-7264 during our regular business hours M-F 8:30am-5pm EST.
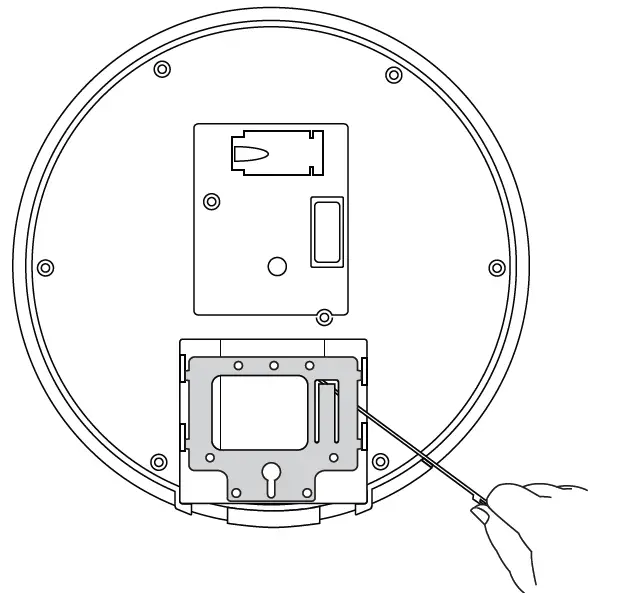
SECURITY BRACKET REMOVAL
- Prior to installation, detach metal security bracket from clock by inserting included release key into slot located on back of clock.
- Push key all the way into slot. Key will slide easily until some resistance from locking tab is felt.
- With key fully engaged, slide the security bracket up and off of the clock.
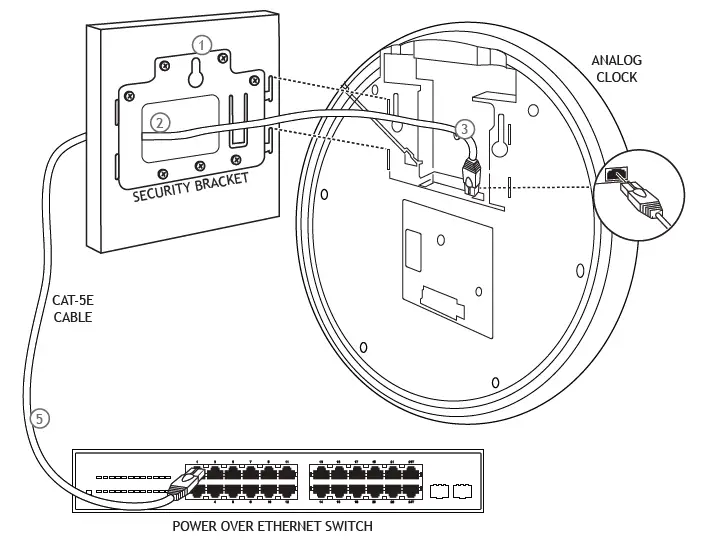
POE SWITCH METHOD
- Install Security Bracket
- Mount the security bracket flush again the wall using the template, four screws and wall anchors provided.
- Install the security bracket onto the electrical box using 6-32 screws (not provided).
- Route an RJ45 Cat5E cable (not included) inside the wall through the rectangle opening of the security bracket.
- Connect RJ45 cable info RJ45 Ethernet port on the back of the clock.
- Push the clock onto the security bracket, aligning the 4 tabs on the bracket with the 4 matching slots on the back of the clock. Slide the clock downwards until the locking tabs click into place. When properly locked into place, the clock cannot be slid off the bracket without using the provided wall bracket release key to disengage the locking tab.
- The other end of the RJ45 cable connects to your PoE Switch (see pictures).
- Upon successful connection, the clock will automatically home to 12:00 and then will find and display the accurate time.
- Run the TimeTrax™ Software to begin “device discovery” and to customize your configuration. Please refer to your software user guide.
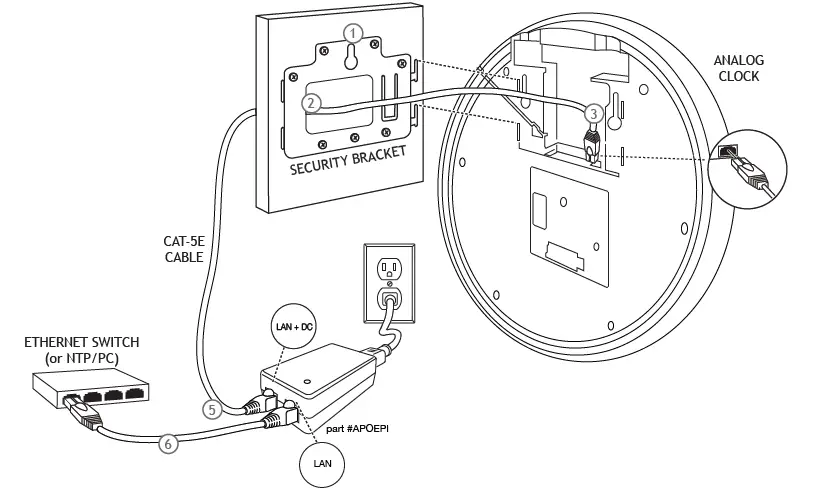
AC-DC ADAPTER METHOD (PORT INJECTOR)
- Install Security Bracket
- Mount the security bracket flush again the wall using the template, four screws and wall anchors provided.
- Install the security bracket onto the electrical box using 6-32 screws (not provided).
- Route an RJ45 Cat5E cable (not included) inside the wall through the rectangle opening of the security bracket.
- Connect RJ45 cable info RJ45 Ethernet port on the back of the clock.
- Push the clock onto the security bracket, aligning the 4 tabs on the bracket with the 4 matching slots on the back of the clock. Slide the clock downwards until the locking tabs click into place. When properly locked into place, the clock cannot be slid off the bracket without using the provided wall bracket release key to disengage the locking tab.
- The other end of the Cat5E RJ45 cable connects into Ethernet Port “LAN + DC of the port injector.
- Connect Ethernet Switch (NTP, PC) to Adapter(Injector) port “LAN” and power up the unit (see pictures).
- Upon successful connection, the clock will automatically home to 12:00 and then will find and display the accurate time.
- Run the TimeTrax™ Software to begin “device discovery” and to customize your configuration. Please refer to your software user guide.
SPECIFICATIONS
| Time Base | NTP | |
| Time Update Frequency | Selectable, 1 minute to 24 hours | |
| Method | NTP time server | |
| Power Input | 48 VDC Power over Ethernet IEEE, 802.3af | |
| Average Power Consumption | 0.96Watts | |
| Operating Temp | -30°F (-34.44°C) to 130°F (54.44°C) | |
| Warranty | 3-Year manufacturer’s limited warranty | |
| Guarantee | 30-Day money back guarantee | |
| Compliance | IEEE 802.3af/ANSI X3.263 | |
| Includes | Security mounting bracket & key, wall mounting template, security mounting bracket template | |
| ABS | WOOD | |
| Display | 12 Hour, 12 Hour w/ seconds, 12/24 Hour or Custom Face | 12 Hour, Roman Numeral |
| Case | Smooth surface 94VO/5VA ABS (black, silver or taupe finish) | Cherry, Oak or Walnut Hardwood (stain & polyurethane) |
| Face | Double opaque styrene | |
| Lens | Shatterproof, side molded, polished polycarbonate crystal | |
| Mounting | Wall or Dual Wall or Ceiling for 13in only | |
| SIZE/MATERIAL | WEIGHT | DIMENSIONS |
| 13in ABS Bezel | 2.8lbs (1.3kg) | 13.25in x 2.5in (33.7cm x 6.5cm) |
| 17in ABS Bezel | 4.1lbs (1.9kg) | 17in x 2.5in (43cm x 6.5cm) |
| 16in Wood Bezel | 5.5lbs (2.5kg) | 16.5in x 2.4in 42cm x 6.4cm) |
| 20in Wood Bezel | 8.1lbs (3.8kg) | 20.25in x 2.4in (51.1cm x 6.4cm) |
*Required for Synchronization
WARRANTY
3-YEAR LIMITED WARRANTY
Pyramid warranties its Synchronized Clock System to the original user against defective material or workmanship for a period of 3 years from date of purchase. The manufacturer’s responsibility under this Warranty is limited to repair or replacement of defective part or parts. Pyramid reserves the right to determine whether parts failed because of defective material, workmanship, or other causes. Failure caused by accident, alteration, misuse or improper packaging of returned unit is not covered by this Warranty. Any repair to equipment other than by Pyramid voids the Warranty. The rights under this Warranty are limited to original user and may not be transferred to subsequent users. If Customer Support cannot troubleshoot your problem over the phone, we will replace your unit free of charge if it is within warranty period. Please contact Customer Support at 888.479.7264 between the hours of 8:30am and 5pm (EST), Monday through Friday, for details.
TECHNICAL SUPPORT
Should you need to speak live to one of our representatives, please call toll-free (US/Canada) at 888.479.7264 during regular business hours 8:30am-5pm EST, Monday-Friday. Or send Email to: WirelessSales@ptitime.com
CLOCK MOUNTING TEMPLATE
Screw Guide Template Below Is Actual Size
TOP OF 17IN ANALOG CLOCK
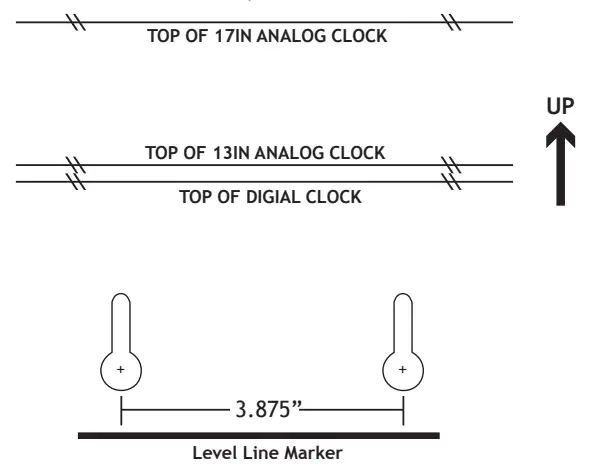
Level Line Marker
For more information contact Pyramid at 888.479.7264
ANALOG SCLOCK SERIESECURITY BRACKET MOUNTING TEMPLA MOUNTINGTETEMPLATE
Screw Guide Template Below Is Actual Size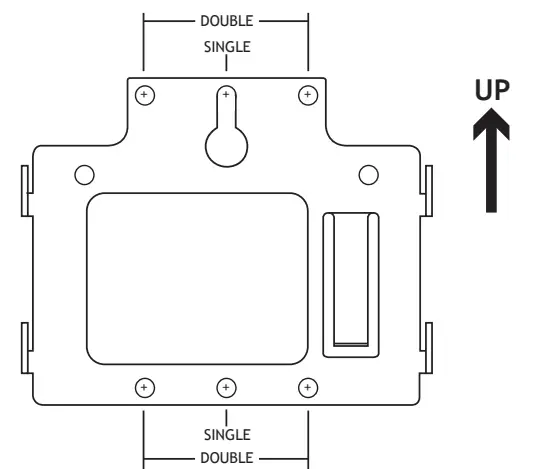
Level Line Marker
TIMETRAX™ SYNC POE ANALOG CLOCK Installation Instructions
I2252 Rev C Page 6 of 6 888.479.7264 pyramidtimesystems.com
FAQ
- Q: How do I know if the clock is properly locked into place on the security bracket?
A: The clock is properly locked when you hear a click sound as the locking tabs engage. You should not be able to slide the clock off without using the release key. - Q: Can I use a different type of cable instead of RJ45 Cat5E for connection?
A: It is recommended to use an RJ45 Cat5E cable for proper functionality and compatibility with the clock.
Documents / Resources
 |
PYRAMID SEA3AALDRS TimeTrax Sync PoE IP Network Wireless Analog Clock [pdf] Instruction Manual SEA3AALDRS, SEA3AALDRS TimeTrax Sync PoE IP Network Wireless Analog Clock, TimeTrax Sync PoE IP Network Wireless Analog Clock, PoE IP Network Wireless Analog Clock, Network Wireless Analog Clock, Wireless Analog Clock, Analog Clock |