1. Introdução
This manual provides detailed instructions for the installation, operation, and maintenance of the Longer RAY5 Laser Engraver XY Axis Expansion Kit. This kit is designed to significantly increase the working area of your existing Longer RAY5 5W, 10W, or 20W laser engraver, enabling larger projects and enhanced creative possibilities. Please read this manual thoroughly before proceeding with installation or operation.

Image 1.1: The Longer RAY5 Laser Engraver with the XY Axis Expansion Kit installed, demonstrating an expanded engraving area.
2. Informações de segurança
WARNING: Laser radiation can cause eye damage and skin burns. Always wear appropriate laser safety goggles when operating the laser engraver. Never look directly into the laser beam.
- Ensure the work area is well-ventilated to dissipate fumes and smoke generated during engraving.
- Mantenha um extintor de incêndio por perto.
- Não deixe a máquina sem supervisão durante a operação.
- Mantenha crianças e animais de estimação longe da área de operação.
- Ensure all electrical connections are secure and meet local safety standards.
- Only engrave materials suitable for laser processing. Avoid highly reflective, flammable, or unknown materials.
3. Conteúdo da embalagem
Verify that all components listed below are present in your expansion kit package:

Image 3.1: The complete contents of the expansion kit, including cables, detailed instructions, timing belts, zippers, and XY-axis beam aluminum profiles.
- XY-axis beam aluminum profiles (elongation shafts)
- Cables for extended connections
- Timing belts
- Cable ties (zippers)
- Detailed instruction manual (physical or digital)
- Necessary fasteners and tools for assembly
4. Configuração e instalação
The expansion kit is designed for straightforward installation. Refer to the included detailed instructions for specific steps. The process generally involves replacing the original frame components with the longer profiles and connecting the extended cables.
4.1 Preparação
- Power off and unplug your RAY5 laser engraver.
- Clear a spacious and clean work area.
- Gather all tools required for assembly (usually included with the kit).
4.2 Passos de Montagem
- Carefully disassemble the existing frame of your RAY5 laser engraver according to its original manual.
- Replace the original XY-axis aluminum profiles with the longer profiles provided in the expansion kit. Ensure proper alignment and secure fastening.
- Install the new timing belts, ensuring they are correctly tensioned.
- Connect the extended cables to the appropriate ports on the motherboard and stepper motors. The kit includes different cable sets; select the one compatible with your motherboard setup.
- Secure all cables using the provided cable ties to prevent interference with moving parts.
- Verify that all components are securely attached and that the laser module moves freely along both axes without obstruction or excessive friction.

Image 4.1: Detail of the high-precision aluminum profiles and the roller mechanism, highlighting the structural integrity.
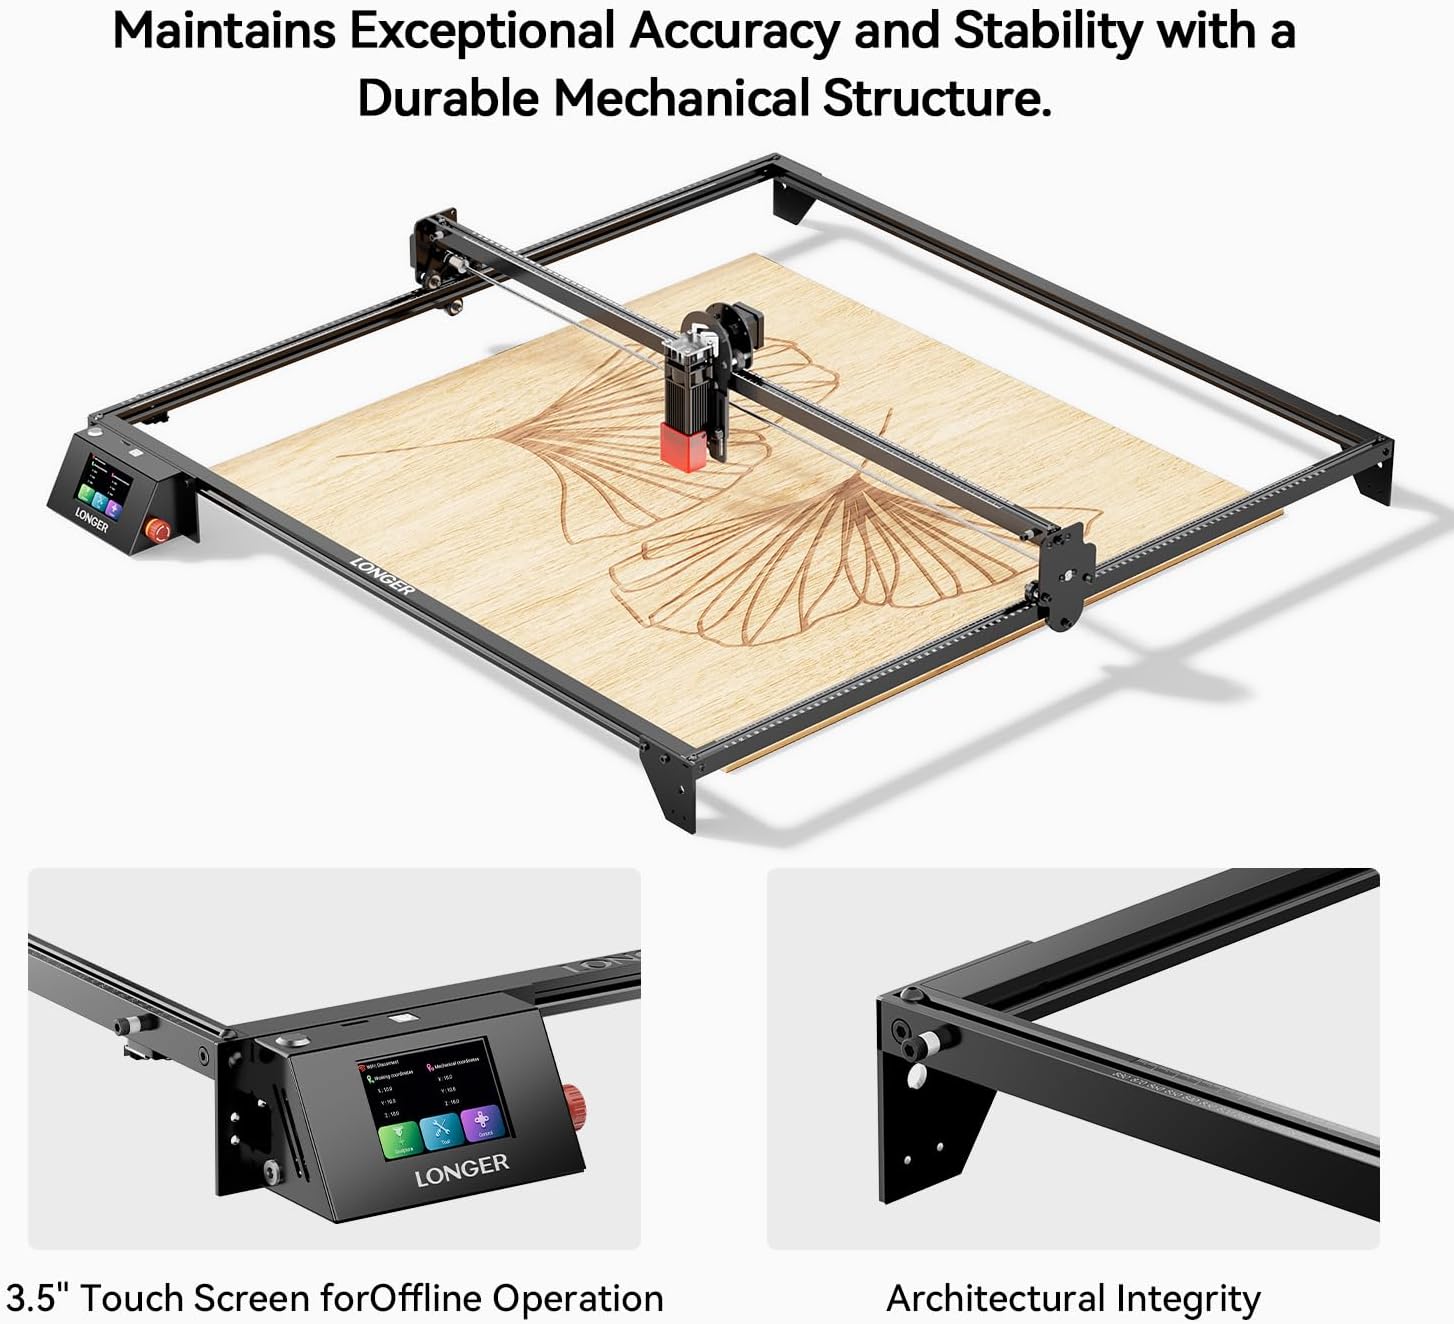
Image 4.2: The expanded frame maintains exceptional accuracy and stability, featuring the 3.5-inch touch screen for offline operation.
5. Instruções de operação
After successful installation of the expansion kit, the operation of your RAY5 laser engraver remains largely the same, but with a significantly larger working area. The expanded area allows for larger designs and batch processing.

Imagem 5.1: Um example of the expanded engraving area, ideal for larger projects like the wooden tractor model shown.
5.1 Configuração de Software
You may need to adjust the working area dimensions in your laser engraving software (e.g., LightBurn, LaserGRBL) to reflect the new, larger engraving size. Refer to your software's documentation for specific instructions on setting workspace dimensions.
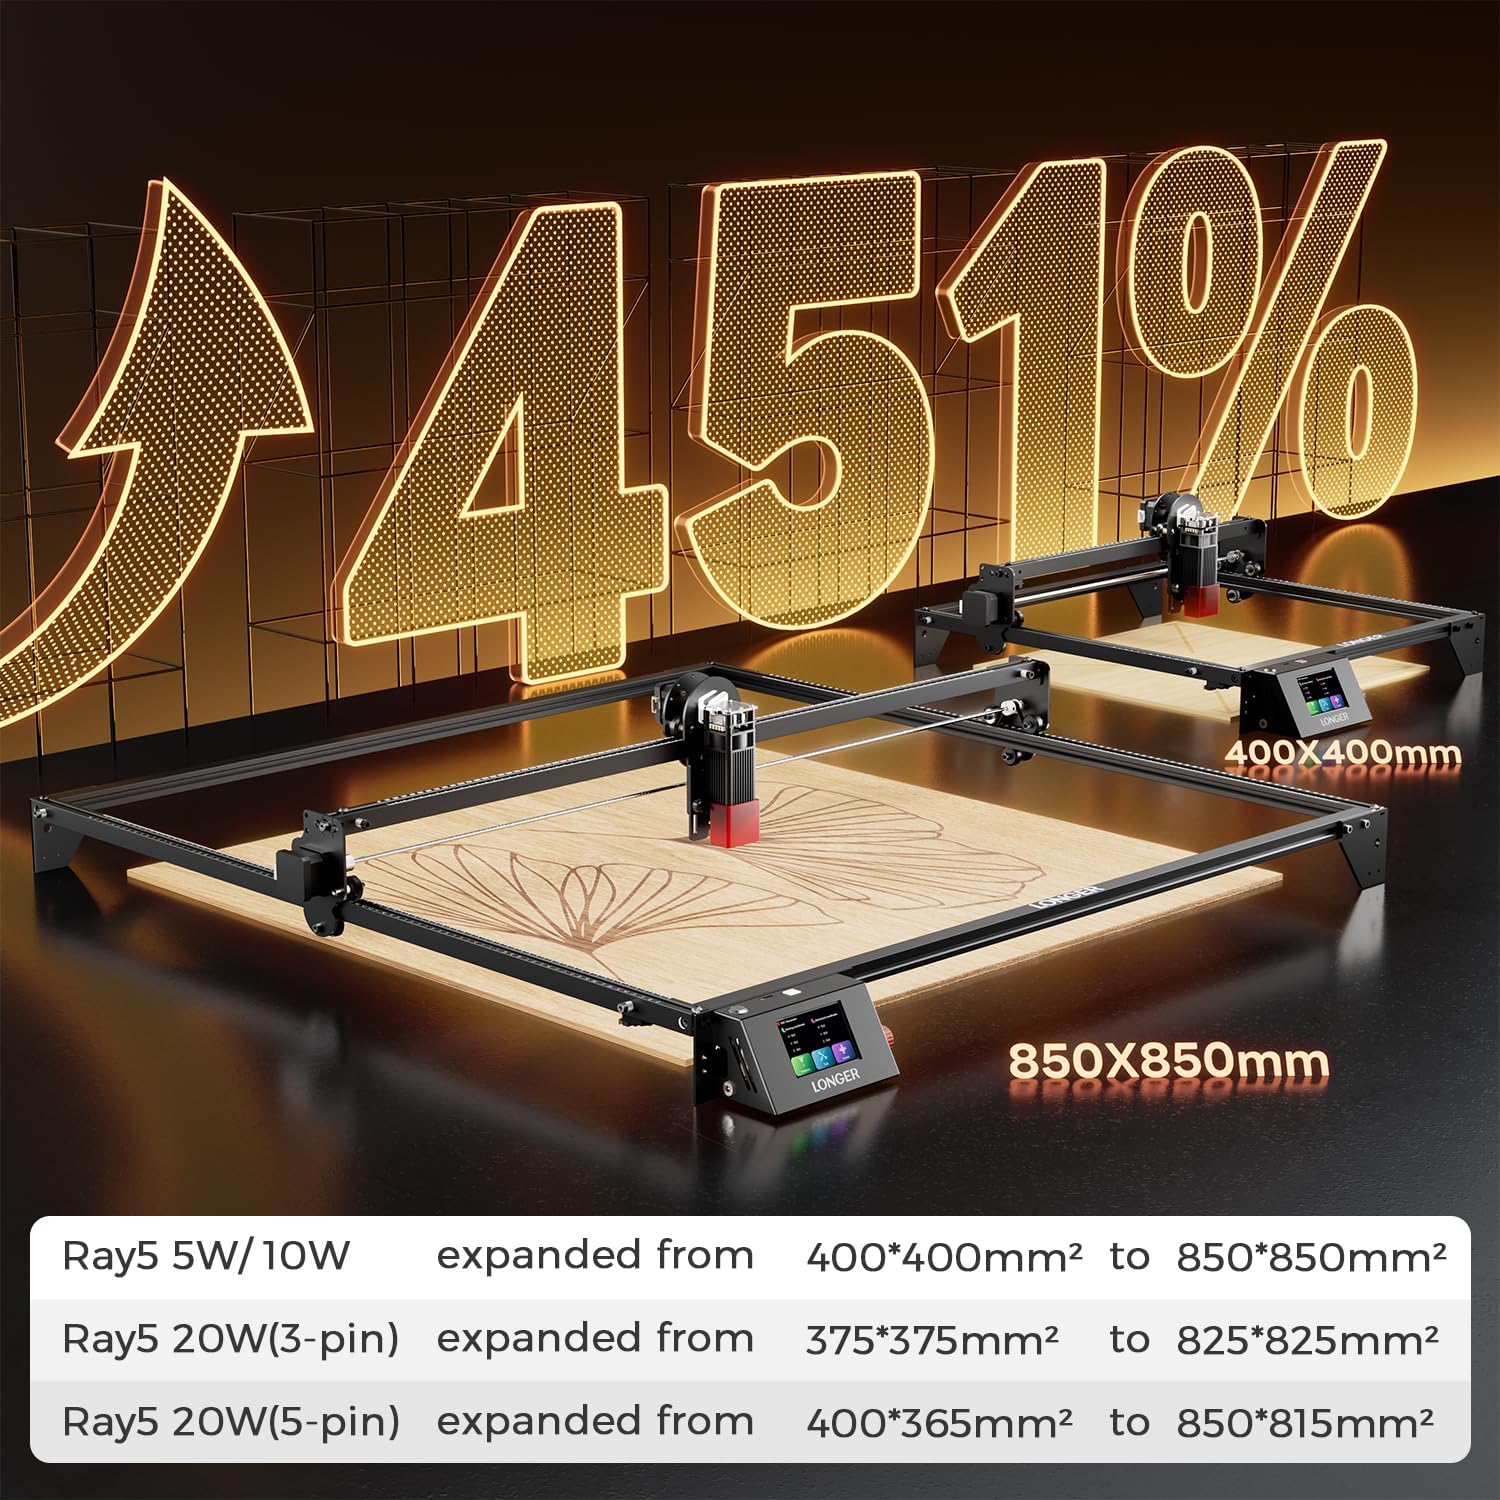
Image 5.2: This graphic illustrates the significant increase in engraving area, up to 451%, depending on the specific RAY5 model.
5.2 Primeiro uso
- Perform a small test engraving to confirm the laser module moves correctly across the entire expanded area.
- Check for any unexpected vibrations or movements.
- Ensure the laser focus is correctly set for the material being used.
6. Manutenção
Regular maintenance ensures the longevity and optimal performance of your expanded laser engraver.
- Limpeza: Regularly clean the aluminum profiles, wheels, and belts to remove dust and debris. Use a soft cloth and avoid abrasive cleaners.
- Tensão da correia: Periodically check the tension of the timing belts. They should be taut but not overly tight. Adjust if necessary.
- Lubrificação: Apply a small amount of appropriate lubricant to the guide rails and bearings as recommended by the original engraver's manual.
- Fixadores: Inspect all screws and fasteners for tightness. Re-tighten any loose connections.
7. Solução De Problemas
This section addresses common issues that may arise after installing the expansion kit.
7.1 X-Axis Movement Issues (Jitter/Tightness)
Some users have reported the X-axis feeling tight or exhibiting jittery movement, particularly after expansion. This can be due to:
- Over-tightened Rollers: The rollers on the laser module carriage might be too tight against the new X-axis profile. Loosen the eccentric nuts on the rollers slightly until the carriage moves smoothly but without excessive play.
- Misaligned Profiles: Ensure the new aluminum profiles are perfectly parallel and square. Even slight misalignment can cause binding.
- Destroços: Check for any small particles or debris on the profiles or rollers that might be impeding smooth movement.
- Interferência de cabos: Verify that no cables are snagging or creating resistance against the moving parts.
7.2 Inaccurate Engraving/Cutting
- Loose Belts: Check and adjust the tension of the timing belts. Loose belts can lead to skipped steps and inaccurate positioning.
- Parafusos soltos: Ensure all frame components and the laser module are securely fastened.
- Configurações do software: Confirm that the working area dimensions in your software match the physical dimensions of the expanded engraver.
7.3 Machine Not Powering On/Responding
- Conexões de cabo: Double-check all cable connections, especially the extended cables, to ensure they are fully seated and correctly wired.
- Fonte de energia: Verify the power supply is correctly connected and functioning.
8. Especificações
The Longer RAY5 XY Axis Expansion Kit modifies the working area of your RAY5 laser engraver. The exact expanded dimensions depend on your specific RAY5 model:
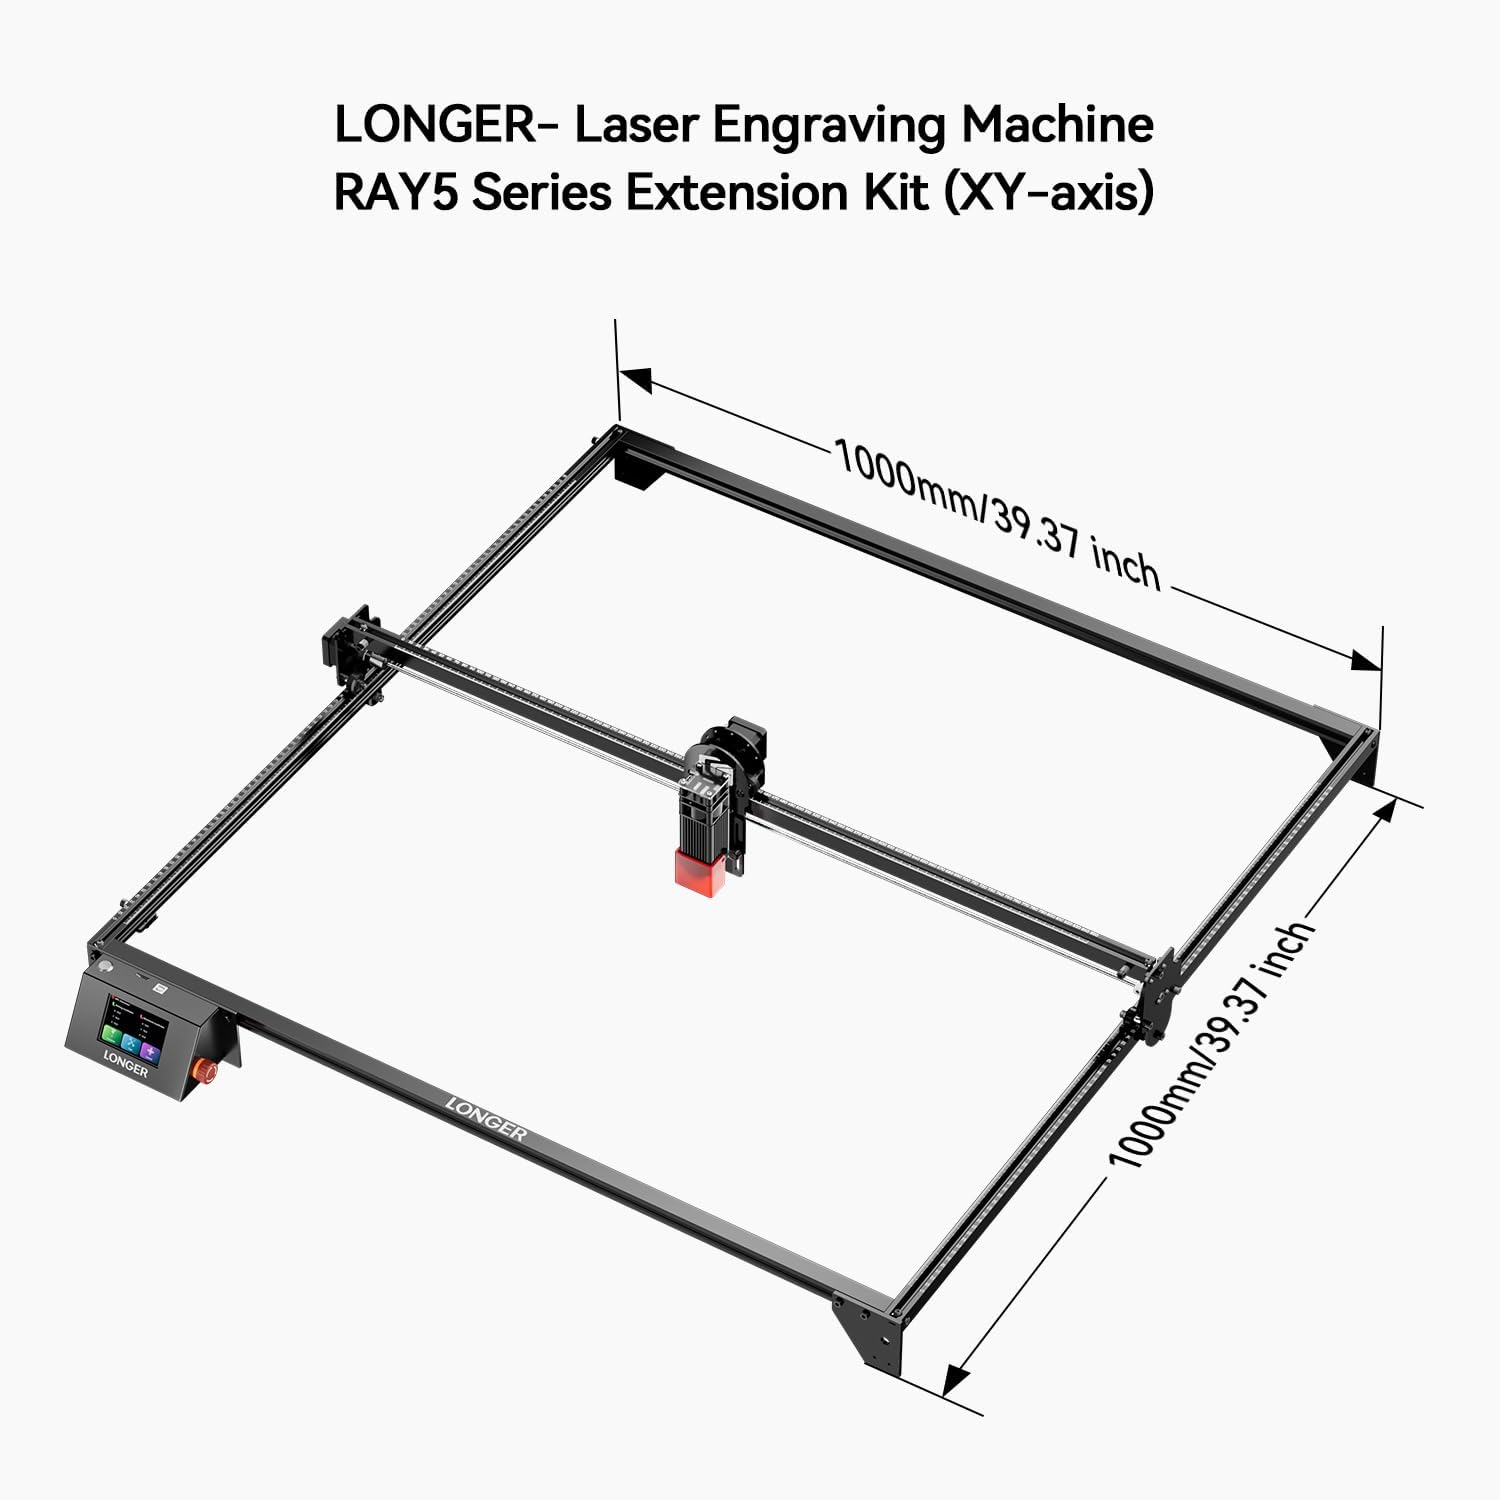
Image 8.1: A diagram illustrating the potential expanded dimensions of the Longer RAY5 series with the XY-axis extension kit, reaching up to 1000mm x 1000mm.
| RAY5 Model | Original Engraving Area | Expanded Engraving Area |
|---|---|---|
| RAY5 5W/10W | 400*400 mm² | 850*850 mm² |
| RAY5 20W (3-pin) | 375*375 mm² | 825*825 mm² |
| RAY5 20W (5-pin) | 400*365 mm² | 850*815 mm² |
- Dimensões do produto (expandidas): Approximately 42 x 14 x 3 inches (frame only)
- Peso do item: 8.43 pounds (kit components)
- Fabricante: Mais longo
- Número do modelo do item: 20240202
9. Garantia e Suporte
Longer is committed to providing quality products and customer support. For warranty information and technical assistance, please refer to the official Longer website ou entre em contato diretamente com o atendimento ao cliente.
9.1 Technical Support Contact
For product issues or technical inquiries, please contact Longer customer support:
- Telefone: +1 888-575-9099
- Operating Hours (EST, UTC-5):
- Mon-Fri: 9:00am-6:00pm
- Sun-Thu: 8:30pm-7:00am
Additional resources and FAQs may be available on the Longer Store on Amazon.


