1. Informações importantes de segurança
Please read this manual carefully before operating the appliance and retain it for future reference. Failure to follow these instructions may result in electric shock, fire, or serious injury.
- Certifique-se de que a fonte de alimentação corresponde à etiqueta de especificações da unidade.
- Não utilize o desumidificador se o cabo ou a ficha estiverem danificados.
- Sempre desconecte a unidade antes de limpá-la ou fazer manutenção.
- Não bloqueie a entrada ou saída de ar.
- Keep the unit on a stable, level surface to prevent water spillage.
- Este aparelho é somente para uso interno.
- Não utilize em áreas onde gases ou líquidos inflamáveis sejam armazenados.
- As crianças devem ser supervisionadas para garantir que não brinquem com o aparelho.
2. Produto acabadoview
The ARGO DRY NATURE 21 is a high-efficiency dehumidifier designed to reduce humidity levels in your living spaces. It features a sleek, slim design with a pure white finish and a silver top control panel.

Figura 2.1: Frente view of the ARGO DRY NATURE 21 Dehumidifier. This image shows the overall slim and elegant design of the unit in pure white.
2.1 Painel de controle
The control panel features soft-touch buttons and an LED display for easy operation. The air outlet flap is motorized for efficient air distribution.

Figura 2.2: Principal view of the control panel. It includes buttons for speed, timer, humidity settings, swing function, and power, along with an LED display.
2.2 Principais Características
- Capacidade de desumidificação: Up to 21 liters per 24 hours (at 32°C, 80% RH).
- Umidostato: High-precision humidistat with adjustable humidity settings (40% – 80%).
- Temporizador: 1-24 hour ON/OFF timer.
- Filtro de ar: Removable and washable air filter for improved air quality.
- Tanque de água: 3.8-liter capacity with a full tank alarm.
- Drenagem Contínua: Quick connection for continuous condensate drainage.
- Temperatura de operação: Functions effectively in low temperatures, from 5°C to 35°C.
- Descongelamento Automático: Integrated automatic defrost system.
- Função de memória: Automatic restart after power outage, retaining previous settings.
- Portabilidade: Equipped with multi-directional wheels and integrated handles for easy transport.
3. Configuração
3.1 Desembalagem
- Retire cuidadosamente o desumidificador da embalagem.
- Remova todos os materiais de embalagem e certifique-se de que nenhum componente esteja faltando ou danificado.
- Guarde a embalagem para armazenamento ou transporte futuros.
3.2 Posicionamento
- Coloque o desumidificador sobre uma superfície firme e nivelada.
- Certifique-se de que haja pelo menos 20 cm (8 polegadas) de espaço ao redor da unidade para uma circulação de ar adequada.
- Evite colocar o aparelho perto de fontes de calor ou sob luz solar direta.
- For optimal performance, position the unit in the center of the room or area requiring dehumidification.
3.3 Drenagem contínua (opcional)
For continuous operation without needing to empty the water tank, you can connect a drainage hose.
- Locate the continuous drainage outlet on the back or side of the unit.
- Remova a rolha de borracha (se houver).
- Connect a suitable drainage hose (not included) to the outlet. Ensure the connection is secure to prevent leaks.
- Direct the other end of the hose to a floor drain or a larger container, ensuring the hose is sloped downwards for gravity drainage.
4. Instruções de operação
4.1 Ligar/Desligar
- Conecte o cabo de alimentação a uma tomada elétrica aterrada.
- Pressione o PODER Botão no painel de controle para ligar ou desligar a unidade.
4.2 Definindo o nível de umidade desejado
- Pressione o Umidade button (often indicated by a water droplet icon or up/down arrows) to adjust the desired humidity level.
- The LED display will show the current humidity, then flash the set humidity. Use the Up e Abaixo arrows to select a target humidity between 40% and 80%.
- O aparelho funcionará até atingir o nível de umidade definido e, em seguida, ligará e desligará automaticamente para mantê-lo.
4.3 Ajuste da velocidade da ventoinha
- Pressione o VELOCIDADE button (often indicated by a fan icon) to cycle between two fan speeds: Low and High.
- Higher fan speed results in faster dehumidification.
4.4 Função do temporizador
- Pressione o CRONÔMETRO botão (geralmente indicado por um ícone de relógio).
- Use o Up e Abaixo arrows to set the desired operating time (1-24 hours) for automatic ON or OFF.
- If the unit is OFF, setting a timer will turn it ON after the set hours. If the unit is ON, setting a timer will turn it OFF after the set hours.
4.5 Função Swing
- Pressione o SWING button to activate the motorized air flap, which oscillates to distribute dehumidified air more evenly.
- Press again to stop the swing function at a desired angle.
4.6 Water Tank Full Alarm
When the 3.8-liter water tank is full, the unit will automatically stop operating, and an alarm or indicator light (e.g., "POWER FULL" or a water droplet icon) will illuminate on the control panel. Empty the tank as described in the Maintenance section.
5. Manutenção
A manutenção regular garante o desempenho ideal e prolonga a vida útil do seu desumidificador. Desligue sempre o aparelho da tomada antes de realizar qualquer manutenção.
5.1 Esvaziar o depósito de água
When the water tank is full, the unit will stop operating. The tank has a capacity of 3.8 liters.
- Retire cuidadosamente o reservatório de água pela parte frontal ou lateral do aparelho.
- Leve o tanque com cuidado até uma pia ou ralo.
- Esvazie a água coletada.
- Slide the empty tank back into the unit until it clicks into place. Ensure it is properly seated to resume operation.

Figura 5.1: Image showing the water tank being removed from the side of the dehumidifier for emptying.
5.2 Limpando o Filtro de Ar
The air filter should be cleaned regularly (e.g., every two weeks or as needed) to maintain efficiency and air quality.
- Localize o filtro de ar na parte traseira ou lateral da unidade.
- Gently remove the filter from its housing.
- Clean the filter using a vacuum cleaner to remove dust, or wash it with lukewarm water and a mild detergent.
- Rinse thoroughly and allow the filter to air dry completely before reinserting it. Do not expose to direct sunlight or high heat.
- Reinsert the dry filter into its housing.
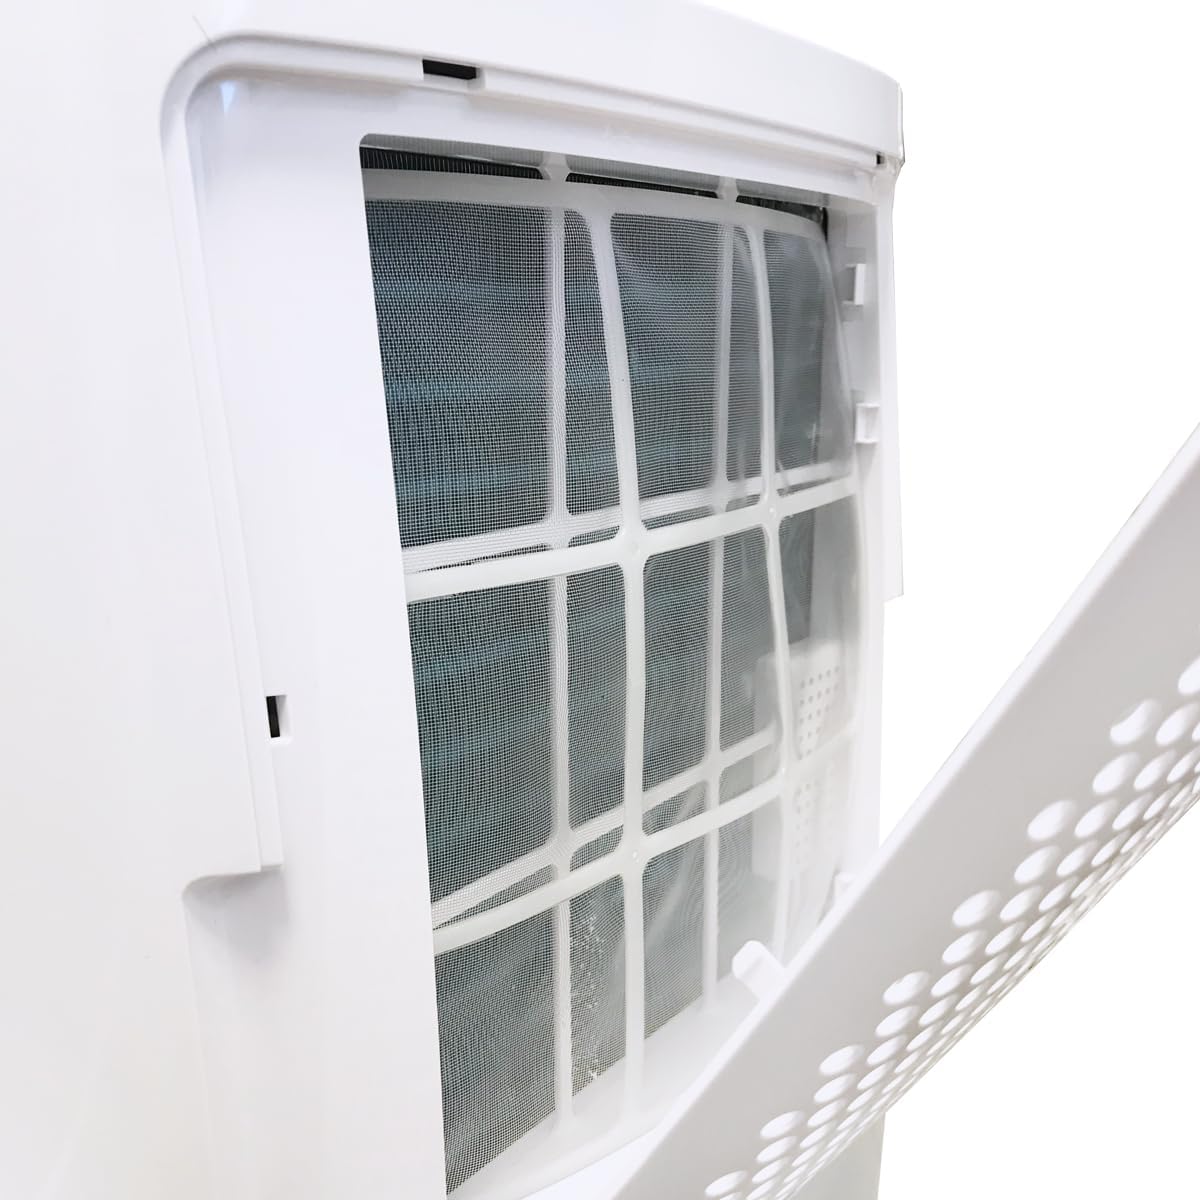
Figura 5.2: Fechar-se view of the removable air filter located on the side of the dehumidifier, shown partially open for access.
5.3 Limpeza do Exterior
- Limpe o exterior da unidade com um pano macio e úmidoamp pano.
- Não utilize produtos químicos agressivos, produtos de limpeza abrasivos ou solventes, pois estes podem danificar a superfície.
- Certifique-se de que não entre água nos componentes internos.
5.4 Armazenamento
- Se for armazenar o aparelho por um período prolongado, certifique-se de que o reservatório de água esteja vazio e limpo.
- Clean the air filter and allow it to dry.
- Cubra a unidade com um saco plástico para protegê-la da poeira.
- Store the dehumidifier in a cool, dry place.
6. Solução De Problemas
Antes de entrar em contato com o suporte ao cliente, consulte o guia de solução de problemas a seguir para problemas comuns.
| Problema | Possível causa | Solução |
|---|---|---|
| A unidade não liga. | Sem fonte de alimentação. O cabo de alimentação não está conectado corretamente. O reservatório de água está cheio ou não está encaixado corretamente. | Verifique a tomada elétrica. Certifique-se de que o cabo de alimentação esteja firmemente conectado. Esvazie o reservatório de água e insira-o novamente corretamente. |
| Sem coleta de água ou baixa desumidificação. | O filtro de ar está entupido. A temperatura ambiente está muito baixa (abaixo de 5°C). A configuração de umidade está muito alta. Portas/janelas estão abertas. O tamanho da unidade é muito pequeno para o quarto. | Limpe o filtro de ar. The unit may not operate efficiently below 5°C. Diminua a configuração de umidade desejada. Feche todas as portas e janelas. Considere o uso de várias unidades para espaços maiores. |
| A unidade é barulhenta. | A unidade não está em uma superfície nivelada. O filtro de ar está entupido. | Coloque a unidade em uma superfície plana e estável. Limpe o filtro de ar. |
| Vazamentos de água da unidade. | O reservatório de água não foi encaixado corretamente. Continuous drainage hose is loose or blocked. | Reinsert the water tank correctly. Check the continuous drainage hose connection and ensure it is not blocked. |
7. Especificações
Technical specifications for the ARGO DRY NATURE 21 Dehumidifier.
| Recurso | Detalhe |
|---|---|
| Marca | ARGO |
| Número do modelo | NATUREZA SECA 21 |
| Capacidade de desumidificação | 21 litros/24h (a 32°C, 80% UR) |
| Volume do tanque de água | 3.8 litros |
| Consumo de energia | 310 Watts |
| Área de piso recomendada | Até 24 metros quadrados |
| Faixa de temperatura operacional | 5°C a 35°C |
| Faixa de umidade ajustável | 40% - 80% |
| Número de velocidades | 2 |
| Dimensões (D x L x A) | 234 mm x 342 mm x 560 mm |
| Peso | 8 quilos |
| Características especiais | Automatic Defrost, Timer, Auto Restart, Continuous Drainage, Motorized Flap, Humidistat, Memory Function, Multidirectional Wheels, Transport Handles |
| Refrigerante | Natural refrigerant with zero impact on global warming |

Figura 7.1: Dimensional diagram of the ARGO DRY NATURE 21 Dehumidifier, showing height (560 mm), width (342 mm), and depth (234 mm).
8. Garantia e Suporte
This product comes with a standard manufacturer's warranty. Please refer to the warranty card included with your purchase for specific terms and conditions.
For technical assistance, troubleshooting beyond this manual, or to inquire about spare parts, please contact ARGO customer support. Contact information can typically be found on the manufacturer's website ou na embalagem do produto.


