Introdução
This manual provides detailed instructions for the setup, operation, and maintenance of your Sunbuck TAV-339BT Wireless Karaoke Bluetooth Power Amplifier System. This 2-channel stereo amplifier is designed for home audio and karaoke applications, featuring Bluetooth connectivity, USB/SD card playback, FM radio, and dual microphone inputs. Please read this manual thoroughly before using the product to ensure proper operation and to prevent damage.

Figura 1: Frente view of the Sunbuck TAV-339BT amplifier. This image displays the main unit with its various controls and inputs on the front panel, including the power switch, microphone inputs, volume knobs, and digital display.
Informações de segurança
- Fonte de energia: Conecte o amplifier only to the specified power supply (AC 110V or DC 12V 5A). Ensure the voltage matches the requirements before plugging in.
- Ventilação: Não obstrua as aberturas de ventilação. Garanta uma circulação de ar adequada ao redor do aparelho para evitar o superaquecimento.
- Água e Umidade: Não exponha o aparelho à chuva, umidade ou gotejamento/respingos de líquidos. Não coloque objetos contendo líquidos, como vasos, sobre o aparelho.
- Fontes de calor: Mantenha a unidade longe de fontes de calor, como radiadores, aquecedores, fogões ou outros aparelhos (incluindo amplificadores) que produzem calor.
- Limpeza: Desligue o aparelho da tomada antes de limpá-lo. Use um pano seco para a limpeza.
- Manutenção: Não tente consertar este produto sozinho. Encaminhe todos os serviços de manutenção para pessoal de serviço qualificado.
- Crianças: Mantenha o aparelho e seus acessórios fora do alcance de crianças.
Conteúdo da embalagem
Por favor, verifique se a embalagem contém os seguintes itens:
- 1 x Sunbuck TAV-339BT Amplificador (110V)
- 1 x Controle Remoto
- 1 x Manual do Usuário
Características do produto
- Compact and powerful 2-channel stereo ampsistema de filtragem.
- Integrated Bluetooth for wireless audio streaming from compatible devices (smartphones, tablets, PCs).
- Supports USB flash drive and SD memory card playback.
- Sintonizador de rádio FM integrado.
- Dual 1/4-inch microphone input jacks for karaoke functions.
- RCA (L/R) audio input for external devices.
- Front panel controls for master volume, bass, treble, microphone volume, echo, and microphone bass/treble.
- Traditional VU meter display.
- Inclui um controle remoto para facilitar o uso.
Painel frontal acabadoview

Figura 2: Detalhado view do amplifier's front panel, highlighting the various knobs, buttons, and input ports.
- Chave POWER: Transforma o amplifier ligado ou desligado.
- ECHO Control: Ajusta o efeito de eco dos microfones.
- Entrada MIC1/MIC2: Conectores de 1/4 de polegada para conectar microfones.
- M.BASS/M.TREBLE: Adjusts bass and treble for microphone input.
- MIC/VOL: Adjusts the volume level for microphones.
- MEDIDOR DE VU: Exibe o nível de saída de áudio.
- USB/SD Card Slot: For connecting USB flash drives or SD memory cards.
- Tela digital: Exibe o modo atual, o número da faixa ou a frequência FM.
- Control Buttons (SCAN, VOL-, VOL+, MODE): For navigating USB/SD/FM functions.
- BAIXOS/AGUDOS: Adjusts the main audio bass and treble levels.
- VOLUME: Master volume control for all audio sources.
- Seletor de ENTRADA: Cycles through input sources (CD/VCD, LINE, MP3/FM, Bluetooth).
- INPUT LED Indicators: Lights up to show the currently selected input source.
Painel Traseiro Sobreview

Figura 3: Traseira view do amplifier, showing the various input and output terminals for connecting speakers and audio sources.
- INPUT (CD/VCD, LINE): RCA (L/R) audio input jacks for connecting external audio sources like CD/DVD players, TVs, or other line-level devices.
- SISTEMA DE AUTO-FALANTES: Spring clip terminals for connecting passive speakers. Ensure correct polarity (+ to + and - to -).
- POWER DC 12V INPUT: DC power input for 12V power supply (e.g., car battery, not included).
- AC 110V 60Hz: AC power input for standard household power.
- Antena FM: Connector for the included FM antenna.
Sobre o controle remotoview
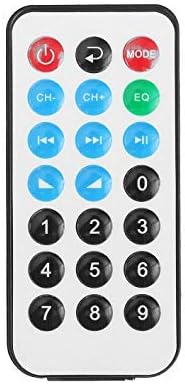
Figura 4: Disposição dos botões do controle remoto.
O controle remoto permite uma operação conveniente do amplifier's functions from a distance. It typically includes buttons for power, mode selection, volume adjustment, track navigation (for USB/SD), and FM radio controls.
Instalação de bateria para controle remoto

Figure 5: Step-by-step guide for installing the CR2025 lithium battery into the remote control.
The remote control requires a CR2025 lithium battery (3V). To install or replace the battery:
- Localize o compartimento da bateria na parte traseira do controle remoto.
- Push the small tab to release the battery tray.
- Deslize para fora a bandeja da bateria.
- Insira a bateria CR2025 com o lado positivo (+) voltado para cima.
- Slide the battery tray back into the remote until it clicks into place.
Configurar
1. Conexão do alto-falante
Connect your passive speakers to the "SPEAKER SYSTEM" terminals on the rear panel. Ensure that the positive (+) terminal of the amplifier connects to the positive (+) terminal of the speaker, and the negative (-) terminal of the amplifier connects to the negative (-) terminal of the speaker. Incorrect polarity can affect sound quality.
2. Conexão de entrada de áudio
- RCA Inputs (CD/VCD, LINE): Use RCA cables to connect external audio sources (e.g., CD player, DVD player, TV audio output) to the corresponding "INPUT" jacks on the rear panel.
- Cartão USB / SD: Insert a USB flash drive or SD memory card into the respective slot on the front panel.
- Bluetooth: No physical connection is needed for Bluetooth. Refer to the "Operating Instructions" section for pairing.
3. Conexão do microfone
Connect up to two 1/4-inch microphones to the "MIC1" and "MIC2" input jacks on the front panel for karaoke use.
4. Conexão da antena FM
Connect the included FM antenna to the FM antenna terminal on the rear panel for improved radio reception.
5. Conexão de energia
Connect the power cord to the AC 110V 60Hz input on the rear panel and then plug it into a standard wall outlet. Alternatively, for DC operation, connect a 12V DC power source (not included) to the "POWER DC 12V INPUT" terminals.
Instruções de operação
1. Ligar/desligar
Press the "POWER" switch on the front panel to turn the amplifier on or off. The digital display will illuminate when the unit is powered on.
2. Seleção da fonte
Press the "INPUT" button on the front panel or the "MODE" button on the remote control to cycle through available input sources: CD/VCD, LINE, MP3/FM, and Bluetooth. The corresponding LED indicator on the front panel will light up.
3. Operação Bluetooth
- Select "Bluetooth" as the input source using the "INPUT" or "MODE" button. The digital display will show "BLUE" or a similar indicator.
- Ative o Bluetooth no seu dispositivo móvel (smartphone, tablet, PC).
- Procurar available Bluetooth devices and select "TAV-339BT" or "Sunbuck" from the list.
- Após o emparelhamento, você pode transmitir áudio sem fio do seu dispositivo para o ampmais vivo.
4. Reprodução via USB/Cartão SD
- Insira um pen drive ou cartão SD contendo arquivos de áudio MP3. files into the respective slot on the front panel.
- Select "MP3/FM" as the input source. The ampO amplificador detectará e começará a reproduzir áudio automaticamente. files.
- Use the "SCAN", "VOL-", "VOL+" buttons on the front panel or the corresponding buttons on the remote control to navigate tracks (play/pause, next/previous).
5. Operação de rádio FM
- Ensure the FM antenna is connected.
- Select "MP3/FM" as the input source.
- Press the "SCAN" button to automatically scan and store available FM radio stations.
- Use the "VOL-" and "VOL+" buttons (or remote control) to manually tune or select stored stations.
6. Função Karaokê
- Connect microphones to the "MIC1" and "MIC2" jacks.
- Adjust the "MIC/VOL" knob to control the microphone volume.
- Use the "ECHO" knob to add an echo effect to the vocals.
- Adjust "M.BASS" and "M.TREBLE" to fine-tune the microphone's tone.
7. Controle de Volume e Tom
- VOLUME: Use the large "VOLUME" knob on the front panel to adjust the overall output volume.
- BAIXOS/AGUDOS: Use the "BASS" and "TREBLE" knobs to adjust the low and high frequencies of the main audio output.
Manutenção
- Limpeza: Disconnect the power before cleaning. Use a soft, dry cloth to wipe the exterior of the unit. Do not use liquid cleaners or aerosol cleaners.
- Ventilação: Ensure that the ventilation openings are clear of dust and debris to maintain proper cooling.
- Armazenar: Se for armazenar a unidade por um período prolongado, desconecte-a da fonte de alimentação e guarde-a em local fresco e seco.
Solução de problemas
| Problema | Possível causa | Solução |
|---|---|---|
| Sem energia | Power cord not connected; Power switch off; No power from outlet. | Ensure power cord is securely connected. Turn the POWER switch on. Check the power outlet with another device. |
| Nenhuma saída de som | Incorrect input source selected; Speaker wires loose or incorrectly connected; Volume too low; Mute activated (if applicable). | Select the correct input source. Check speaker connections and polarity. Increase the VOLUME. Ensure no mute function is active. |
| Bluetooth não conecta | Amplifier not in Bluetooth mode; Device too far; Device already connected to another amplifier; Bluetooth on device is off. | Select Bluetooth input on the amplifier. Move device closer. Disconnect from other devices. Enable Bluetooth on your device. |
| USB/cartão SD não funciona | Incorrect input source; Files not in supported format (MP3); USB/SD card corrupted or empty. | Select MP3/FM input. Ensure files are MP3 format. Try another USB/SD card. |
| Controle remoto não funciona | Battery depleted or incorrectly installed; Obstruction between remote and ampAmplificador; Sensor remoto bloqueado. | Replace battery (CR2025) and ensure correct polarity. Remove any obstructions. Ensure the remote sensor on the ampO amplificador está limpo. |
Especificações
| Recurso | Detalhe |
|---|---|
| Modelo | TAV-339BT |
| Impedância Nominal | 4 a 8 Ohms |
| Saída de potência RMS | 200W + 200W (Recommended for speaker boxes with speakers less than 8") |
| Peak Music Power Output (P.M.P.O) | 300W + 300W (Total 600W) |
| Fonte de energia | AC: 110V 60Hz or DC: 12V 5A |
| Canais | 2 canais |
| Entrada de áudio | Multi-channel signal input (RCA L/R), USB, SD, Bluetooth |
| Entrada de microfone | Dual 1/4-inch Jack |
| Tecnologia de Conectividade | Bluetooth, USB, RCA |
| Tipo sem fio | Bluetooth, Infrared (for remote) |
| Dimensões do produto (C x L x A) | 25.4 x 20.32 x 7.01 cm (10 x 8 x 2.76 polegadas) |
| Peso do produto | 2.72 kg (6 libras) |
| Dispositivos compatíveis | Headphones, Laptops, Smartphones |
Garantia e Suporte
Para informações sobre garantia ou suporte técnico, consulte a documentação fornecida no momento da compra ou entre em contato com o revendedor. Guarde o comprovante de compra para eventuais solicitações de garantia.