Introdução
This manual provides essential instructions for the safe and efficient operation, installation, and maintenance of your Sharp R-25AM microwave oven. Please read this manual thoroughly before using the appliance and retain it for future reference. Proper use will ensure optimal performance and extend the lifespan of your microwave oven.
Instruções importantes de segurança
Ao usar aparelhos elétricos, precauções básicas de segurança devem ser seguidas, incluindo as seguintes:
- Leia todas as instruções antes de usar o aparelho.
- Não tente utilizar este forno com a porta aberta, pois isso pode resultar em exposição prejudicial à energia das micro-ondas.
- Não coloque nenhum objeto entre a parte frontal do forno e a porta, nem permita que resíduos de sujeira ou produtos de limpeza se acumulem nas superfícies de vedação.
- Não utilize o forno se estiver danificado. É particularmente importante que a porta do forno feche corretamente e que não haja danos na porta, nas dobradiças ou nas vedações.
- Somente pessoal de serviço qualificado deve ajustar ou reparar este aparelho.
- Certifique-se de que o aparelho esteja devidamente aterrado.
- Não aqueça líquidos ou outros alimentos em recipientes fechados, pois podem explodir.
- Utilize sempre utensílios de cozinha próprios para micro-ondas.
Produto acimaview
Familiarize yourself with the components of your Sharp R-25AM microwave oven.
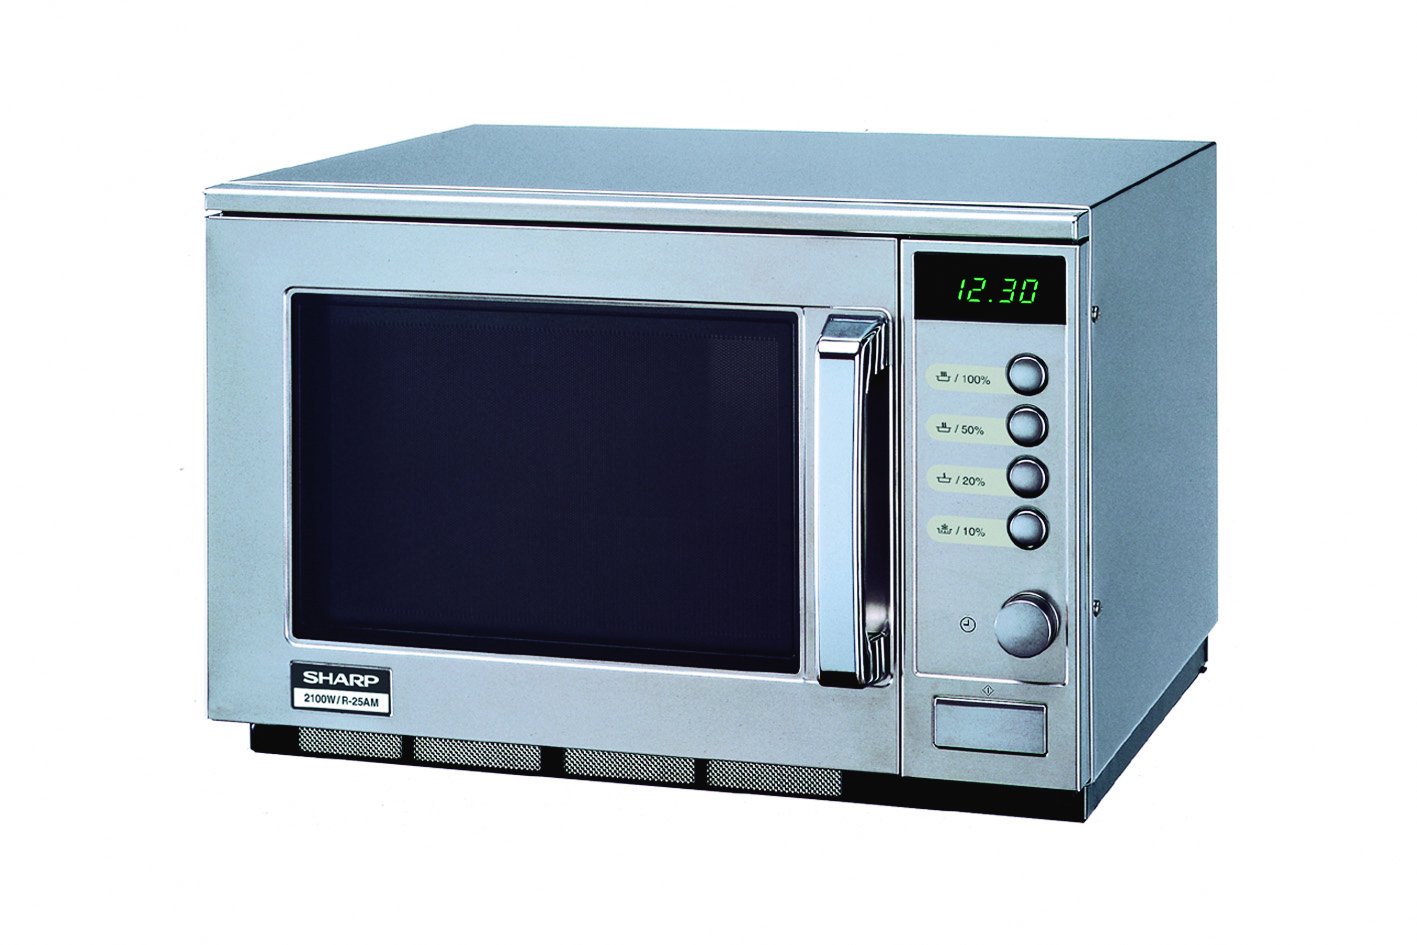
This image displays the front of the Sharp R-25AM microwave oven. It features a stainless steel finish, a dark glass door with a chrome handle, and a control panel on the right. The control panel includes a digital time display (showing '12.30'), four power level buttons (100%, 50%, 20%, 10%), and a rotary dial for setting time or weight. The model number '2100W/R-25AM' is visible on the lower left of the unit.
- Cavidade do forno: O espaço interior onde os alimentos são colocados para cozinhar.
- Plataforma giratória de vidro: Gira os alimentos para um cozimento uniforme.
- Montagem da porta: Inclui a porta, a fechadura e viewjanela de abertura.
- Painel de controle: Contains the digital display, power level buttons, and rotary dial for setting cooking time and functions.
- Maçaneta: Used to open and close the oven door.
Configuração e instalação
- Desembalagem: Remove all packaging materials from inside and outside the oven. Check for any damage. Do not remove the waveguide cover.
- Colocação:
- Coloque o forno sobre uma superfície plana e estável, suficientemente resistente para suportar o forno e os alimentos que serão preparados.
- Ensure adequate ventilation. Leave a minimum of 10 cm (4 inches) clearance at the rear, 20 cm (8 inches) at the top, and 5 cm (2 inches) on both sides.
- Não bloqueie nenhuma abertura de ventilação.
- Mantenha o forno longe de fontes de calor e campos magnéticos fortes.
- Conexão elétrica:
- Plug the power cord into a properly grounded electrical outlet (230V, 50Hz, 16A).
- Não utilize extensões ou adaptadores.
Instruções de operação
Ajustando o relógio
- Ensure the oven is plugged in. The display will show '0:00' or the current time if previously set.
- Pressione o Relógio button (often indicated by a clock icon next to the rotary dial).
- Turn the rotary dial to set the hour. Press the Relógio botão novamente.
- Turn the rotary dial to set the minutes. Press the Relógio Pressione o botão mais uma vez para confirmar.
Cozinhar no Micro-ondas
- Local de alimentação: Put food in a microwave-safe container on the glass turntable. Close the oven door securely.
- Selecione o nível de potência: Press one of the power level buttons (100%, 50%, 20%, 10%) to choose the desired cooking intensity. For example, press '100%' for full power (2100W).
- Definir tempo de cozimento: Turn the rotary dial to set the desired cooking time. The display will show the time counting down.
- Comece a Cozinhar: The oven will start automatically after setting the time. Some models may require pressing a separate 'Start' button.
- Fim da receita: O forno emitirá um sinal sonoro quando o cozimento estiver completo. Abra a porta e retire o alimento com cuidado.
Descongelamento
A função de descongelamento permite descongelar alimentos congelados de forma eficiente.
- Coloque o alimento congelado no prato giratório.
- Pressione o Descongelar button (if available, or use a lower power setting like 20% or 50%).
- Turn the rotary dial to set the defrost time or weight, depending on the model's features.
- The oven will begin defrosting. It may be necessary to turn the food over halfway through the defrosting process for even thawing.
Manutenção e Limpeza
Regular cleaning and maintenance will ensure your microwave oven operates effectively and safely.
- Limpeza do interior:
- Após cada utilização, limpe o interior com um pano úmido.amp pano para remover respingos de comida.
- For stubborn stains, place a bowl of water with lemon juice inside and microwave for 2-3 minutes. The steam will loosen the grime, making it easier to wipe clean.
- Não utilize produtos de limpeza abrasivos ou palhas de aço.
- Limpeza do Exterior:
- Limpe as superfícies exteriores com um pano macio, damp pano.
- Para superfícies de aço inoxidável, utilize um produto de limpeza específico para aço inoxidável a fim de manter o acabamento.
- Limpeza do prato giratório: The glass turntable and roller ring can be removed and washed in warm, soapy water or in a dishwasher. Ensure they are completely dry before placing them back in the oven.
- Vedações de porta: Limpe regularmente as borrachas de vedação das portas e as partes adjacentes com um produto de limpeza.amp pano para garantir uma vedação adequada e evitar vazamento de micro-ondas.
Solução de problemas
Antes de entrar em contato com o serviço de atendimento ao cliente, consulte os problemas e soluções mais comuns a seguir:
| Problema | Possível causa | Solução |
|---|---|---|
| O forno não liga. | Power cord not plugged in; door not closed properly; fuse blown or circuit breaker tripped. | Ensure plug is firmly in outlet; close door securely; check household fuse or reset circuit breaker. |
| A comida não está esquentando. | Door not closed properly; incorrect cooking time or power level set. | Ensure door is closed; verify cooking time and power level settings. |
| Luz não funciona. | A lâmpada precisa ser substituída. | Contate pessoal de serviço qualificado para a substituição da lâmpada. |
| A plataforma giratória não está girando. | Turntable not properly placed; debris under turntable. | Ensure turntable and roller ring are correctly positioned; clean any debris. |
Especificações
Key technical specifications for the Sharp R-25AM microwave oven:
- Modelo: R-25AM
- Marca: Afiado
- Capacidade: 20 litros
- Potência de saída: 2100 Watts
- Volumetage: 230 Volts
- Freqüência: 50 Hz
- Tipo de instalação: Bancada
- Material: Aço inoxidável
- Dimensões do produto (C x L x A): 470 x 510 x 335 mm (aprox. 18.5 x 20.1 x 13.2 polegadas)
- Peso: 33.12 kg (aprox. 73 lbs)
- Tipo de controle: Botão, seletor rotativo
Garantia e Suporte
For warranty information, please refer to the warranty card included with your purchase or visit the official Sharp website. For technical support or service inquiries, please contact Sharp customer service directly. Keep your purchase receipt as proof of purchase for warranty claims.
Nota: De acordo com as informações do produto, a disponibilidade de peças de reposição está atualmente indisponível.


