![]()

Instruction Manual
V18C Prosharp Advant Edge
![]() PROSHARP BAUER ADVANTEDGE Machine Manual
PROSHARP BAUER ADVANTEDGE Machine Manual
All users must read and understand the safety information and instructions in this document before using the PROSHARP BAUER ADVANTEDGE Machine. Failure to follow these warnings and instructions can result in serious injury or death, and may damage the machine, thereby voiding warranty.
Save this document for future reference, and provide it to other users and subsequent owners.
Upon set up scan the QR code to register your device and discover your companion app (available at APP Store) for further assistance.
 www.bauer.com/pages/prosharp-bauer-advantedge
www.bauer.com/prosharp
INTENDED USE
PROSHARP BAUER ADVANTEDGE Machine is a skate sharpening machine and should only be used for sharpening ice hockey blades and skates.
SAFETY PRECAUTIONS
A WARNING Read all safety warnings, instructions, illustrations and specifications provided with this machine.
Failure to follow all instructions listed below may result in electric shock, fire and/or serious injury.
Save all warnings and instructions for future reference.
- Work area safety
a. Keep work area clean and well lit. Cluttered or dark areas invite accidents.
b. Do not operate this machine in explosive atmospheres, such as in the presence of flammable liquids, gases or dust. Machines create sparks which may ignite the dust or fumes.
c. Keep children and bystanders away while operating the machine. Distractions can cause you to lose control. - Electrical safety
a. Machine plugs must match the outlet. Never modify the plug in any way. Do not use any adapter plugs with earthed (grounded) Machiness. Unmodified plugs and matching outlets will reduce risk of electric shock.
b, Avoid body contact with earthed or grounded surfaces, such as pipes, radiators, ranges and refrigerators.
There is an increased risk of electric shock if your body is earthed or grounded.
c. Do not expose the machine to rain or wet conditions. Water entering a machine will increase the risk of electric shock.
d. Do not abuse the cord. Never use the cord for carrying, pulling or unplugging the machine. Keep cord away from heat, oil, sharp edges or moving parts. Damaged or entangled cords increase the risk of electric shock.
e. When operating the machine outdoors, use an extension cord suitable for outdoor use. Use of a cord suitable for outdoor use reduces the risk of electric shock.
f. If operating the machine in a damp location is unavoidable, use a RESIDUAL CURRENT DEVICE (RCD) protected supply, Use of an RCD reduces the risk of electrical shock. - Machine use and care
a. Do not force the machine. Use the correct machine for your application. The correct machine will do the job better and safer at the rate for which it was designed.
b. Do not use the machine if the switch does not turn it on and off. Any machine that cannot be controlled with the switch is dangerous and must be repaired.
c. Disconnect the plug from the power source from the machine before making any adjustments, changing accessories, or storing machines. Such preventive safety measures reduce the risk of starting the machine accidentally.
d. Store idle machines out of the reach of children and do not allow persons unfamiliar with the machine or these instructions to operate the machine. Power tools are dangerous in the hands of untrained users.
e. Maintain machines and accessories. Check for misalignment or binding of moving parts, breakage of parts and any other condition that may affect the machine’s operation. If damaged, have the machine repaired before use. Many ccidents are caused by poorly maintained machines.
f. Keep cutting tools sharp and clean. Properly maintained cutting tools with sharp cutting edges are less likely to bind and are easier to control.
g. Use the machine, accessories and tool bits etc. in accordance with these instructions, taking into account the working conditions and the work to be performed. Use of the machine for operations different from those intended could result in a hazardous situation.
h. Keep handles and grasping surfaces dry, clean and free from oil and grease. Slippery handles and grasping surfaces do not allow for safe handling and control of the tool in unexpected situations.
i. If devices are provided for the connection of dust extraction and collection facilities, ensure these are connected and properly used. Use of dust collection can reduce dust-related hazards.
j. The rated speed of the accessory must be at least equal to the maximum speed marked on the machine. Accessories running faster than their rated speed can break and fly apart.
k. Never grind on the sides of a grinding wheel. Grinding on the side can cause the wheel to break and fly apart.
I. Do not use a damaged accessory. Before each use, inspect the accessory such as abrasive wheels for chips and cracks. After inspecting and installing an accessory, position yourself and bystander away from the plane of the rotating accessory while running the machine. - Service
a. Have your machine serviced by a qualified repair person using only identical replacement parts. This will ensure that the safety of the machine is maintained. - Personal safety
a. Stay alert, watch what you are doing and use common sense when operating a machine. Do not use a machine while you are tired or under the influence of drugs, alcohol or medication. A moment of inattention while operating power tools may result in serious personal injury.
b. Use personal protective equipment. Always wear eye protection. Protective equipment such as a dust mask, non-skid safety shoes, hard hat or hearing protection used for appropriate conditions will reduce personal injuries.
c. Prevent unintentional starting. Ensure the switch is in the off-position before connecting to power source, picking up or carrying the tool. Carrying machines with your finger on the switch or energizing machines that have the switch on invites accidents.
d. Remove any adjusting key or wrench before turning the machine on. A wrench or a key left attached to a rotating part of the machine may result in personal injury.
e. Do not overreach. Keep proper footing and balance at all times. This enables better control of the machine in unexpected situations.
f. Dress properly. Do not wear loose clothing or jewellery. Keep your hair and clothing away from moving parts. Loose clothes, jewellery or long hair can be caught in moving parts.
g. Do not let familiarity gained from frequent use of tools allow you to become complacent and ignore tool safety principles. A careless action can cause severe injury within a fraction of a second.
![]() THE FRONT DOOR CAN ONLY BE OPENED USING HMI TOUCH SCREEN
THE FRONT DOOR CAN ONLY BE OPENED USING HMI TOUCH SCREEN
![]() WARNING!
WARNING!
KEEP FINGERS, HAIR AND CLOTHING AWAY FROM CLAMPING AREA AND GRINDING WHEEL AT ALL TIMES.
INTRODUCING YOUR PROSHARP BAUER ADVANTEDGE PARTS
 |
1 X PROSHARP BAUER ADVANTEDGE MACHINE |
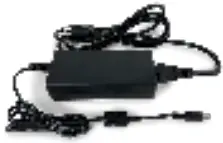 |
1 X POWER CORD |
 |
1 X INSTRUCTION MANUAL |
 |
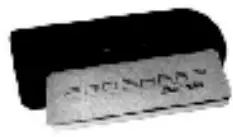
1 X MANUAL ADJUSTMENT TOOL |
 |
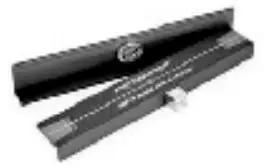
1 x 2mm HEX WRENCH |

INSTALLATION INSTRUCTIONS
- Place the machine on a level surface.
- The power cord is in the accessories box that is included with the machine.
- Protective film on the HMI touch screen can be removed.
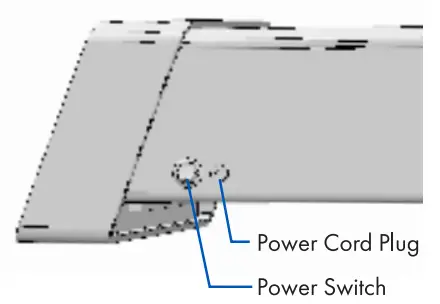
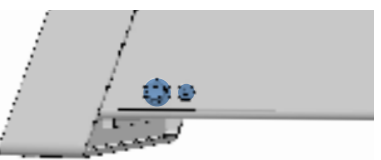
- Plug in the power cord and turn on the machine by flipping the power switch located at the back of the machine beside the plug. The machine will power on.
- Follow the prompts on the HMI touch screen to get started. The screen will guide you to remove the internal protection packaging.
HMI TOUCH SCREEN

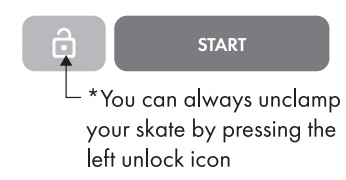
After pressing “CLAMP”, the buttons will change to “START”. To unclamp the skate, press the gray unlock icon.
GRINDING WHEELS AND WHEEL LIFE
All PROSHARP BAUER ADVANTEDGE grinding wheels are sold separately. Change the wheel according to the instructions. The wheel type (hollow) and wheel life is monitored on the HMI touch screen. From 10% and below, the machine will notify for wheel replacement. When the wheel life arrives at 0%, it cannot be used anymore to sharpen your skate. Replacement could also be required when it is no longer taking away material from the steel and/or giving an unsatisfying result. Only PROSHARP BAUER ADVANTEDGE accessories will work on the machine. Non-PROSHARP BAUER components are not compatible. Attempting to use non-compatible accessories will void warranty.
INSTALLING AND CHANGING A PROSHARP BAUER GRINDING WHEEL
![]() WARNING! After sharpening, grinding wheel are hot to the touch. Allow to cool off before touching or wear protective gloves
WARNING! After sharpening, grinding wheel are hot to the touch. Allow to cool off before touching or wear protective gloves
- Open the front door of the machine using touch screen. WARNING! Leaving the machine plugged in presents a risk of unexpected startup.

- Turn off the power switch and unplug the machine.
- Unscrew the grinding wheel lock (counter- clockwise} while holding the grinding wheel in place. Wheel is snug, pull off carefully without excessive force while rocking the grinding wheel off the spindle.
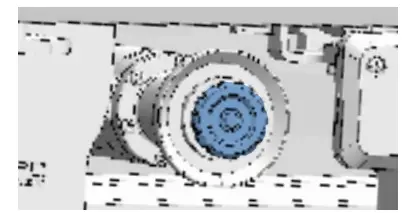
- Replace with a new grinding wheel, set in place. Do not push on with force, just place on the spindle and turn wheel lock clockwise while holding grinding wheel until snug.
- Close front door, plug machine back in and turn power back on. The motor packe age will now return to its home position.
 Scan the QR code to get a further step-by-step guide or consult your Prosharp app.

http://bauer.com/pages/prosharp-bauer-advantedge
HOW TO SHARPEN YOUR SKATE BLADE
Using the HMI Touch screen, select either “Guest/Player Blade”, “Guest/Goalie Blade” or any user that was previously saved (see Create User Information section).
- Put the skate in the machine with the heel towards the HMI touch screen. WARNING! Pinch hazard! Be sure nothing but the skate blade is in the slot when clamping. Press “CLAMP” on the HMI touch screen and wait until the motor has stopped.

- Select the number of passes using the +/- symbols on the HMI touch screen. You may sharpen up to 10 cycles at a time-depending on your need.
A. Average is 4 cycles.
B. First time skates or skates with bad nicks OR changing hollow depth could require up to 10 cycles.
- Press the “START” button on the HMI touch screen. WARNING! Entanglement hazard! Check that no loose items are in or near the skate slot (for example, laces, clothing, jewelry, or hair). Motor package will do a ‘dry pass’ to determine the length and height of your blade, protecting your profile with specific entry and exit points
- After skate is done sharpening, machine LED lights will turn green and HMI touch screen. will indicate, “SHARPENING COMPLETE”. Skate will unclamp automatically.
- Press “CONTINUE” on HMI touch screen to go back to Home Screen.
 WARNING! Skate is sharp! Use caution when handling. Protective gloves are recommended for steps 6 & 7 below.
 - Deburr the skate safely with a PROSHARP hone (not included) by pressing the honing stone against the face of the skate blade. With light pressure, press down on the lower side of the stone and slowly run the stone back and forth along the edge of the blade for 2-4 full passes. Repeat on the opposite side. ALERT- When deburring coated steel, make sure to only use the X-5 or X-3 Combi Hone on the porcelain side or Gummi Hone (not included) to ensure you do not remove or damage the coating. Visit www.bauer.com/prosharp to learn more.
- Check level using a PROSHARP blade angle tester (not included).
MACHINE CALIBRATION
WARNING! Turn off and unplug machine before calibration to prevent unexpected startup. When checking the blade level with the PROSHARP blade angle tester, if it is off-center, your machine may be out of calibration. First try running more cycles as your skate blade may have been un level to begin with. If the problem persists, adjust the manual wheel calibration nut accordingly to find the center of the blade again using the manual adjustment tool (shown on page 5) provided with purchase. Scan the QR code to get a further step-by-step guide or consult your PROSHARP App.
 http://bauer.com/pages/prosharp-bauer-advantedge
HOW TO STORE A USER PROFILE
- To create a new user, go to the user menu by selecting the “USERS” button at the bottom left of the touch screen.

- Select “Create new user” at the top of the menu.

- Input a name then select your preferences for wheel hollow, number of cycles and the type of blade (player or goalie)
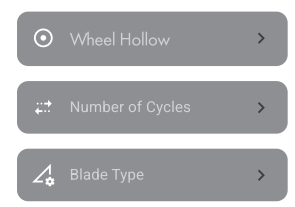
- Make sure you select “SAVE” at the bottom of the user preferences menu.
CLEANING AND EMPTYING THE DUST TRAY
WARNING! Clean the machine according to these instructions to reduce the risk of fire. The machine will regularly notify you for a cleaning routine every 10, 30 or 50 pairs of skates you sharpened. This reminder and the frequency can be managed in “Cleaning Schedule” menu inside the “Settings” menu. You can also start the cleaning procedure manually by selecting the “Start Cleaning” button inside the “Cleaning Schedule” menu, then follow the step-by-step instructions on the screen. Machine should be cleaned out regularly to maintain optimum performance. Do not use any solvents or chemical products in and around the machine. When starting the cleaning procedure
- The front door will automatically open after starting the procedure. Note that the grinding wheel will stay on the right side (home) position during the cleaning process.
- Remove the internal dust tray carefully by disengaging the 2 clips. Dispose all dust on this tray.
- Use a vacuum to thoroughly vacuum at the top, sides and around the edges inside the machine.
- Replace the tray and secure it with the front clips.
- Close the door
Please note, excessive dust can and may void the warranty. Not cleaning the machine properly can lead to issues and can cause fire. Please clean machine when prompted to maintain warranty. Turning cleaning prompts off also voids warranty. Additionally, a vacuum port is built on the left side of the machine to connect a 1/4 (32mm) vacuum hose. Remove the side cover to access the vacuum port. This will further reduce the accumulation of dust inside your machine but it does not replace the need for a proper cleaning routine like described above.
SHARPENING AND STEEL INFORMATION
- For new steel PROSHARP BAUER recommends 3 cycles with a FLAT Hollow Wheel followed by 4 cycles with your Hollow Wheel of choice. All grinding wheels are sold separately.
- FLAT Grinding Wheel: Whether prepping new steel, or refreshing damaged edges, our flat grinding wheel will reset your blade so you can build your preferred hollow.
- For used steel PROSHARP BAUER recommends 3-4 cycles with a your Hollow Wheel of choice.
- For player steel, the PROSHARP BAUER ADVANTEDGE is compatible for Size 6 Youth Steel up to Size 15 Senior Steel.
- For goalie steel, the PROSHARP BAUER ADVANTEDGE is compatible for Size 10 Youth Steel up to Size 12 Senior Steel.
- Please use the CL (Center Line) markings on the skate slot to center your steel for best results.
- To sharpen the blade only without the skate, please use the single blade holder sold separately.
Blade compatibility:

BLUETOOTH® AND Wi-Fi
The PROSHARP BAUER ADVANTEDGE machine is Wi-Fi & Bluetooth® compatible. Please read through the next section to understand capabilities and set up.
Please note, only broadcast Wi-Fi networks will appear when searching for Wi-Fi. Hidden networks will not be able to be added to your machine.
To manage your Bluetooth® and Wi-Fi settings access the “SETTINGS” menu using the bottom right button on the HMI touch screen.
The machine has the capability to update its firmware via Wi-Fi. To check if your machine is running on the latest firmware version, or to proceed with an update, make sure your machine is connected to Wi-Fi. Proceed to the “Software” menu inside the “SETTINGS” main menu to determine current machine status.
Upon set up scan the QR code to register your device and discover your companion phone APP (available in APP Store) for further assistance.
 http://bauer.com/pages/prosharp-bauer-advantedge
Upon the launch of the PROSHARP BAUER ADVANTEDGE, only iOS devices will be supported with the companion APP and Bluetooth® functionality for the PROSHARP BAUER ADVANTEDGE.
TECHNICAL DATA
- Voltage: 24V
- Power: 96W
- Weight: 25.6 lb/11.6KG
- Noise Level: ≤85dB
- Width: 12.4in/315mm
- Length: 30 in/762mm
- Height: 6.85 in/174mm
LIMITED WARRANTY
Any purchase of a PROSHARP BAUER ADVANTEDGE Machine is covered under the associated product warranty posted at www.bauer.com. Bauer Hockey may at any time, and in its sole discretion, modify any of the terms and conditions contained in the warranty policy.
Bauer Hockey represents and warrants to the end user that, under normal use and provided that you have followed our reasonable care and maintenance instructions, your PROSHARP BAUER ADVANTEDGE machine will be free from defects in materials and workmanship for a period of one (1) year from the date of consumer receiving the machine from Bauer Hockey or an authorized Bauer Hockey reseller or 12,000 sharpening cycles(whichever comes first). Your exclusive remedy, and our sole obligation, is to repair or replace any Product that Bauer Hockey reasonably determines complies with this warranty or, at our sole discretion, to accept the return of such product and refund to you the price paid therefore.
Products that have been repaired or replaced hereunder shall be covered by this warranty for the longer of thirty (30) days after being shipped back to you or the remainder of the original 1-year/12,000 cycle (whichever comes first) warranty period. Any defective Product or component that is replaced becomes the sole property Bauer Hockey.
HOW TO MAKE A WARRANTY CLAIM
If you experience any problems with your PROSHARP BAUER Product, please contact Customer Service at www.bauer.com/pages/warranty. In order to make a warranty claim, a valid proof of purchase is required. A valid proof of purchase is either a valid order number from the bauer.com website or a dated sales receipt from an authorized Bauer Hockey Dealer that shows the date of shipment and a description of the product along with its price.
Upon confirmation and approval of your warranty claim, we will assign a return material authorization number (“RA”). At your risk and expense, you must deliver the nonconforming Product (with prominent indication of the RA) to Bauer Hockey or its designated repair center.
Products returned without RA shall not be afforded warranty service, and you shall be liable for all costs and expenses incurred by us in connection with servicing the unauthorized return.
EXCLUSIONS
All claims under this limited warranty must be made during the applicable warranty period.
The limited warranty obligations do not cover physical damage sustained from improper handling during ship- ping. This limited warranty shall be void and not apply to any Product that was (a) used, handled, operated, maintained, or stored improperly, or in any manner not in accordance with our documentation, instructions, maintenance procedures, or recommendations; (b) subjected to unusual physical or electrical stress; (c) subjected to abuse, misuse, accident, neglect; (d) exposed to moisture, flooding, fire, electrical problems asso- ciated with incoming power or other acts not the fault of BAUER HOCKEY; (e) altered or modified by anyone other than BAUER HOCKEY or its authorized agents. This limited warranty shall be void and not apply to any Product damage caused by repairs made or attempted by anyone other than BAUER or its authorized agents. This limited warranty shall be void and not apply to any Product damage caused by hardware modifications or through the use of any parts or accessories that were not certified or approved by BAUER, including without limitation the use of grinding wheels not from BAUER. This limited warranty shall be void and not apply to any Product that is found to have a usage history that is inconsistent with the claimed ownership history or for which the supplied proof of purchase is inconsistent with the Product returned to BAUER HOCKEY. Warranty Coverage Contact: www.bauer.com/pages/warranty
TRAVELING WITH THE PROSHARP BAUER ADVANTEDGE
- Proceed with a complete cleaning cycle by following the “Cleaning and Emptying the Dust Tray” section of page 10 of this manual.
- When cleaning is completed, close the front door and ensure the grinding wheel is in the home position (right side of the machine).
- Switch Power Off.
- Unplug the power supply.
For the highest level of protection and safety, we recommend traveling with the PROSHARP BAUER carry bag (sold separately). ALERT: When setting up the machine after travel, wipe down the clamp and grinding wheel housing to remove any unwanted steel shavings that may have gathered during transit. This will ensure proper fit of the grinding wheel when sharpening again.
TROUBLESHOOTING
| Machine Warning | Cause and solutions |
| Verify grinding wheel | When there is a difference of hollow between your selected user preference and the current wheel installed on the machine. Dismiss the warning or open the door and change the wheel. |
| Clamping problems | Your skate blade is probably not positioned correctly. Make sure your skate is leveled before clamping. If your skate is clamped correctly and the machine still detects a problem, make sure there is no object obstructing the clamp. |
| Check blade height | Your skate blade is probably too low in height. The machine cannot sharpen when it reaches the security limit. Make sure your skate is clamped properly or change your blade. |
| Maintenance cleaning | You need to proceed with the cleaning routine of your machine. |
| Loss of power | Your machine experienced a loss of power during a sharpening sequence, resulting in an abrupt stop in the process. Please check your blade sharpening result and proceed with a new sharpening if needed. |
| Error | There is a problem with your machine. Try rebooting your machine by doing a power cycle. If rebooting and all of the above do not help with troubleshooting, please call customer service. |
| Problem | Cause and solutions |
| Cannot open the door | The machine has a hidden manual unlock button located underneath on the left side near the left leg. If the problem persists, please call customer service. |
| Black HMI Screen | Make sure your machine is powered on. If the machine has power, the screen could be in hibernation mode. Just touch the screen to wake it up. |
Customer Service Contacts:
USB https://www.bauer.com/pages/warranty Phone: 1-833-897-9942
CANADA
https://ca.bauer.com/pages/warranty
Phone: 1-833-897-9942 REST OF WORLD
https://eu.bauer.com/pages/warranty
Phone: +46 31 705 52 95
Machine serial #:……
Date of purchase:…………..
![]()

https://www.bauer.com/prosharp
Designed and developed in Blainville, Quebec, Canada / Manufactured in China
| BAUER HOCKEY LTD. 55 Standish Court, Suite 700 Mississauga, Ontario CANADA L5R 4B2 |
BAUER HOCKEY, LLC 100 Domain Drive Exeter, New Hampshire U.S.A. 03833 |
BAUER HOCKEY AB Nellickevagen 24 412 63 Goteborg Sweden |
Documents / Resources
 |
PROSHARP V18C Prosharp Advant Edge [pdf] Instruction Manual V18C, V18C Prosharp Advant Edge, V18C, Prosharp Advant Edge, Advant Edge, Edge |


