ProPlex IMS Multiple Universe Drive DIN Rail Devices

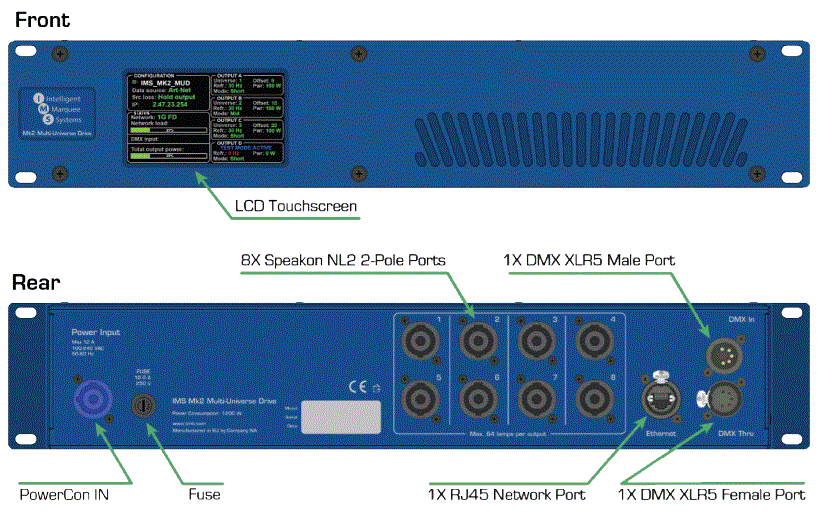
The IMS Mk2 Multiple Universe Drive (MUD) is a 2U RackMount power and data supply unit designed specifically for IMS systems. The MUD supports Ethernet based lighting protocols as well as standard 5-pin DMX input. With an expanded footprint that distributes up to 512 individual lamps, the IMS Mk2 MUD is the ultimate solution for large-scale installation of IMS.
MAIN FEATURES
| Expanded Drive Footprint | 8 output ports – 4 pairs (A, B, C or D) |
| 64 lamps are allowable per output – 512 MAX lamps total per MUD1 | Each of the 4 buttons can be set to trigger a predetermined behavior:
|
| Multi-Protocol Support | Each output group can be individually assigned an Art-Net or sACN universe, or can be controlled together by a standard 5-pin DMX input |
| Locking Outputs | Neutrik speak ON NL2 chassis connectors prevent accidental pull-out |
| Web GUI Management | IP based browser interface allows remote setup of a unit in the network |
| Rugged Enclosure | Shock-mounted circuitry with forced-air cooling designed for touring or permanent installation |
| Safe Touch Navigation | Large LCD touchscreen provides a simple and easy-to-understand user interface with auto-lock timeout to prevent unwanted settings changes |
| Built-in Testing | Fully test each output by selecting from several pre-programmed static or dynamic scenes – no console needed |
1 MAX lamp operation may require additional mode and cable considerations to mitigate voltage drop – see our testing charts below for more information
MODEL DIMENSIONS
SETUP
Safety Precautions
- Please read these instructions carefully.
- This user guide contains important information about the installation, usage, and maintenance of this product
- Ensure the device is connected to proper voltage, and that line voltage is not higher than that stated in the device specifications
- Make sure there are no flammable materials close to the unit while operating
- Always use a safety cable when hanging fixture overhead
- Always disconnect from the power source before servicing or fuse replacement (if applicable)
- Maximum ambient temperature (Ta) is 40°C (104°F). Do not operate unit at temperatures above this rating
- In the event of a serious operating problem, stop using the unit immediately. Repairs must be carried out by trained, authorized personnel. Contact the nearest authorized technical assistance center. Only OEM spare parts should be used
- Do not connect the device to a dimmer pack
- Make sure power cord is never crimped or damaged
- Never disconnect power cord by pulling or tugging on the cord
CAUTION! There are no user serviceable parts inside the unit. Do not open the housing or attempt any repairs yourself. In the unlikely event your unit may require service, please see the limited warranty information at the end of this document
UNPACKING
- Upon receipt of the unit, carefully unpack the carton and check the contents to ensure that all parts are present and in good condition.
- Notify the shipper immediately and retain packing material for inspection if any parts appear to be damaged from shipping or if the carton itself shows signs of mishandling.
- Save the carton and all packing materials. If a unit must be returned to the factory, it is important that it be returned in the original factory box and packing whenever possible.
WHAT’S INCLUDED
- PROPLEX IMS MK2 MULTIPLE UNIVERSE DRIVE
- POWERCON POWER CABLE
- QR CODE DOWNLOADS CARD
POWER REQUIREMENTS
- Before powering the unit, make sure the line voltage is within the range of accepted voltages. IMS Mk2 Multiple Universe drive operates within 100-240 V 50-60 Hz.
- Units must be powered directly from a switched circuit – they must not be operated with a rheostat (variable resistor) or dimmer circuit, even if it used solely as a 0-100% switch.
- When powered up, the MUD will initially show a boot screen, then the home screen will display the factory configuration. Any changes made will save automatically and be recalled on power cycle.
FUSE REPLACEMENT
IMS MUD has a user-serviceable fuse compartment which is accessible with a flat-head screwdriver. Replacement fuses are available from TMB, please contact sales@tmb.com.
To replace a fuse:
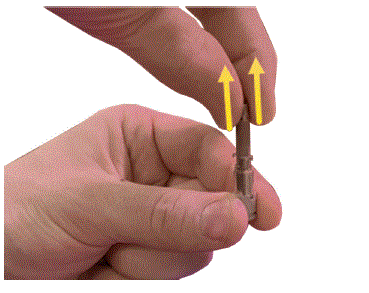
- Locate the fuse cap and insert a flat-head screwdriver into the slot. Push in slightly and rotate the fuse cap counterclockwise to remove .
- The fuse should be tightly installed; to remove the fuse, grab it between two fingers and apply upward pressure until the fuse releases.
- Reverse the process – discard the old fuse and insert a new fuse of appropriate value – IMS Mk2 MUD uses a 12A – 250V fuse.
- Reinsert fuse cap with new fuse and push in slightly while tightening clockwise ½ turn – don’t overtighten.

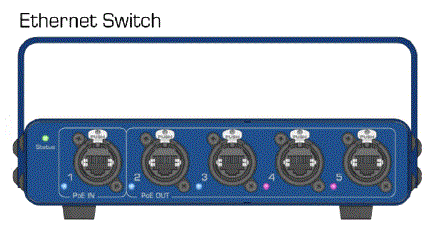
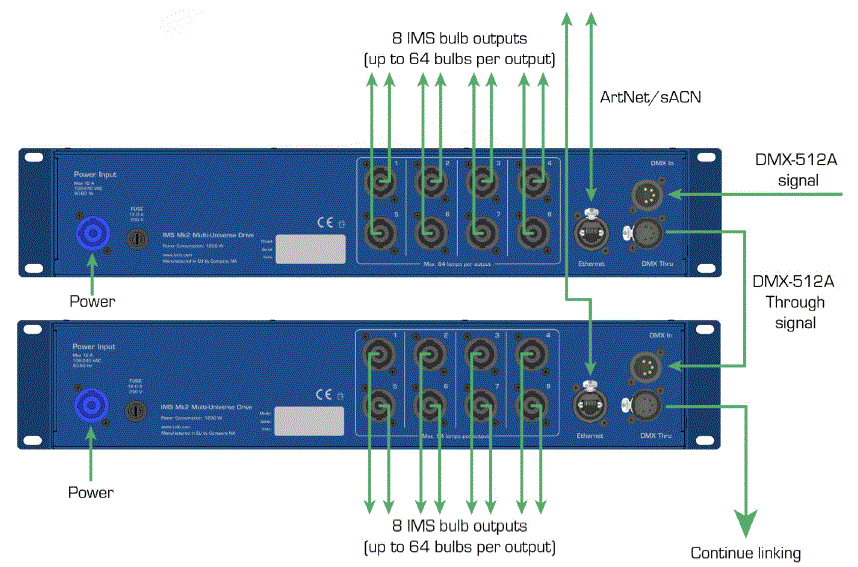
HOOKUP DIAGRAM
SPEAKON NL2 WIRING
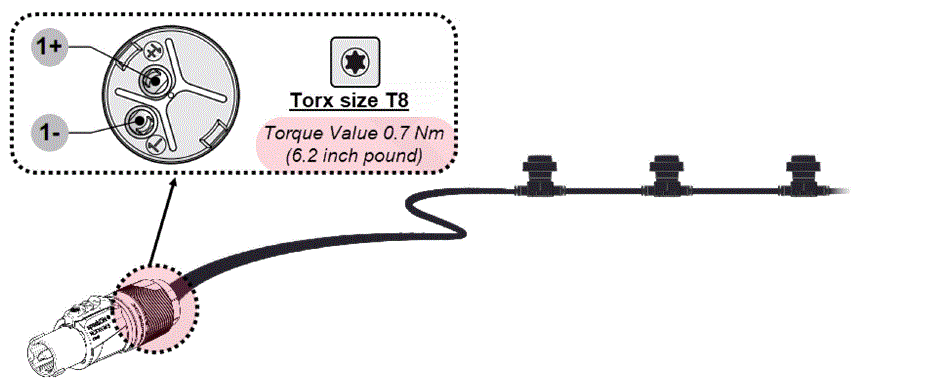
- Our proprietary IMS power + data signal flows on a standard 2-wire socket setup. Whether it is portable festoon cable, or architectural façade sockets – all new and retrofit circuits work if they are a 2-wire socket system.
- A speakON NL2 connector must be used to connect a socket run to the MUD unit. This connector is normally used in audio equipment, but is suitably rated and has a locking functionality that is ideal for touring IMS systems especially.
One important note: IMS WIRING POLARITY DOES NOT MATTER
OPERATION
- The easiest way to navigate and manage the MUD menu is to utilize the built-in touchscreen on the front of the unit.
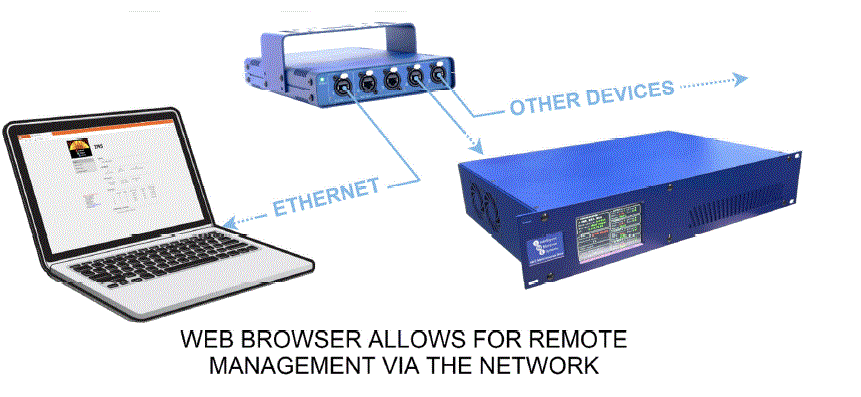
- Remote configuration is available through the Web Browser. Any computer connected to the network can access the virtual interface of the IMS Multi-Universe Drive. Any changes and saved via the web browser will update on the MUD LCD.
NAVIGATING THE SCREEN
The Home Screen is made up of 3 distinct menu areas which can be selected and modified by touching the relevant area of the screen.
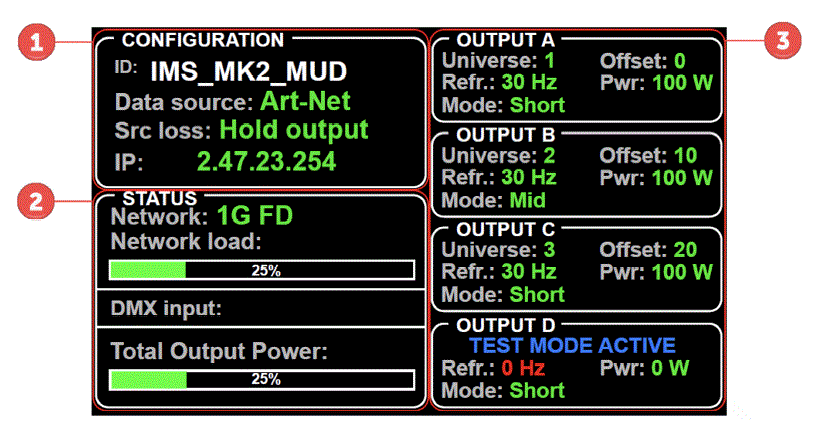
- Unit Configuration
Change MUD unit’s global identification and management settings . - Unit Status
Displays the current load status of the unit in percentage bars and monitors the incoming DMX data by universe. - Outputs
Each output group A, B, C and D have individualized settings menus which show a snapshot of how the output behaves in addition to how much power is allocated to those ports.
SCREEN LOCK
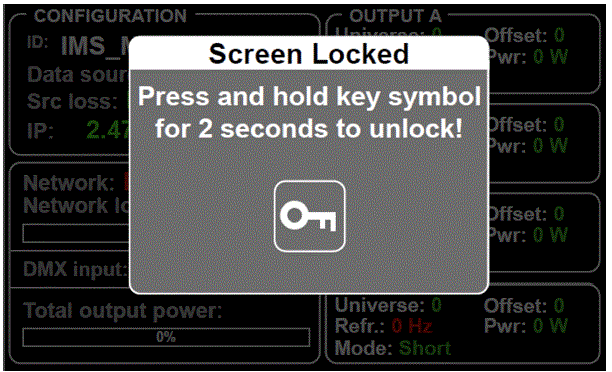
- The MUD automatically locks the screen after 60 seconds of being idle.
- The screen lock warning and the
 symbol will be displayed once the screen is touched.
 - To unlock the screen, press and hold the key symbol for four seconds.
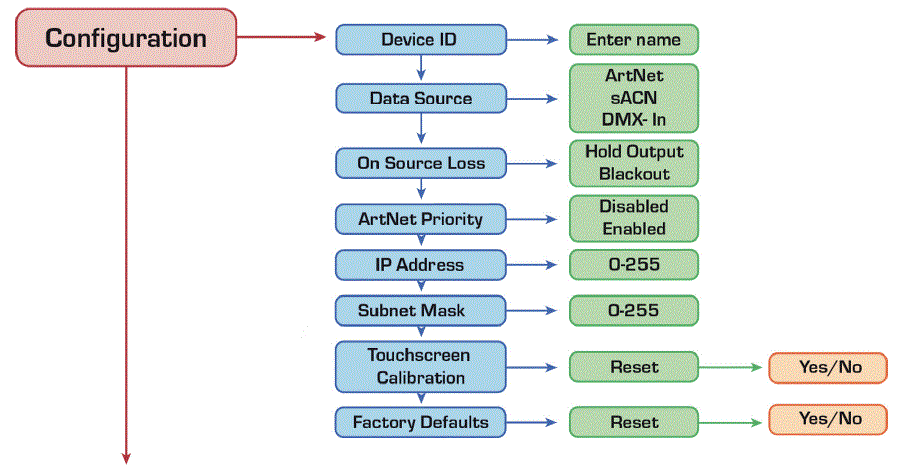
Enter the Configuration Menu from the home screen by first unlocking the screen, then touching the bounded region on the upper left side of the LCD. Once inside the Configuration Menu, you will see several different soft keys with sub-menus related to various settings and behaviors. Additionally, this menu is divided into 3 separate pages indicated by the number at the bottom right of the configuration window.
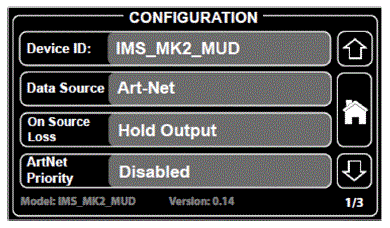
There are three navigation soft keys on the right side of the screen:
 Use the up and down arrow buttons to cycle between different menu page options
- Use the home button to exit out back to the Home Screen at any time
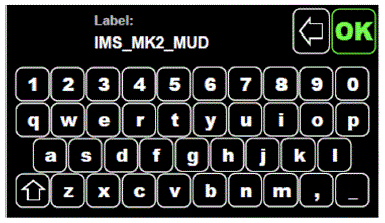
Device ID
Remove the default name label and replace it with any desired name using the virtual keyboard. 31 characters are available for naming the unit.
There are also 3 editor buttons:
 Shift to uppercase/symbols
 Delete a character
 Save name and exit
Device ID
Remove the default name label and replace it with any desired name using the virtual keyboard. 31 characters are available for naming the unit.
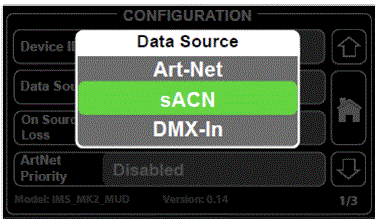
- The IMS MUD supports Ethernet-based lighting protocols such as Art-Net or sACN, or simply connect a standard 5-pin DMX input
- Determine the type of data output that originates from the playback or source controller and match this to the Data Source setting
Note: DMX-In is copied to each output
Source Loss Action
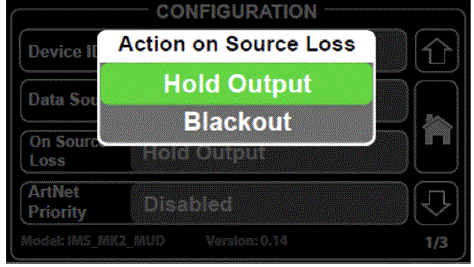
Choose how the IMS MUD responds when a source drops out:
- Hold Output – if the source is lost, the unit holds the last DMX values it received and outputs these values until the source is restored
- Blackout – if the source is lost, all DMX values will change to 0 and will be held until the source is restored
Art-Net Priority
Art-Net Priority (AKA Easy Priority) is a method by which multiple consoles in the network can easily switch and take priority over the MUD by sending a specific DMX command.
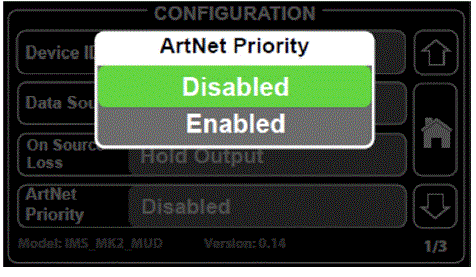
- When enabled, the console currently sending the highest value on address 512 on any assigned universe for output A, B, C or D will have control over that universe
- Address 512 was chosen because it is the least likely DMX Address to be patched, and thus usually available to allow this quick priority shift between multiple consoles
IP Address and Subnet Mask
- Network settings are located on page 2 of the Configuration Menu.
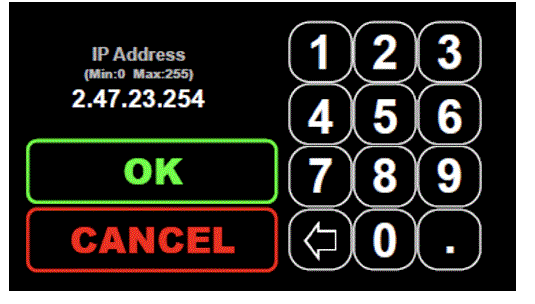
- To edit a new IP or mask, touch the ◄ button to delete the default octets. Then use the numeric keypad to enter the desired new values and press OK to save

Defaults
- Default settings are located on page 3 of the Configuration Menu.
- Touchscreen Calibration and Factory Default reset options are available, and both will trigger a second confirmation popup to prevent any accidental reset
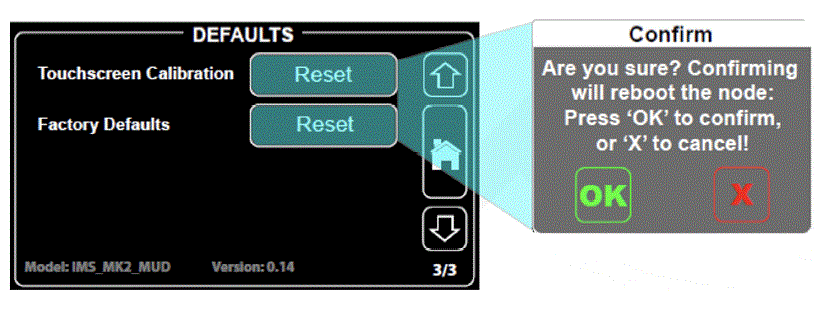
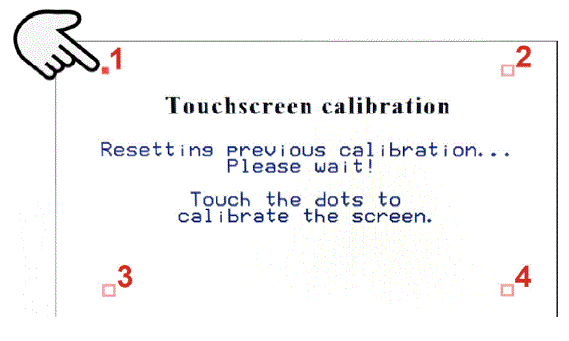
- Touchscreen Calibration will reboot the unit into a calibration window where a sequential dot pattern will appear on the screen.
- Touch each dot in order making sure to press perpendicular to the screen as accurately as possible.
- Tip: use a stylus pen to guarantee perfect calibration.
Status Menu
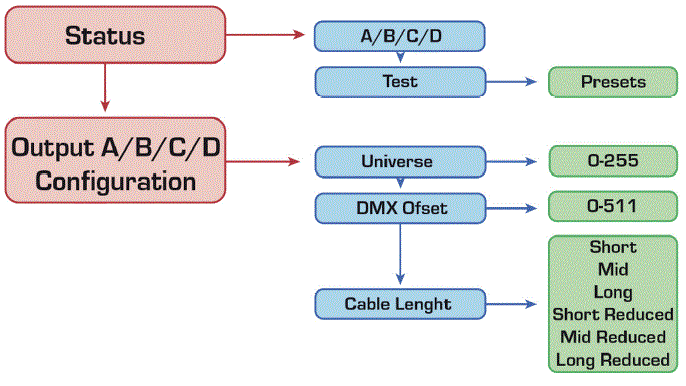
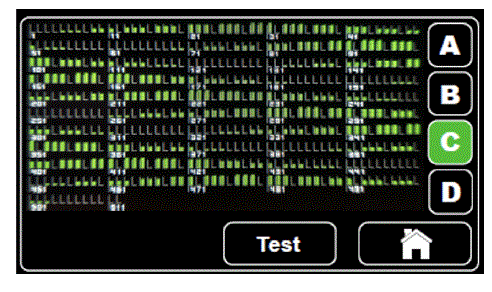
Enter the Status Menu from the home screen by first unlocking the screen, then touching the bounded region on the bottom left side of the LCD. Once inside the Status Menu, you will see a universe-level view of the incoming DMX data.
- 512 DMX channels are represented by value bars on the display and will update in real time relative to the value received.
- Softkeys on the right side of the LCD allow you to select between A, B, C and D universes.
Test Menu
In some cases, you may need to test connected IMS lamps, but you may not have a connected DMX source. The testing menu will allow you to test both static and dynamic scenes and check that lamps are working properly without the need for any source or controller.
- Playback scenes are organized in rows labeled A, B, C and D for each of the output groups.
- Only one playback scene per row can be activated at a time – if a new scene is selected, the previous one is automatically deselected.
- Press the ► or ◄ softkey to cycle between static and dynamic scene playbacks.
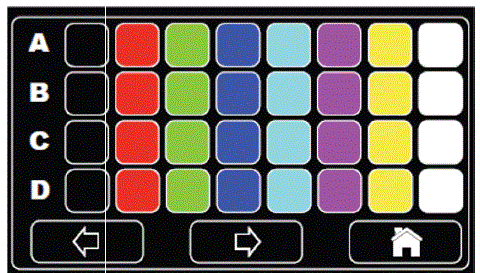
Note: Testing patterns applied to an output will also show as DMX data in the live status view.
OUTPUT MENU
Unlock the screen and then touch any of the four output regions on the right side of the LCD. Each output A, B, C or D has an identical menu set which controls the specific configuration for each of the port pairs.
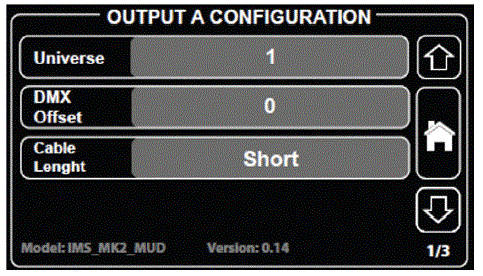 Navigation soft keys show on the right side of the screen:
 Use the up and down arrow buttons to cycle between different menu page options.
 Use the home button to exit out back to the Home Screen at any time.
Output configurations are always tied to the physical ports which are organized into the following groups:
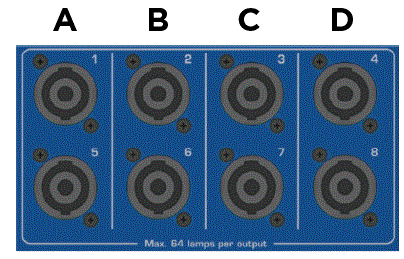
- Output A (ports 1 and 5)
- Output B (ports 2 and 6)
- Output C (ports 3 and 7)
- Output D (ports 4 and 8)
Universe

- Universe assignments are necessary to distribute Art-Net and sACN data to the appropriate IMS lamps.
- To assign a universe to an output, simply touch the numeric soft keys to enter the desired new value and press OK to save.
Note: DMX-In configurations will automatically assign all ports to universe 0.
DMX Offset
Applying a DMX Offset will add the offset value to the DMX channel being controlled, so that the channels “skip ahead” of the control data sent by the source. For example:
- IMS RGBW set to Address 001
- IMS MUD – DMX Offset value: 2
- Console sends a “red” command (DMX Channel 001 @ FULL)
- The resulting look is blue, not red – because the offset value is added to the original channel DMX ch.1 + DMX Offset 2 = DMX ch. 3

Cable Length
The Cable Length setting controls the refresh rate and color depth of the IMS power/data signal. The required operating mode is dependent on the length, spacing and load of IMS lamps on a single output. Please refer to the chart below to determine the appropriate mode.
- The Short cable setting offers the best data refresh, but the tradeoff is a reduction in overall run length.
- The Long cable setting offers the lowest data rate, but the tradeoff is an extension in overall run length.
- Reduced modes (AKA Transcoding) decrease color and intensity resolution to reduce data and thus extend the run length even further.
CABLE LENGTH GUIDELINES
- The following chart illustrates length testing recommendations for variety of portable festoon cable spacing options. These results can be applied to any 12 AWG (3.31 mm2) 2-conductor cable.
- While these results are not encompassing of every IMS deployment, we can use the data to help infer what mode to use; or if still in the design phase, how much run length and lamps are possible with the best data transmission.

If D ≈ 6 in (15 cm)
| Cable Mode | Max Lead-in (L) | Max Lamps | |
| Short | 1 m | 3.2 ft | 64 |
| Medium | 5 m | 16.4 ft | 64 |
| Long | 20 m | 65.6 ft | 64 |
| Short + Transcoding | 5 m | 16.4 ft | 64 |
| Medium + Transcoding | 25 m | 82 ft | 64 |
| Long + Transcoding | 55 m | 180.4 ft | 64 |
If D ≈ 12 in (30 cm)
| Cable Mode | Max Lead-in (L) | Max Lamps | |
| Short | 1 m | 3.2 ft | 51 |
| Medium | 5 m | 16.4 ft | 64 |
| Long | 10 m | 32.8 ft | 64 |
| Short + Transcoding | 5 m | 16.4 ft | 64 |
| Medium + Transcoding | 20 m | 65.6 ft | 64 |
| Long + Transcoding | 50 m | 164 ft | 64 |
If D ≈ 20 in (50 cm)
| Cable Mode | Max Lead-in (L) | Max Lamps | |
| Short | 1 m | 3.2 ft | 41 |
| Medium | 1 m | 3.2 ft | 64 |
| Long | 10 m | 32.8 ft | 64 |
| Short + Transcoding | 1 m | 3.2 ft | 62 |
| Medium + Transcoding | 15 m | 49.2 ft | 64 |
| Long + Trans- coding | 50 m | 164 ft | 64 |
If D ≈ 40 in (100 cm)
| Cable Mode | Max Lead-in (L) | Max Lamps | |
| Short | 1 m | 3.2 ft | 30 |
| Medium | 1 m | 3.2 ft | 46 |
| Long | 1 m | 3.2 ft | 64 |
| Short + Transcoding | 1 m | 3.2 ft | 45 |
| Medium + Transcoding | 1 m | 3.2 ft | 64 |
| Long + Trans- coding | 40 m | 131.2 ft | 64 |
WEB BROWSER
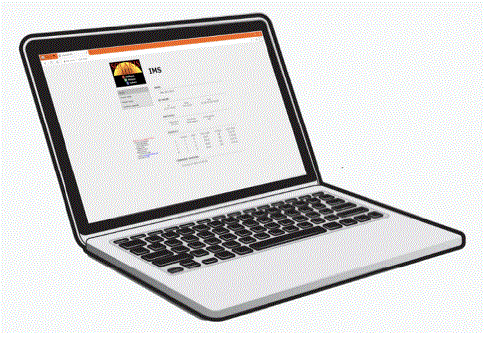
- The IMS Multiple Universe Drive has a built-in network interface allowing point-and-click remote configuration via the browser.
- The Web Browser behaves like a website – simply type the unit IP address into a browser to open the GUI.
Note: your computer will need to have an IP address within the same network as the IMS MUD unit. - Relevant device and output settings will show in menus on the left side of the screen, with settings and options that have similar structure to the on-board LCD menu.
FIRMWARE UPDATES
- Occasionally we will release firmware updates that contain new features or bug fixes. Firmware for all ProPlex units is available via the TMB Cloud.
- A link to TMB Cloud is under the Resources menu on our main website https://tmb.com/
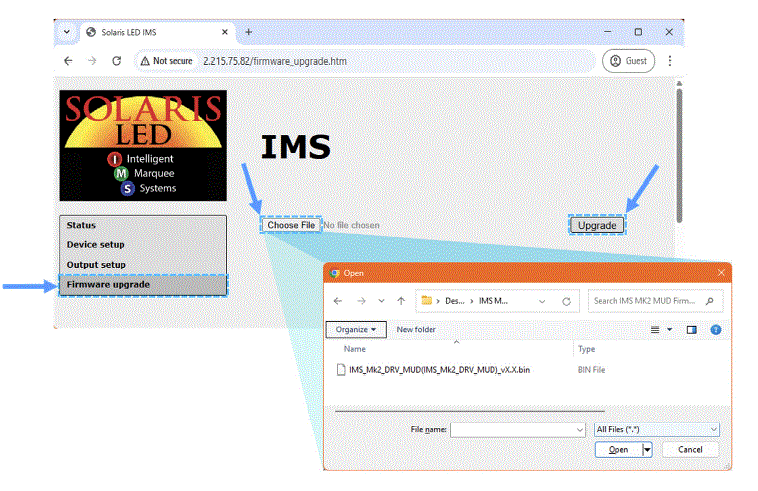
To update the IMS MUD:
- Download the latest “.bin” firmware file
- Select the Firmware Upgrade page from the browser menu and select Choose File to locate the “firmware.bin” file on your computer
- Press the Upgrade button and wait a few moments until complete
- Once finished, the unit should automatically reboot into the new firmware version
TECHNICAL SPECIFICATIONS
| Part Number | PPMK2MUD |
| Operating Voltage | 100-240 VAC, 50-60 Hz |
| Power Consumption | 1200 W MAX |
| Power Connector | Neutrik powerCON |
| Fuse | 12 A, 250 V |
| Ethernet Connector | (1x) Neutrik etherCON |
| Network Protocols | Art-Net, sACN |
| DMX Input/Output Connector | Neutrik XLR 5-Pin, Male/Female |
| DMX Universes | (4x) Universes MAX (via Ethernet) |
| IMS power/data Connector | (8x) Neutrik speakON NL2 (2-pole) |
| MAX Lamp Capacity | (64x) lamps per output – (512x) lamps MAX |
| MAX Cable Length | 1 246 feet / 75 meters to final lamp (using 14 AWG / 2.5MM2 ) |
| Operating Temperature | -4° to +104° F (-20° to +40° C) |
| Cooling | Fan Cooled |
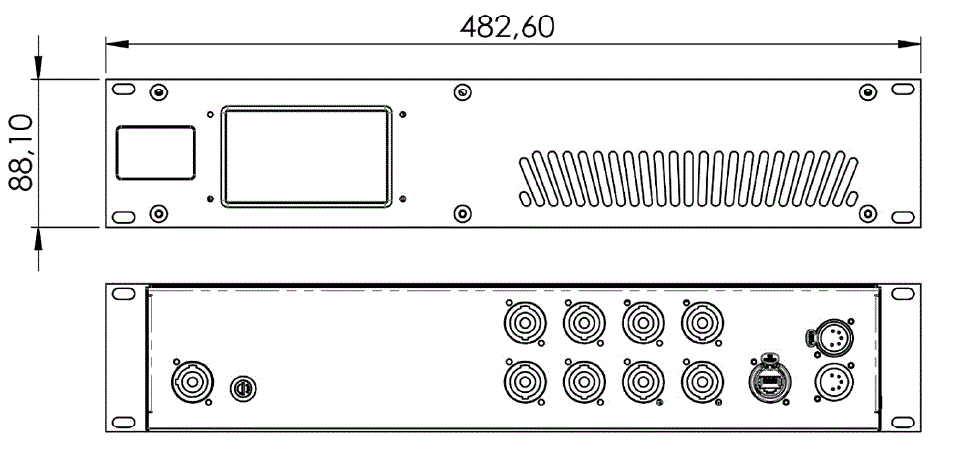
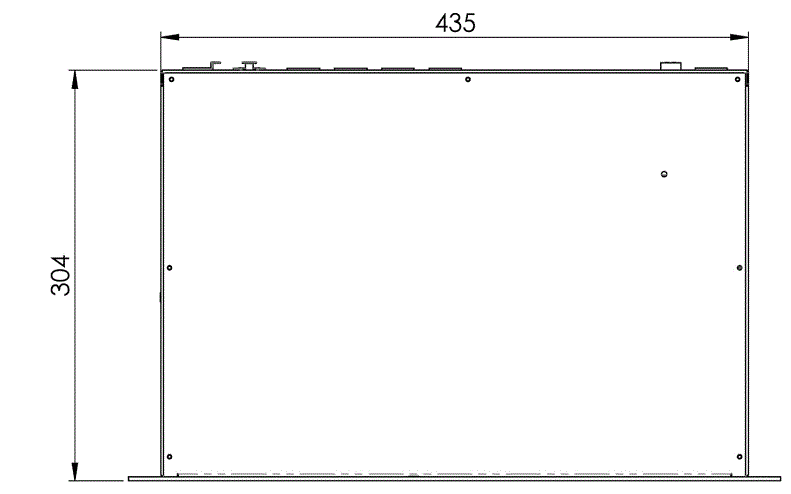
| Unit Dimensions (HxWxD) | 3.46 in (88.1 mm) × 19 in (482.6 mm) × 11.96 in (304 mm) |
| Shipping Dimensions (HxWxD) | 8 in (203 mm) x 21 in (533 mm) x 16 in (406 mm) |
| Unit Weight | 14.77 lbs (6.7 kg) |
| Shipping Weight | 17 lbs (7.7 kg) |
ORDERING CODES
| Part Number | Descriptions |
| PPMK2MUD | PROPLEX IMS UNIVERSE DRIVE, MULTIPLE UNIVERSE, 2U |
| NL2FXX-W-S | NEUTRIK NL2FXX-W-S SPEAKON XX SERIES 2 POLE CABLE END-BROWN |
LIMITED WARRANTY INFORMATION
- ProPlex Data Distribution Devices are warranted by TMB against defective materials or workmanship for a period of two (2) years from the date of original sale by TMB.
- TMB’s warranty shall be restricted to the repair or replacement of any part that proves to be defective and for which a claim is submitted to TMB before the expiration of the applicable warranty periods.
This Limited Warranty is void if the defects of the Product are the result of:
- Opening the casing, repair, or adjustment by anyone other than TMB or persons specifically authorized by TMB
- Accident, physical abuse, mishandling, or misapplication of the product
- Damage due to lightning, earthquake, flood, terrorism, war, or act of God
- TMB will not assume responsibility for any labor expended, or materials used, to replace and/or repair the Product without TMB’s prior written authorization. Any repair of the Product in the field, and any associated labor charges, must be authorized in advance by TMB. Freight costs on warranty repairs are split 50/50: Customer pays to ship defective product to TMB; TMB pays to ship repaired product, ground freight, back to Customer.
- This warranty does not cover consequential damages or costs of any kind.
- A Return Merchandise Authorization (RMA) Number must be obtained from TMB prior to return of any defective merchandise for warranty or non-warranty repair. For repair enquiries, please contact TMB via
email at TechSupport@tmb.com or phone at either of our locations below:
TMB US
- 527 Park Ave.
- San Fernando, CA 91340
- United States
- Tel: +1 818.899.8818
TMB UK
- 21 Armstrong Way Southall,
- UB2 4SD England
- Tel: +44 (0)20.8574.9700
RETURN PROCEDURE
- Please contact TMB and request a repair ticket and Return Merchandise Authorization Number prior to shipping items for repair. Be prepared to provide the model number, serial number, and a brief description of the cause for the return as well as the return shipping address and contact information. Once a repair ticket has been processed, the RMA # and return instructions will be sent via email to the contact on file.
- Clearly label any shipping package(s) with ATTN: RMA#. Please return equipment prepaid and in the original packaging whenever possible. DO NOT include cables or accessories (unless advised otherwise). If original packaging is not available, be sure to properly pack and protect any equipment. TMB is not liable for any shipping damage resulting from inadequate packaging by the sender.
- Freight call tags will not be issued for shipping repairs to TMB, but TMB will pay the freight for return to the customer if the repair qualifies for warranty service. Non-warranty repairs will undergo a quotation process by the technician assigned to the repair. All associated costs for parts, labor and return shipping must be authorized in writing before any work can be completed.
- TMB reserves the right to use its own discretion to repair or replace product(s) and determine the warranty status of any equipment.
MANUAL EDITION NOTICE, COPYRIGHT, DISCLAIMER
- ProPlex IMS Multiple Universe Drive User Manual
- ProPlex-IMS-Multiple-Universe-Drive-Manual-v1.0
- Effective 4 June 2025
- © Copyright 2025, TMB
- All rights reserved
- TMB authorizes its customers to download and print this electronically published manual for professional use only. TMB prohibits reproduction, modification or distribution of this document for any other purposes, without express written consent.
- Specifications are subject to change without notice. The information in this document supersedes all previously supplied information before the effective date listed above. TMB has confidence in the accuracy of the document information herein but assumes no responsibility or liability for any loss occurring as a direct or indirect result of errors or exclusions whether by accident or any other cause.
TMB 24/7 TECH SUPPORT
- US/Canada: +1.818.794.1286
- Toll Free: 1.877.862.3833 (1.877.TMB.DUDE)
- UK: +44 (0)20.8574.9739
- Toll Free: 0800.652.5418
- techsupport@tmb.com
FAQs
- How does transcoding affect lamp operation?
Transcoding changes the dimming resolution from 8-bit (256 steps of dimming) to 6-bit (64 steps of dimming).- Standard 8-bit color fade – greater color depth, richer fading visuals

- Standard 8-bit color fade – greater color depth, richer fading visuals
- Standard 8-bit color fade – greater color depth, richer fading visuals

Can I control all output groups simultaneously?
Yes, you can control all output groups together by using a standard 5-pin DMX input for synchronized operation.
How many lamps can the IMS MUD support?
The IMS MUD can distribute power to up to 512 individual lamps for large-scale installations.
How many lamps can be used per output?
It is possible to use a maximum of 64 lamps per output – at eight outputs you can operate a maximum of 512 lamps per MUD. However, the maximum possible lamps may vary depending on length and type of cable. Please refer to the cable length diagram above for guidance.
What do the different modes mean?
The relationship between cable length and control is inversely related – the further a signal has to travel, the more susceptible it is to voltage drop. Cable length modes ensure safe and reliable data transfer while mitigating those issues caused by long cables and voltage drop. There are six available modes which tweak the data transfer and allow for longer runs when needed: Short: 40Hz refresh rate / 8bit resolution Medium: 20Hz refresh rate / 8bit resolution Long: 10Hz refresh rate / 8bit resolution Short with transcoding: 40Hz refresh rate / 6.5bit color resolution Medium with transcoding: 20Hz refresh rate / 6.5bit color resolution Long with transcoding: 10Hz refresh rate / 6.5bit color resolution
When should I implement transcoding?
Cable length and lamp count will be the main determining factor when deciding to enable the Transcoding option. Transcoding is particularly useful in situations where IMS lamps are being used for quick color changes that do not require a long, smooth crossfade. The standard, non-transcoding setting has a higher bitrate and makes for smoother dimming in situations where cable length and/or lamp quantity per run are secondary concerns. Always try to use the standard option if possible.
Documents / Resources
 |
ProPlex IMS Multiple Universe Drive DIN Rail Devices [pdf] User Manual IMS Multiple Universe Drive DIN Rail Devices, IMS, Multiple Universe Drive DIN Rail Devices, Universe Drive DIN Rail Devices, Drive DIN Rail Devices, DIN Rail Devices, Rail Devices |
