![]()
UPSMON PRO V2.57
UPS Monitoring Software
User’s Manual
Overview
UPSMON PRO is compatible with the following windows :
- Windows XP, Vista, 7, 8, and 10 (32-Bit and 64-Bit)
- Windows Server 2000, 2003, 2008, 2012, 2016, and Hyper-V (32-Bit and 64-Bit)
NOTE: administrator authority is necessary to execute at windows here

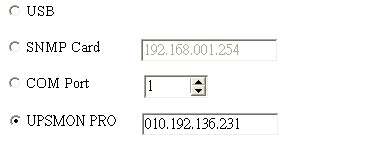
UPS Connecting
To start the ups connection :
- Connect Page
- Choose the ups connecting interface :
2.1 USB Port
2.2 SNMP Card : Fill in the snmpcard ip address
2.3 COM Port : The serial port cable is attached from the ups box
NOTE: The serial port cable is not suitable from the others
2.4 UPSMON PRO : Fill in the upsmon-pro computer ip address

- Then you will successfully get the ups monitoring as below :


Shutdown Configuration
Below steps guides you shutdown windows and ups when power failure occurs :
- Run Time Page
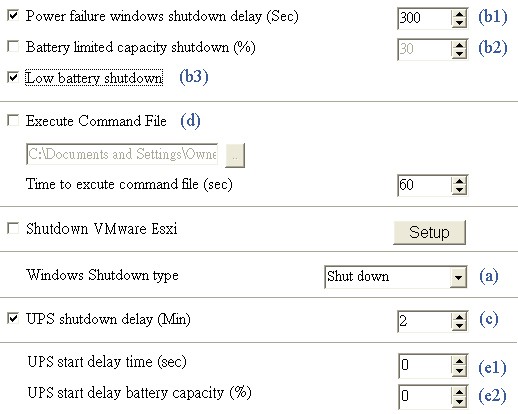
- Windows shutdown type (a)
2.1 None : No any reaction for windows even the blackout condition
2.2 Shut down : Running out of the procedures to save the programs to hard disk
2.3 Hibernate : Power-saving state and puts open documents and programs on hard disk - Power failure windows shutdown delay (b1) : After this period of time runs out, windows start to act shutdown
Battery limited capacity shutdown (b2) : Once the battery is declining to this level, windows start to act shutdown
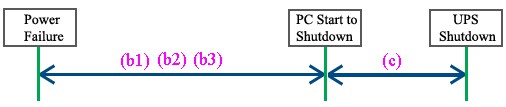
Low battery shutdown (b3) : If the condition of battery is low, the windows act shutdown Any one of the(b1,2,3)item-conditions is fulfilled, upsmon execute windows shutdown or hibernate at once - UPS shutdown delay (c) : This duration is affording to completely shutdown the computer
- Execute command file (d) : when (b1) seconds runs out, upsmon will start to act your designate command
5.1 Time to execute command file : your command have such more seconds to run.
And then upsmon commit windows shutdown - Ups start delay time (e1) : To charge the more power, the ups will delay its power supply
Ups start battery capacity (e2) : To charge the more power, the ups will supply its power when the battery ascend to this capacity %
Only both of the(e1, 2) item-conditions is fulfilled, ups will start to supply its power
Email Notification
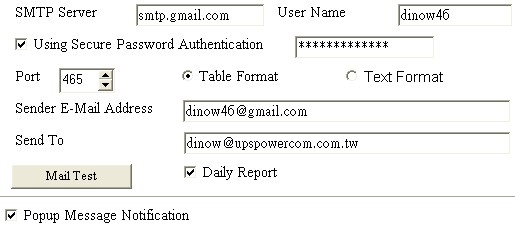
It supplies an active E-Mail notification :
- Notification Page
- Enter your SMTP Mail server’s information (ex : SMTP Server, User name, Port, Authentication, Sender’s mail, Receiver’s mail)
NOTE : This feature requires your e-mail account support SMTP Server - Button Mail Test : It helps you to check the email configuration is okay or not
- Checkup Daily Report : It reports you the summary ups output power (Watt)
UPS Control
- UPS Control Page
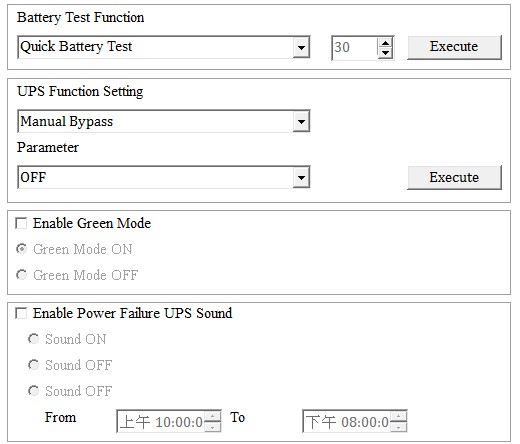
- Battery Test Function
2.1 Quick Battery Test : Ups switch its power from battery
2.2 Battery Test for Specific Time : Exhaust the battery power for this period of time
2.3 Test for Specific Battery Level : Exhaust the battery capacity to this battery level
2.4 Deep Battery Test : Exhaust the battery to low condition
2.5 Cancel Test : Stop battery testing - UPS Function Setting : Select the function to set the UPS, there will be the corresponding parameter options, and then press Execute button to set the selected function
- Green Mode :
ON : The ups automatically turn off its power if the load is low
OFF : UPS will sustain the power to its limit - Power Failure UPS Sound : Turn on and off the alarm in your desire
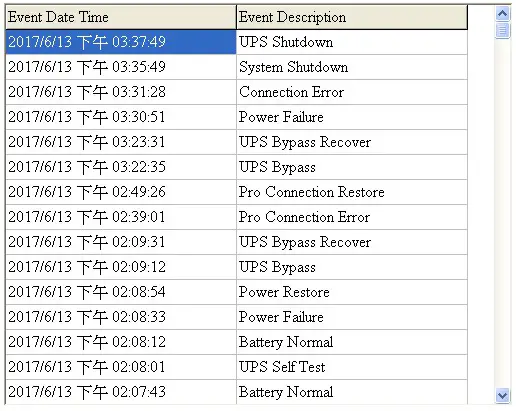
Historical Event
It displays all ups events which taken place
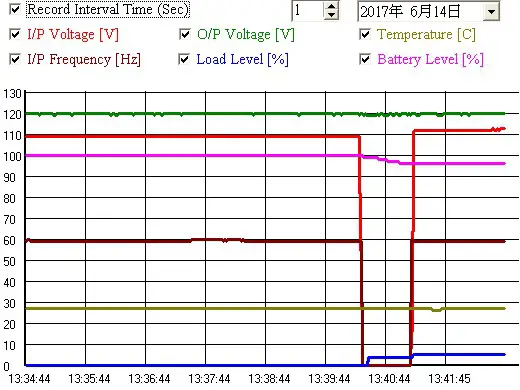
Record Viewer
- Record Viewer Page
- It records and actively shows UPS information : I/P Voltage, I/P Frequency, O/P Voltage, Battery Level, Load, and Temperature
- As well you can check up the historical data by calendar (Upper Right Corner)
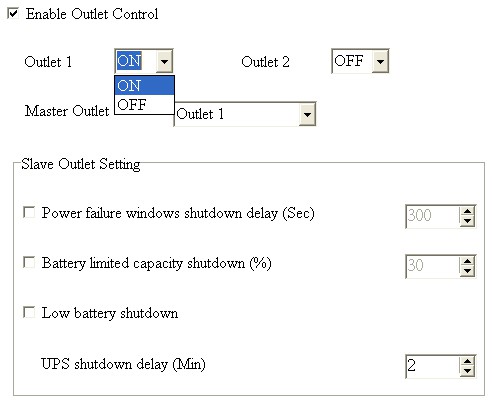
Outlets Control
- Outlets – Control Page
- Turn ON/OFF the outlets power at once
- Set up the UPS-Outlet shutdown sequence for blackout condition
NOTE: This feature requires the specific UPS to support
UPS Schedule
It helps you to have an automatic UPS OFF / ON / Battery self test
- Schedule Page
- Recurrence & Occurrences : Once / Daily / Weekly / Monthly
- Event : Ups shutdown / ups start / battery test
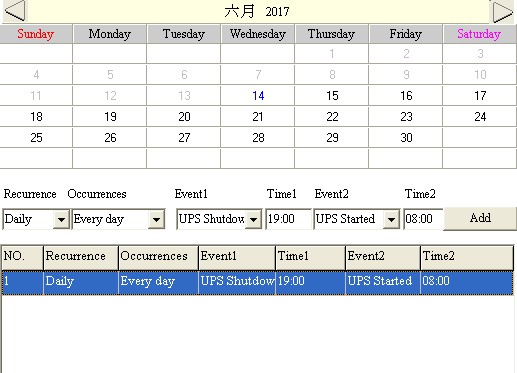
- If you set up the UPS shutdown, all the UPSMON-Slaves will execute OS shutdown earlier 30 seconds than UPSMON-Master
NOTE: The time of ups shutdown must be earlier than ups start - You can check the last UPS schedule for the current status

Multi OS Connect

The UPSMON PRO can play the role as Master or Slave
- UPSMON PRO Master : Physically connect(RS232 / USB) with ups
==> Master can share the ups information to other Slaves
==> EX : IP 10.192.136.231 (Master pc ip address) - UPSMON PRO Slave : Get the ups information from UPSMON PRO Master by ways of the internet or intranet
==> All the other pc, which installed upsmon pro, can get the ups status from UPSMON PRO Master
EX : UPSMON PRO Windows / Connect Page / UPSMON PRO : 10.192.136.231
And then you get ups connection

EX : UPSMON PRO Linux
==> Execute the UPSMON-PRO-for-Linux application : ./upsmon
==> Choose UPSMON-PRO (4) with Master IP address
==> UPSMON : Start Monitor ==> It means the connection is successful

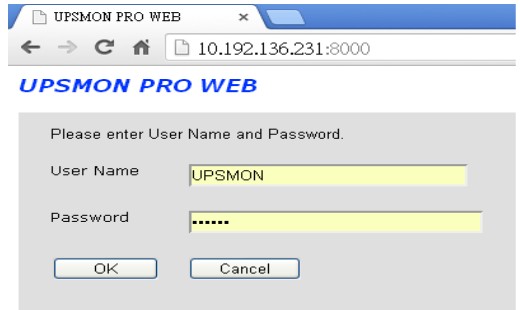
Web Portal
Ups remotely monitoring via browser
- Connect Page
- Enable Web Server UPSMON Function
- IP Address : Make sure this Windows has a IP address (ex : 10.192.136.231)
- Port : 8000 (default)
- User Name : UPSMON (default)
- Password : UPSMON (default)
NOTE: This feature requires your windows has a connectable ip address

Windows auto startup
Below configuration can help you to auto startup windows when power is restored
- PC Restart
- When the PC brand logo screen appears, press correct key on your keyboard to open to the BIOS Setup window (For general PCs, press the delete key)
- Use your arrow keys on the keyboard to select the correct power option
- Select the correct setting to enable PC power always on. For general PCs, use your arrow keys to Enable “Restore on AC Power Loss”
- Save your changes
NOTE: Each PC varies in how to enter and make changes to the BIOS settings
VMWare Support

A. Get ups monitoring on Vmware-Windows
- Vmware-Windows upsmon get ups connection from usb
==> Start Vmware ESXi
==> Vmware-Windows >> Actions >> Edit settings
==> Add other device >> USB device >> Powercom HID UPS Battery >> Save


- Vmware-Windows install upsmon pro and choose usb connection

- Successfully get ups monitoring

- UPSMON PRO >> Run Time >> Shutdown Vmware Esxi (Enable) >> Setup

- Filled in your Vmware Exsi IP / User Name (administrator) / Password

B. Vmware OS shutdown with sequence configuration

- Install Vmware vSphere Client
- Start Vmware vSphere Client and login to the Vmware Esxi

- Vmware host >> Software >> Virtual Machine Startup / Shutdown >> Properties

- This windows is allowed you to setup : shutdown type / shutdown delay / shutdown order / startup order
 Ex : In above example : Win7Eng shutdown first / Win2016Eng shutdown last
C. Power failure and the Vmware shutdown as sequence

SMS Alarm
A. Configuration >> UPSMON >> Email Notification
- User Name and password >> Check with your ups vendor
- UPS Name >> Receive alarm’s message with ups label
- Phone Number >> Receive alarm’s phone number

B. Smart Phone >> Get messages
- Alarm >> Power failure

- Alarm >> Power restore

- Alarm >> UPS connect lost

- Alarm >> UPS battery test

- Alarm >> UPS battery test normal

- Alarm >> UPS battery fail

- Alarm >> UPS battery expired

- Alarm >> UPS fail

- Alarm >> UPS overload

- Alarm >> UPS bypass on

- Alarm >> UPS bypass off

Documents / Resources
 |
POWERCOM UPSMON PRO V2 UPS Monitoring Software [pdf] User Manual UPSMON PRO V2 UPS Monitoring Software, UPSMON PRO V2, UPS Monitoring Software, Monitoring Software |