1. Instalacja i montaż
This section guides you through the initial setup and assembly of your iScooter DX5 Electric Scooter. Ensure all components are present and undamaged before proceeding.
1.1 Rozpakowywanie i identyfikacja komponentów
Carefully remove all items from the packaging. Lay them out and identify each component using the provided parts list in your physical manual. Keep the packaging for future transport or storage.

Image: All components of the iScooter DX5 Electric Scooter laid out on the floor, ready for assembly.
1.2 Montaż kierownicy
- Attach the handlebar stem to the fork using the provided bolts and Allen wrench. Ensure it is securely tightened.
- Connect the electrical cables from the handlebar to the main body. Secure any loose cables with zip ties.
Video: Detailed installation guide for the iScooter DX5 Adults Electric Scooter with Seat, demonstrating handlebar attachment, brake lever setup, and mirror installation.
1.3 Brake Lever and Mirror Installation
- Mount the brake levers onto the handlebar. Tighten the bolts using the appropriate tool.
- Przykręć tyłview mirrors into their designated slots on the handlebar. Adjust for optimal visibility.
1.4 Montaż reflektorów
- Attach the headlight to the front fork using the provided screws.
- Connect the headlight's electrical cable to the corresponding connector.
1.5 Front Fender and Reflector Installation
- Secure the front fender to the fork using the provided hardware.
- Attach the reflectors to the sides of the front fork.
- Ensure the brake cable is routed correctly inside the fender stay.
1.6 Rear Shock Absorber Adjustment
Adjust the rear shock absorbers to your preferred stiffness using the provided wrench. Ensure both sides are adjusted evenly.
1.7 Montaż przedniego koła
- Separate the brake pads to create enough space for the brake rotor.
- Tilt the wheel to help the brake rotor slide easily between the brake pads.
- Insert the axle through the front wheel and fork. Secure with the nuts.
1.8 Footrest Installation
- Attach the footrests to the side of the scooter frame using the provided screws.
- Ensure they are securely fastened and can fold/unfold smoothly.
1.9 Montaż siedzeń
- Place the seat onto the designated mounting points on the rear rack.
- Secure the seat with the provided bolts and tighten them firmly.
1.10 Front Bag Installation
Attach the scooter bag to the front of the handlebar using the straps. Ensure it is securely fastened and does not obstruct steering or visibility.
2. Instrukcja obsługi
Familiarize yourself with the controls and features before your first ride.
2.1 Powering On/Off and NFC Unlock
- Ensure the battery disconnect switch (located on the side of the scooter) is in the 'ON' position.
- Tap the NFC smart card to the display to unlock and power on the scooter. The display will show 'READY'.
- To power off, tap the NFC card again or hold the power button.

Obraz: Ponadview of the iScooter DX5 handlebar controls, including the NFC unlock area on the display.
2.2 tryby prędkości
The iScooter DX5 features four speed modes, adjustable via the 'S' button on the handlebar:
- Tryb 1. biegu: 15 mil na godzinę (tryb oszczędzania energii)
- Tryb 2. biegu: 21 mil na godzinę (dojazdy do pracy w mieście, stała prędkość)
- Tryb 3. biegu: 28 mil na godzinę (zrównoważona moc, szybsza jazda)
- Tryb 4. biegu: 35 mil na godzinę (turbo sprint, pełna moc)

Image: The scooter's display showing the different speed modes and their corresponding maximum speeds.
2.3 Lighting and Horn
- Reflektor: Press the headlight switch to turn on/off the front LED light.
- Kierunkowskazy: Use the turn signal button to indicate left or right turns.
- Światła stopu: Integrated into the taillight, these automatically illuminate when braking.
- Klakson: Press the horn button for an instant alert to pedestrians or traffic.

Obraz: Zbliżenie view of the iScooter DX5's front headlight, taillight, and integrated turn signals.
2.4 Anti-theft Alarm
The scooter is equipped with a built-in anti-theft alarm. Refer to your physical manual for specific instructions on activating and deactivating the alarm system.
3. Konserwacja
Regularna konserwacja gwarantuje długowieczność i bezpieczną eksploatację Twojego iScooter DX5.
3.1 Pielęgnacja opon
- Regularly check tire pressure. Maintain recommended PSI for optimal performance and safety.
- Przed każdą jazdą sprawdź stan opon pod kątem zużycia, przebić lub uszkodzeń.
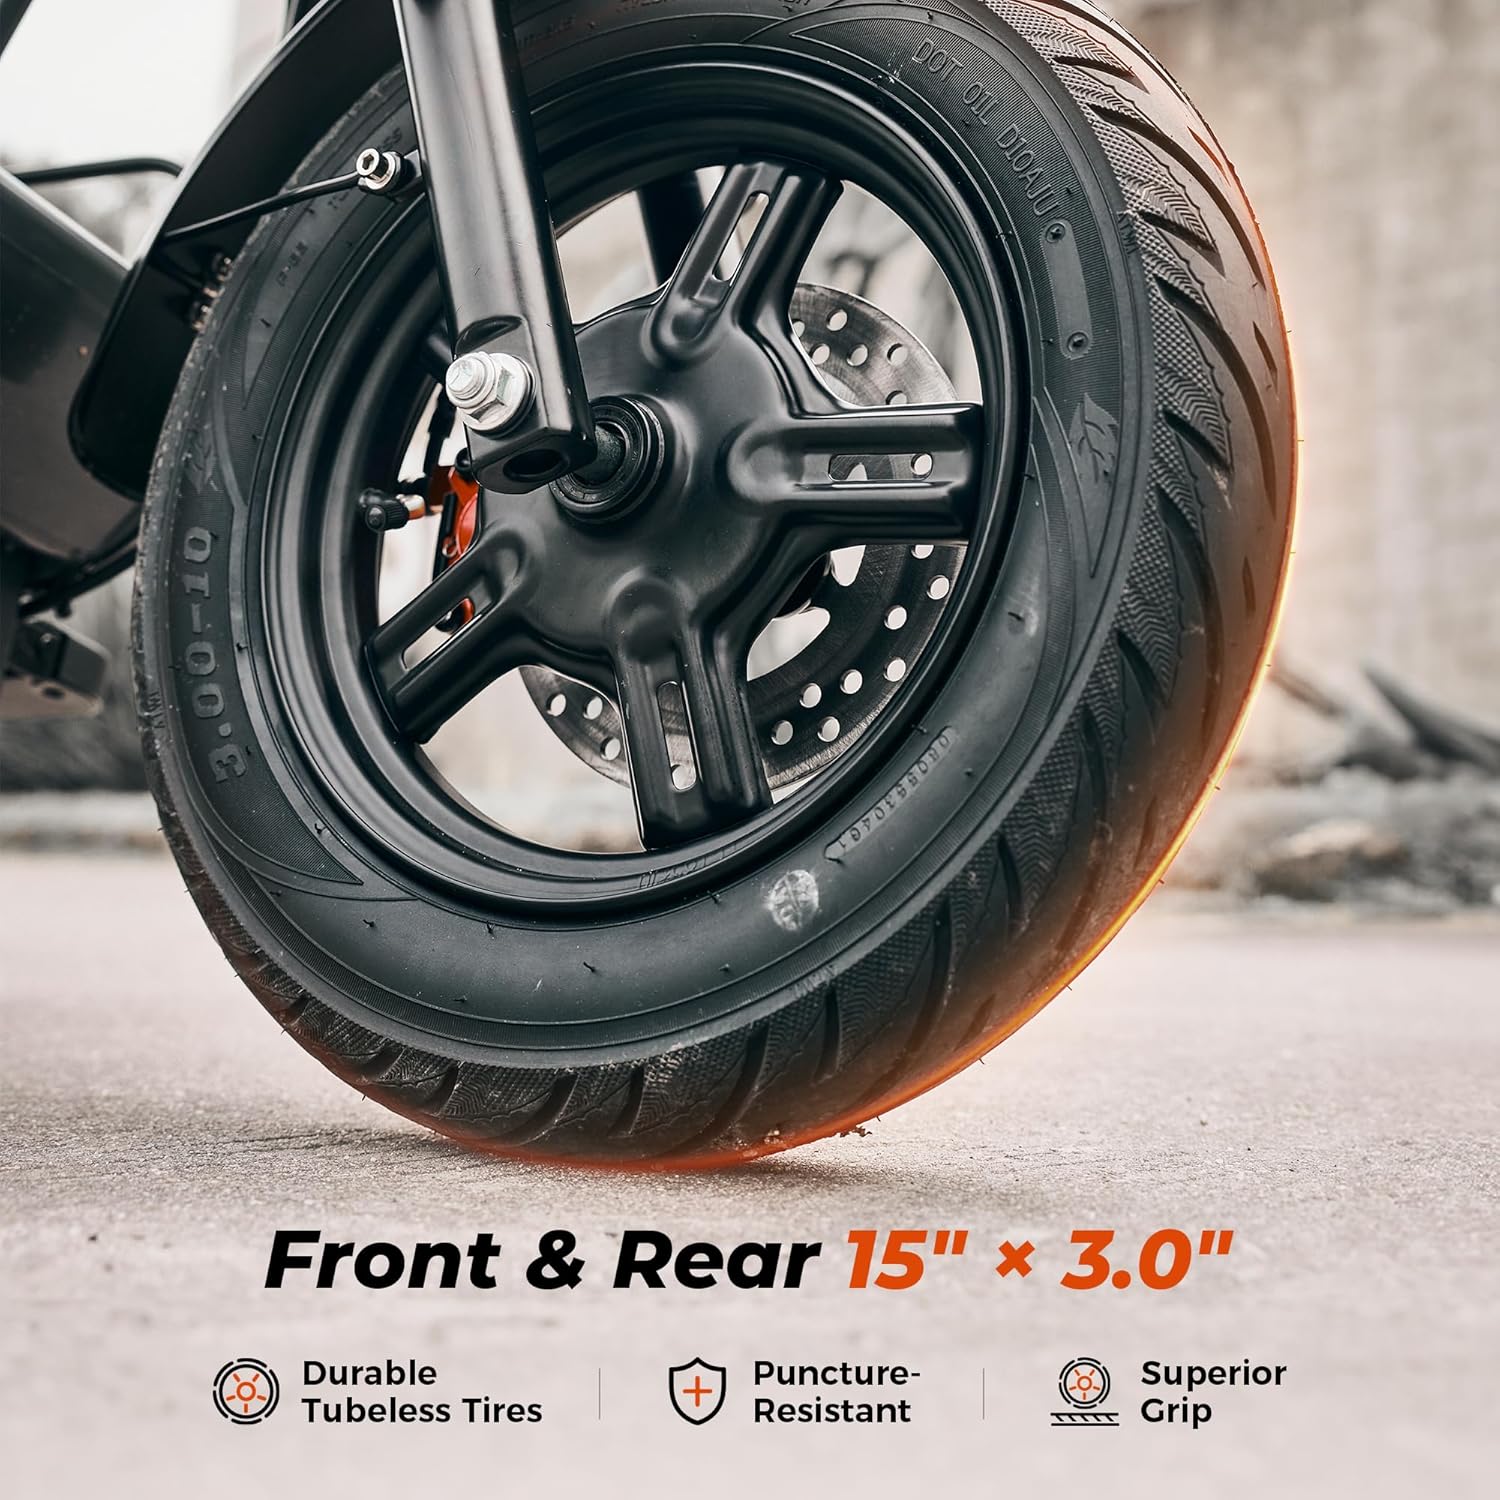
Image: Close-up of the iScooter DX5's durable 15-inch pneumatic tires, highlighting their tread and puncture resistance.
3.2 Kontrola układu hamulcowego
- Check brake levers for proper function and responsiveness.
- Inspect brake pads and rotors for wear. Replace if necessary.
- Ensure brake fluid levels are adequate for hydraulic disc brakes.

Obraz: Szczegółowy view of the iScooter DX5's dual hydraulic disc brakes, emphasizing their stopping power and design.
3.3 Czyszczenie i przechowywanie
- Regularnie czyść skuter za pomocąamp cloth. Avoid high-pressure washing.
- Przechowuj hulajnogę w suchym i chłodnym miejscu, z dala od bezpośredniego światła słonecznego i ekstremalnych temperatur.
3.4 Pielęgnacja baterii
- Unikaj całkowitego rozładowania akumulatora. Ładuj go regularnie, nawet jeśli nie jest używany przez dłuższy czas.
- Use only the official iScooter charger.
4. Operacja ładowania
Proper charging procedures are essential for battery health and safety.
4.1 Proces ładowania
- Ensure the scooter is powered off and the battery disconnect switch is in the 'OFF' position before charging.
- Znajdź port ładowania z boku hulajnogi.
- Connect the charger to a power outlet, then connect the charging cable to the scooter's charging port.
- Podczas ładowania kontrolka ładowarki zazwyczaj świeci na czerwono, a po pełnym naładowaniu na zielono.
- Odłącz ładowarkę po zakończeniu ładowania.

Image: The iScooter DX5's 48V 15.6Ah battery, illustrating its capacity and charging time.
5. Rozwiązywanie Problemów
This section provides solutions to common issues you might encounter with your iScooter DX5.
5.1 Hulajnoga nie włącza się
- Check if the battery disconnect switch is in the 'ON' position.
- Ensure the battery is charged. Connect the charger and check the indicator light.
- Verify that the NFC card is correctly tapped to the display.
5.2 Zmniejszony zasięg lub moc
- Check tire pressure; underinflated tires can reduce efficiency.
- Ensure the battery is fully charged. Battery performance can decrease in cold weather.
- Riding conditions (e.g., uphill, heavy load, aggressive acceleration) can affect range.
5.3 Problemy z hamowaniem
- Sprawdź stan klocków hamulcowych i w razie potrzeby wymień je.
- Check brake fluid levels for hydraulic brakes.
- Ensure brake cables are properly adjusted and free from obstruction.
5.4 Nietypowe dźwięki
- Inspect all visible bolts and connections for tightness.
- Check for any foreign objects caught in the wheels or motor.
- Jeśli hałas nadal występuje, skontaktuj się z obsługą klienta.
6. Specyfikacje
Detailed technical specifications for the iScooter DX5 Electric Scooter.
| Funkcja | Specyfikacja |
|---|---|
| Marka | iScooter |
| Nazwa modelu | DX5 |
| Silnik | 1500W (Peak) Brushless Motor |
| Bateria | Akumulator litowy 48 V 15.6 Ah (748.8 Wh) |
| Maksymalna prędkość | 35 mil na godzinę |
| Maksymalny zasięg | 38-45 mil (w zależności od warunków) |
| Opony | Opony pneumatyczne do motocykli elektrycznych 15" x 3.0" |
| Hamulce | Podwójne hydrauliczne hamulce tarczowe |
| Zawieszenie | Front Hydraulic Suspension & Rear Air Spring Suspension |
| Maksymalna ładowność | 330 funtów |
| Wymiary produktu | 58.27" dł. x 26.8" szer. x 55.1" wys. |
| Waga przedmiotu | 100 funtów |
| Ocena odporności na wodę | IPX4 |
| Zawarte komponenty | Electric Scooter, Scooter Bag |
7. Gwarancja i pomoc techniczna
Your iScooter DX5 Electric Scooter comes with a limited warranty. For specific details regarding warranty periods for different parts, please refer to the warranty information provided with your product packaging or contact iScooter customer support.
7.1 Obsługa klienta
For any questions, technical assistance, or warranty claims, please contact iScooter Customer Support. You can typically find contact information on the manufacturer's webstronie lub w dokumentacji produktu.
Sprzedający: iScooter Center
Opis gwarancji: We offer a 360-day or 180-day warranty on different parts.


