1. Wprowadzenie
This manual provides essential information for the safe and efficient operation of your Pretul DESI-36P2 3.6V Cordless Screwdriver. Please read it thoroughly before first use and keep it for future reference. This compact cordless screwdriver is designed for light-duty fastening tasks, featuring a two-position handle and an integrated LED work light.

Rysunek 1: Pretul DESI-36P2 Cordless Screwdriver. This image shows the screwdriver in its straight configuration, highlighting its compact design and yellow and black color scheme.
2. Informacje dotyczące bezpieczeństwa
Aby zminimalizować ryzyko pożaru, porażenia prądem i obrażeń ciała, należy zawsze przestrzegać podstawowych zasad bezpieczeństwa podczas korzystania z narzędzi elektrycznych.
- Bezpieczeństwo w miejscu pracy: Utrzymuj miejsce pracy w czystości i dobrze oświetlone. Zaśmiecone lub ciemne obszary zachęcają do wypadków.
- Bezpieczeństwo elektryczne: Nie wystawiaj elektronarzędzi na deszcz lub mokre warunki. Woda dostająca się do elektronarzędzia zwiększa ryzyko porażenia prądem.
- Bezpieczeństwo osobiste: Bądź czujny, uważaj, co robisz i kieruj się zdrowym rozsądkiem podczas obsługi elektronarzędzia. Nie używaj elektronarzędzia, gdy jesteś zmęczony lub pod wpływem narkotyków, alkoholu lub leków.
- Używanie i konserwacja narzędzia: Nie używaj elektronarzędzia na siłę. Użyj odpowiedniego elektronarzędzia do swojego zastosowania. Wykona pracę lepiej i bezpieczniej w tempie, do jakiego został zaprojektowany.
- Pielęgnacja baterii: Ładuj wyłącznie za pomocą ładowarki określonej przez producenta. Ładowarka, która jest odpowiednia do jednego typu akumulatora, może stwarzać ryzyko pożaru, gdy jest używana z innym akumulatorem.
3. Komponenty i cechy produktu
Familiarize yourself with the parts of your Pretul DESI-36P2 cordless screwdriver.
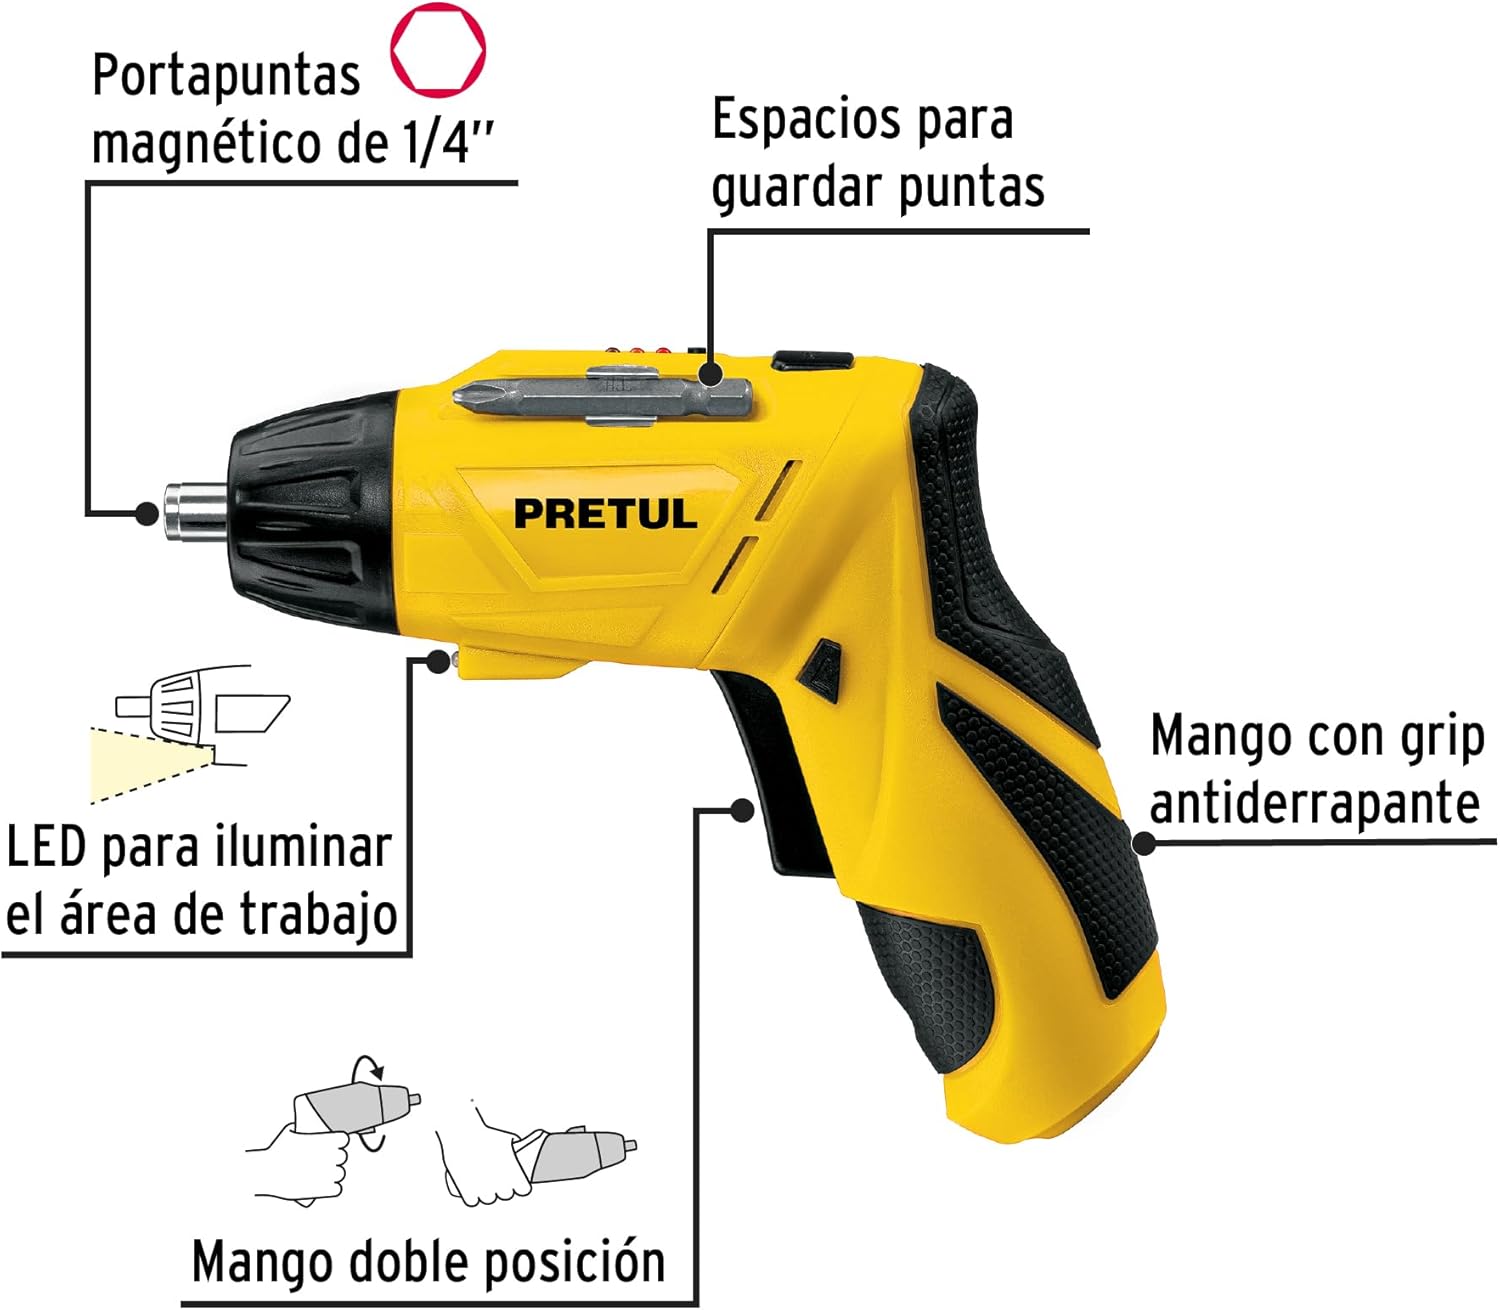
Rysunek 2: Key features of the Pretul DESI-36P2. This diagram illustrates the magnetic 1/4" bit holder, bit storage slots, anti-slip grip handle, LED work light, and the two-position handle mechanism.
- Magnetic 1/4" Hex Bit Holder: Securely holds screwdriver bits for quick changes.
- Bit Storage Slots: Conveniently located on the tool for storing extra bits.
- Anti-slip Grip Handle: Zapewnia wygodną i bezpieczną obsługę podczas pracy.
- Światło robocze LED: Illuminates the work area for improved visibility in dimly lit spaces.
- Uchwyt dwupozycyjny: Allows the screwdriver to be used in a straight or pistol-grip configuration for versatility and access in tight spaces.
- Przełącznik przód/tył: Controls the direction of rotation for tightening and loosening screws.
- Przycisk zasilania: Aktywuje śrubokręt.
4. Konfiguracja
4.1 Pierwsze ładowanie
Before first use, fully charge the screwdriver's internal battery. Connect the charger to a standard electrical outlet and then to the charging port on the screwdriver. The charging indicator (if present) will show the charging status. Disconnect the charger once the battery is fully charged.
4.2 Mocowanie bitów śrubokrętowych
- Select the appropriate 1/4" hex screwdriver bit for your task.
- Insert the bit firmly into the magnetic bit holder at the front of the screwdriver until it is securely seated.
- To remove a bit, simply pull it out from the holder.
4.3 Regulacja położenia uchwytu
The screwdriver features a two-position handle for enhanced versatility:
- Uchwyt pistoletowy: Standard configuration for most tasks.
- Uchwyt prosty: For reaching into confined spaces. To change the handle position, firmly grasp the handle and the body of the screwdriver, then pivot the handle until it locks into the desired position.
5. Instrukcja obsługi
5.1 Włączanie/wyłączanie
Press and hold the power button to activate the screwdriver. Release the button to stop operation. The LED work light will activate when the power button is pressed.
5.2 Wybór kierunku obrotu
Use the forward/reverse switch, typically located near the trigger, to select the desired rotation direction:
- Przesuń przełącznik w lewo, aby rozpocząć obrót do przodu (dokręcanie śrub).
- Przesuń przełącznik w prawo, aby rozpocząć obrót w tył (odkręcając śruby).
- Ensure the switch is in the center position to lock the tool and prevent accidental activation.
5.3 śruby mocujące
- Ensure the correct bit is installed and the rotation direction is set to forward.
- Place the bit onto the screw head, applying gentle pressure.
- Press the power button to start driving the screw. Release the button once the screw is fully seated or the desired torque is reached.
5.4 Odkręcanie śrub
- Ensure the correct bit is installed and the rotation direction is set to reverse.
- Place the bit onto the screw head, applying gentle pressure.
- Press the power button to start loosening the screw. Release the button once the screw is free.
6. Konserwacja
Regularna konserwacja zapewnia optymalną wydajność i wydłuża żywotność narzędzia.
- Czyszczenie: Utrzymuj otwory wentylacyjne narzędzia w czystości i bez zanieczyszczeń. Używaj miękkiej,amp Do czyszczenia powierzchni zewnętrznych należy używać ściereczki. Nie należy używać silnych środków chemicznych ani ściernych środków czyszczących.
- Uchwyt na bity: Periodically inspect the bit holder for wear or damage. Clean any accumulated dust or metal shavings.
- Przechowywanie baterii: Store the screwdriver in a cool, dry place away from direct sunlight and extreme temperatures. For long-term storage, ensure the battery is partially charged (around 50%).
- Kontrola: Regularly check for loose screws, damaged cords (if applicable), or any other conditions that may affect safe operation.
7. Rozwiązywanie Problemów
Jeśli masz problemy ze swoim wkrętakiem, zapoznaj się z poniższymi typowymi problemami i ich rozwiązaniami:
| Problem | Możliwa przyczyna | Rozwiązanie |
|---|---|---|
| Śrubokręt nie włącza się. | Akumulator jest rozładowany. | Całkowicie naładuj baterię. |
| Śrubokręt ma za małą moc. | Bateria jest słaba. | Naładuj baterię. |
| Bit zsuwa się z łba śruby. | Nieprawidłowy rozmiar bitu lub bit zużyty. | Użyj właściwego rozmiaru bitu; wymień zużyte bity. |
| Handle does not lock into position. | Not fully pivoted. | Ensure the handle is fully pivoted until it clicks into place. |
Jeśli po wypróbowaniu tych rozwiązań problem nadal występuje, skontaktuj się z obsługą klienta.
8. Specyfikacje
Technical specifications for the Pretul DESI-36P2 Cordless Screwdriver.

Rysunek 3: Dimensions of the Pretul DESI-36P2. This image shows the screwdriver with measurements indicating a length of 17.5 cm and a height of 13 cm.
| Funkcja | Specyfikacja |
|---|---|
| Numer modelu | DESI-36P2 (26402) |
| Marka | Cena |
| Źródło zasilania | Bateria |
| Pojemność bateriitage | 3.6 wolty |
| Prędkość | 230 obr./min. |
| Moment obrotowy | 3E+1 Pound-inches (approximately 30 in-lbs) |
| Uchwyt bitu | 1/4" sześciokątny magnetyczny |
| Tworzywo | Plastik, Metal |
| Wymiary (dł x wys.) | 17.5 cm x 13 cm (w przybliżeniu, na podstawie obrazu) |
| Waga | 530 g (0.53 kg) |
| Zawarte komponenty | 5 Phillips bits 1" (PH1, PH2, PH3), Charger, 2 Phillips bits 2" (PH1, PH2), 1/4" Magnetic extension |
9. Gwarancja i wsparcie
The Pretul DESI-36P2 Cordless Screwdriver comes with a 1-letnia gwarancja od daty zakupu. Zachowaj dowód zakupu na wypadek roszczeń gwarancyjnych.

Rysunek 4: Product packaging showing the included components and a "1 year warranty" seal.
For technical support, service, or warranty inquiries, please contact Pretul customer service through their official channels or the retailer where the product was purchased.


