1. Wprowadzenie
The ATOMSTACK AE85 Engraving Area Extension Kit is designed to significantly expand the working area of your compatible ATOMSTACK laser engraver. This kit allows you to increase your engraving and cutting space to an impressive 850 x 800 mm, providing greater flexibility for larger projects and batch processing.
This manual provides essential information regarding the installation, operation, maintenance, and specifications of the AE85 Extension Kit to ensure optimal performance and longevity.
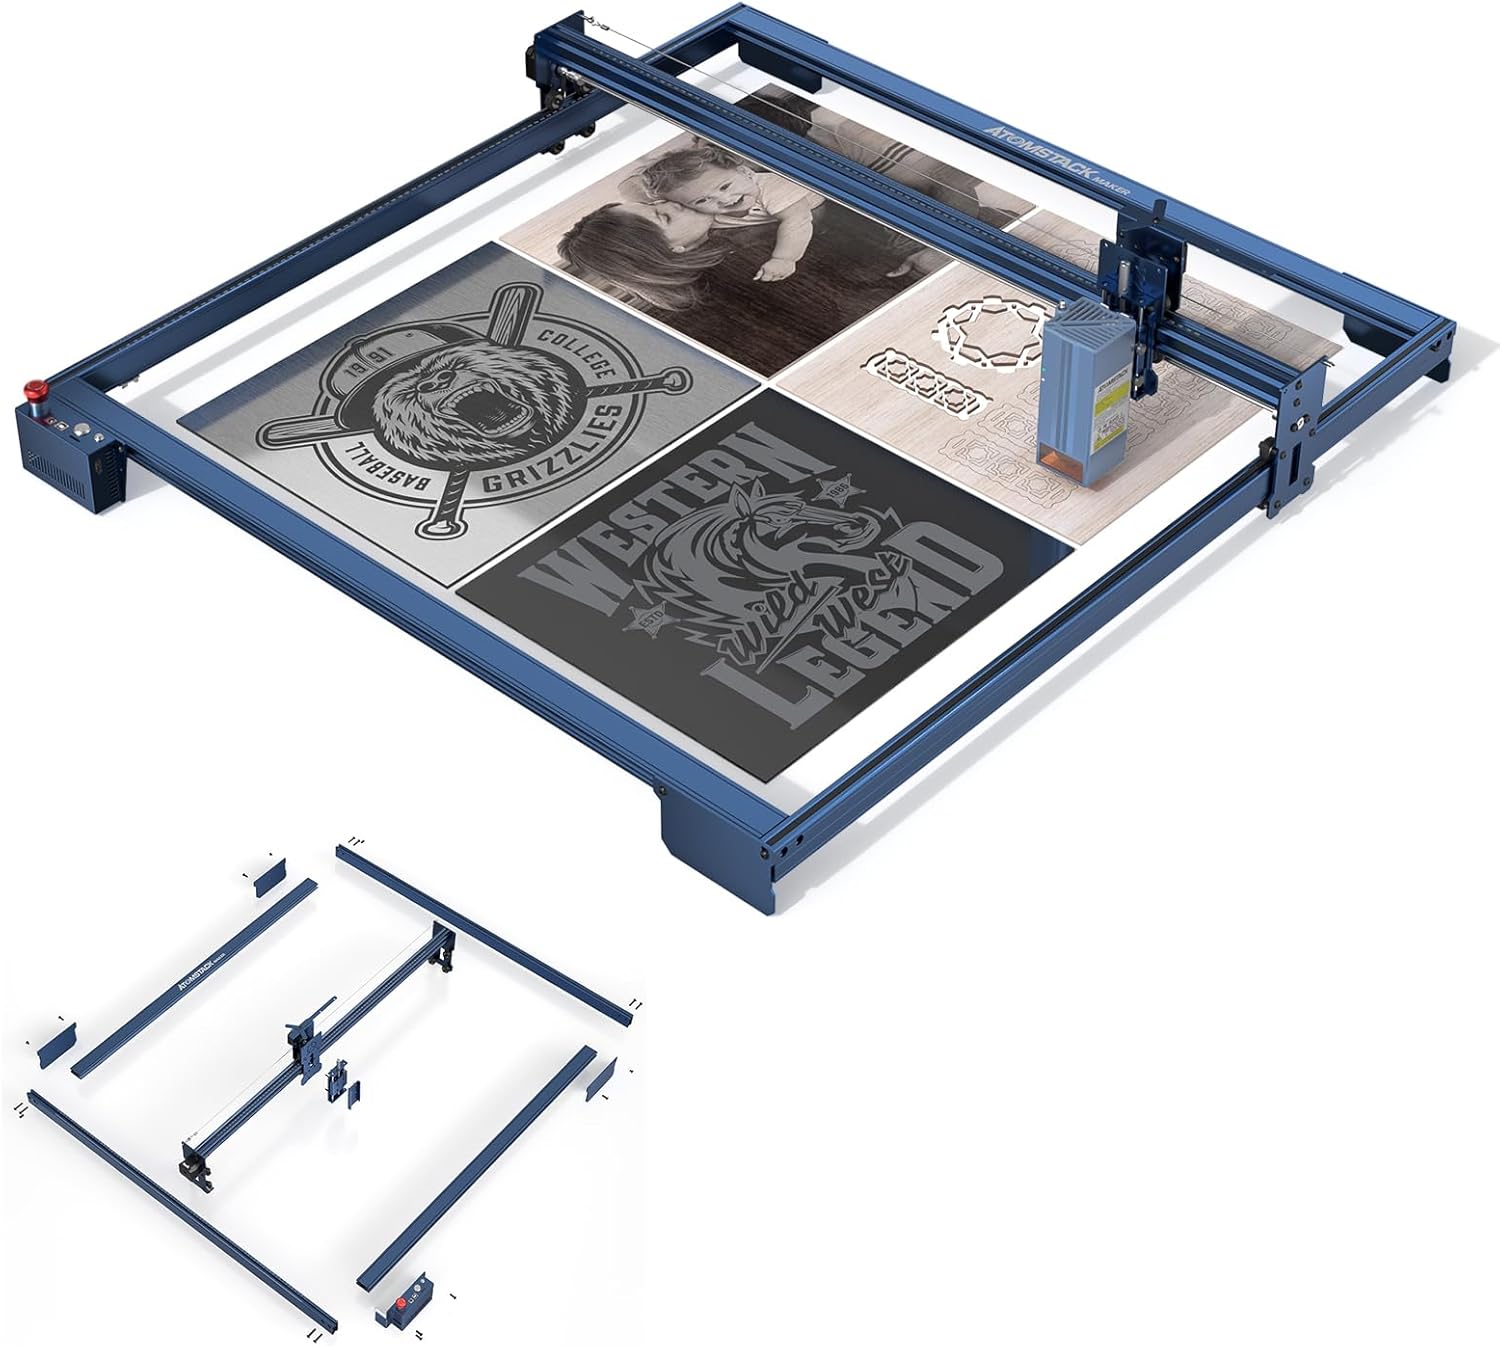
Figure 1.1: The ATOMSTACK AE85 Extension Kit, showcasing its expanded engraving capabilities with various sampprojekty plików.
2. Funkcje produktu
The AE85 Extension Kit offers several key features designed to enhance your laser engraving experience:
- Expanded Engraving Area: Easily extends the engraving size to 850 x 800 mm, a 315% increase from standard 410 x 400 mm areas, without requiring additional accessories.
- High-Precision Original Profile: Utilizes original metal profiles matching the color and quality of ATOMSTACK X-series engraving machines, ensuring stability and precision.
- Z-Axis Rotary Focus: Features a new rotary focusing mechanism for faster and more accurate height adjustment, incorporating a double optical axis and a four-slider precision structure.
- Stable All-Aluminum Construction: Designed with a robust all-aluminum profile, rigorously tested to maintain the same precision and stability as the original machine during engraving and cutting.
- Wszechstronne zastosowanie: The large working area allows for simultaneous engraving and cutting of various materials, significantly improving work efficiency and expanding creative possibilities.

Rysunek 2.1: Koniecview of key features of the AE85 Extension Kit.

Rysunek 2.2: Szczegółowy view of the Z-axis rotary focus system.

Figure 2.3: Illustration of the stable full aluminum profile and precision rollers.

Figure 2.4: Replaceable modules and high adaptability with various laser modules.
3. Compatible Models and Modules
The ATOMSTACK AE85 Extension Kit is compatible with a wide range of ATOMSTACK laser engravers and modules:
Applicable Engraver Models:
- ATOMSTACK A40 PRO, X40 PRO, S40 PRO
- ATOMSTACK A30 PRO, X30 PRO, S30 PRO
- ATOMSTACK A20 PRO, X20 PRO, S20 PRO, A20
- ATOMSTACK A10 PRO, S10 PRO, A10
- ATOMSTACK A5 M30, A5 M40, A5 Pro+, A5 M50 Pro, A5 M50
- ATOMSTACK X7 Pro, X7
- ATOMSTACK P7 M30, P7 M40, P9 M50
Applicable Laser Modules:
- Moduł M40
- Moduł M50
- Moduł M100
- Moduł M150
4. Konfiguracja i instalacja
The AE85 Extension Kit features a modular design for easy installation. Follow these general steps to assemble and integrate the extension kit with your existing ATOMSTACK laser engraver. Refer to the included installation tool and user manual for detailed, step-by-step instructions specific to your engraver model.
4.1. Zawartość opakowania:
Przed rozpoczęciem instalacji należy upewnić się, że wszystkie komponenty są obecne:
- 2 x wałki przedłużające osi Y
- 3 x X-axis Extension Shafts
- 1 x 2.8m Synchronous Belt
- 1 x Z-axis Regulator
- 1 x uchwyt
- 3 x Foot Supports
- 1 x Control Box (with extension cable)
- 2 x Laser Backplane Slides
- 1 x Connection Wire Fixing Bracket
- 1 x Motherboard Connection Cable
- Opaski kablowe 10 x
- 1 x Instrukcja obsługi
- 1 x zestaw narzędzi instalacyjnych
4.2. Assembly Steps (General):
- Demontaż: Carefully disassemble the original frame of your ATOMSTACK laser engraver according to its specific user manual.
- Frame Extension: Replace the original X and Y axis profiles with the longer extension shafts provided in the kit. Ensure all connections are secure and aligned.
- Instalacja paska: Install the new 2.8m synchronous belt, ensuring it is properly tensioned and routed through the pulleys.
- Z-axis Regulator & Bracket: Attach the Z-axis regulator and bracket to the laser module carriage as per the detailed instructions.
- Control Box & Cabling: Connect the extended control box and motherboard connection cable. Use the provided cable ties and fixing bracket to manage cables neatly.
- Foot Supports: Attach the foot supports to ensure the extended frame is stable and level.
- Kontrole końcowe: Before powering on, double-check all connections, belt tension, and ensure the laser module moves freely along both axes.

Figure 4.1: Modular components for easy installation.
5. Operating the Extended Engraver
Once the AE85 Extension Kit is successfully installed, your ATOMSTACK laser engraver will have a significantly larger working area. This section provides general guidance on operating your extended machine.
5.1. Utilizing the Expanded Area:
- Konfiguracja oprogramowania: Ensure your engraving software (e.g., LightBurn, LaserGRBL) is configured to recognize the new, larger working dimensions (850 x 800 mm). This is crucial for accurate project scaling and positioning.
- Umieszczenie materiału: Weź awanturętage of the increased space to engrave or cut larger materials, or to process multiple smaller items in a single batch. Secure your materials properly to prevent movement during operation.
- Regulacja osi Z: Use the Z-axis rotary focus for precise height adjustment of the laser module, especially when working with materials of varying thicknesses.

Figure 5.1: Visual comparison of engraving area expansion.

Rysunek 5.2: Example of a large engraving project enabled by the expanded area.
5.2. Środki ostrożności:
Always adhere to the safety guidelines provided with your original laser engraver. When operating with the extended kit:
- Należy nosić odpowiednie okulary ochronne chroniące przed promieniowaniem laserowym.
- Zadbaj o odpowiednią wentylację w miejscu pracy.
- Nigdy nie pozostawiaj maszyny bez nadzoru podczas pracy.
- Trzymaj materiały łatwopalne z dala od obszaru grawerowania.
6. Konserwacja
Regular maintenance ensures the longevity and optimal performance of your ATOMSTACK AE85 Extension Kit and laser engraver. Perform these checks periodically:
- Czyszczenie szyn i kół: Regularly clean the guide rails and wheels to remove dust and debris, which can affect smooth movement and precision. Use a soft, dry cloth.
- Napięcie pasa: Check the synchronous belt tension. It should be taut but not overly tight. Adjust if necessary to prevent skipping or excessive wear.
- Component Fasteners: Periodically inspect all screws and fasteners on the frame and moving parts. Tighten any loose connections to maintain structural integrity and precision.
- Zarządzanie kablami: Ensure all cables are securely routed and not interfering with moving parts. Replace any worn or damaged cable ties.
7. Rozwiązywanie Problemów
This section addresses common issues you might encounter with the AE85 Extension Kit. For more detailed troubleshooting related to the laser module or software, refer to your original engraver's manual.
7.1. Typowe problemy i rozwiązania:
- Uneven Engraving/Cutting:
- Check if the frame is level and stable. Adjust foot supports if needed.
- Verify that all frame connections are securely tightened.
- Inspect the synchronous belt for proper tension and ensure it's not slipping.
- Movement Stuttering/Resistance:
- Clean the guide rails and wheels to remove any obstructions or debris.
- Ensure the Z-axis mechanism moves smoothly without binding.
- Software Not Recognizing New Area:
- Manually update the working area dimensions in your engraving software settings (e.g., LightBurn, LaserGRBL) to 850 x 800 mm.
- Uruchom ponownie oprogramowanie i grawerkę.
8. Specyfikacje
Key technical specifications for the ATOMSTACK AE85 Engraving Area Extension Kit:
| Specyfikacja | Wartość |
|---|---|
| Marka | UKŁAD ATOMÓW |
| Enlarged Engraving Size | 800x850mm |
| Masa netto produktu | 8 kilogramów |
| Waga paczki | 8.5 kilogramów |
| Independent Package Dimensions | Wymiary: 1195 x 385 x 13 mm |
9. Gwarancja i wsparcie
For information regarding warranty coverage and technical support for your ATOMSTACK AE85 Extension Kit, please refer to the documentation provided with your original purchase or contact the seller directly. As per the product information, a return policy of 30 days for refund/replacement is available.
For further assistance, you may also visit the official ATOMSTACK webodwiedź witrynę lub skontaktuj się z ich kanałami obsługi klienta.


