Ważne informacje dotyczące bezpieczeństwa
Please read this manual thoroughly before assembly and use. Retain this manual for future reference.
- Montaż dwuosobowy: This item requires two people for safe and efficient installation.
- Protective Fences: Consider adding additional protective fences if necessary for your specific environment and animal needs.
- Bezpieczna instalacja: Ensure all components are securely fastened and the coop is anchored to the ground to prevent movement or collapse.
Produkt ponadview
The VEVOR Large Metal Chicken Coop with Run provides a secure and spacious outdoor enclosure for various poultry and small animals. It features a sturdy galvanized frame, hexagonal wire mesh, a waterproof cover, and a convenient half-door design for feeding.

Figure 1: Fully assembled VEVOR Large Metal Chicken Coop with Run.
Konfiguracja i montaż
Assembly of the VEVOR chicken coop is designed to be straightforward. Follow the steps below and refer to the included part number manual for specific component identification.
Instrukcja montażu w formie filmu
Video 1: Step-by-step assembly guide for the VEVOR Large Metal Chicken Coop.
- Step 1: Assemble Base Connectors. Connect pieces 2A, C, and 2B to form five base units.
- Step 2: Install Bottom Frame. Lay out and connect the bottom frame pieces according to the manual's part numbers.
- Step 3: Install Vertical Columns. Insert the vertical support columns into the base connectors.
- Step 4: Install Horizontal Beams. Connect the horizontal beams between the vertical columns to form the main structure.
- Step 5: Install Top Surface Arches. Attach the curved top surface pieces to create the roof structure.
- Step 6: Assemble Door. Assemble the door frame and attach hinges and latches.
- Step 7: Attach Door to Frame. Secure the assembled door to the main coop frame.
- Step 8: Install Top Mesh. Lay the hexagonal wire mesh over the top of the frame. The mesh can be pre-cut to suit the dimensions. Secure it using the provided ties.
- Step 9: Install Front and Rear Mesh. Secure the mesh to the front and rear sections of the coop. Interlace the two mesh sections with PVC lashing rope and secure to the frame, trimming any excess length.
- Step 10: Install Waterproof Cover. Lay the waterproof PE tarp over the top section of the coop and secure it using the rubber cords. Use tent pegs to further secure the entire chicken coop to the ground for stability.
Sturdy Structure and Wire Mesh
The coop is constructed with galvanized frames and hexagonal wire mesh, designed for durability. The mesh extends to the ground, preventing wildlife intrusion.

Figure 2: Detail of the galvanized frame and hexagonal mesh for predator protection.
Instrukcja obsługi
Half-Door Design for Feeding
The coop features an independent half-door design, allowing you to feed your animals without fully opening the main door. This minimizes the risk of animals escaping during feeding.
Video 2: Demonstration of the half-door design for convenient feeding.

Figure 3: The half-door allows for easy feeding without opening the full enclosure.
Konserwacja
Waterproof Cover for Outdoor Use
The included PE tarp provides protection against sun and rain. Its pitched design helps prevent water, debris, and light snow accumulation. Regularly check the tarp for any damage and ensure it is securely fastened to maintain protection.
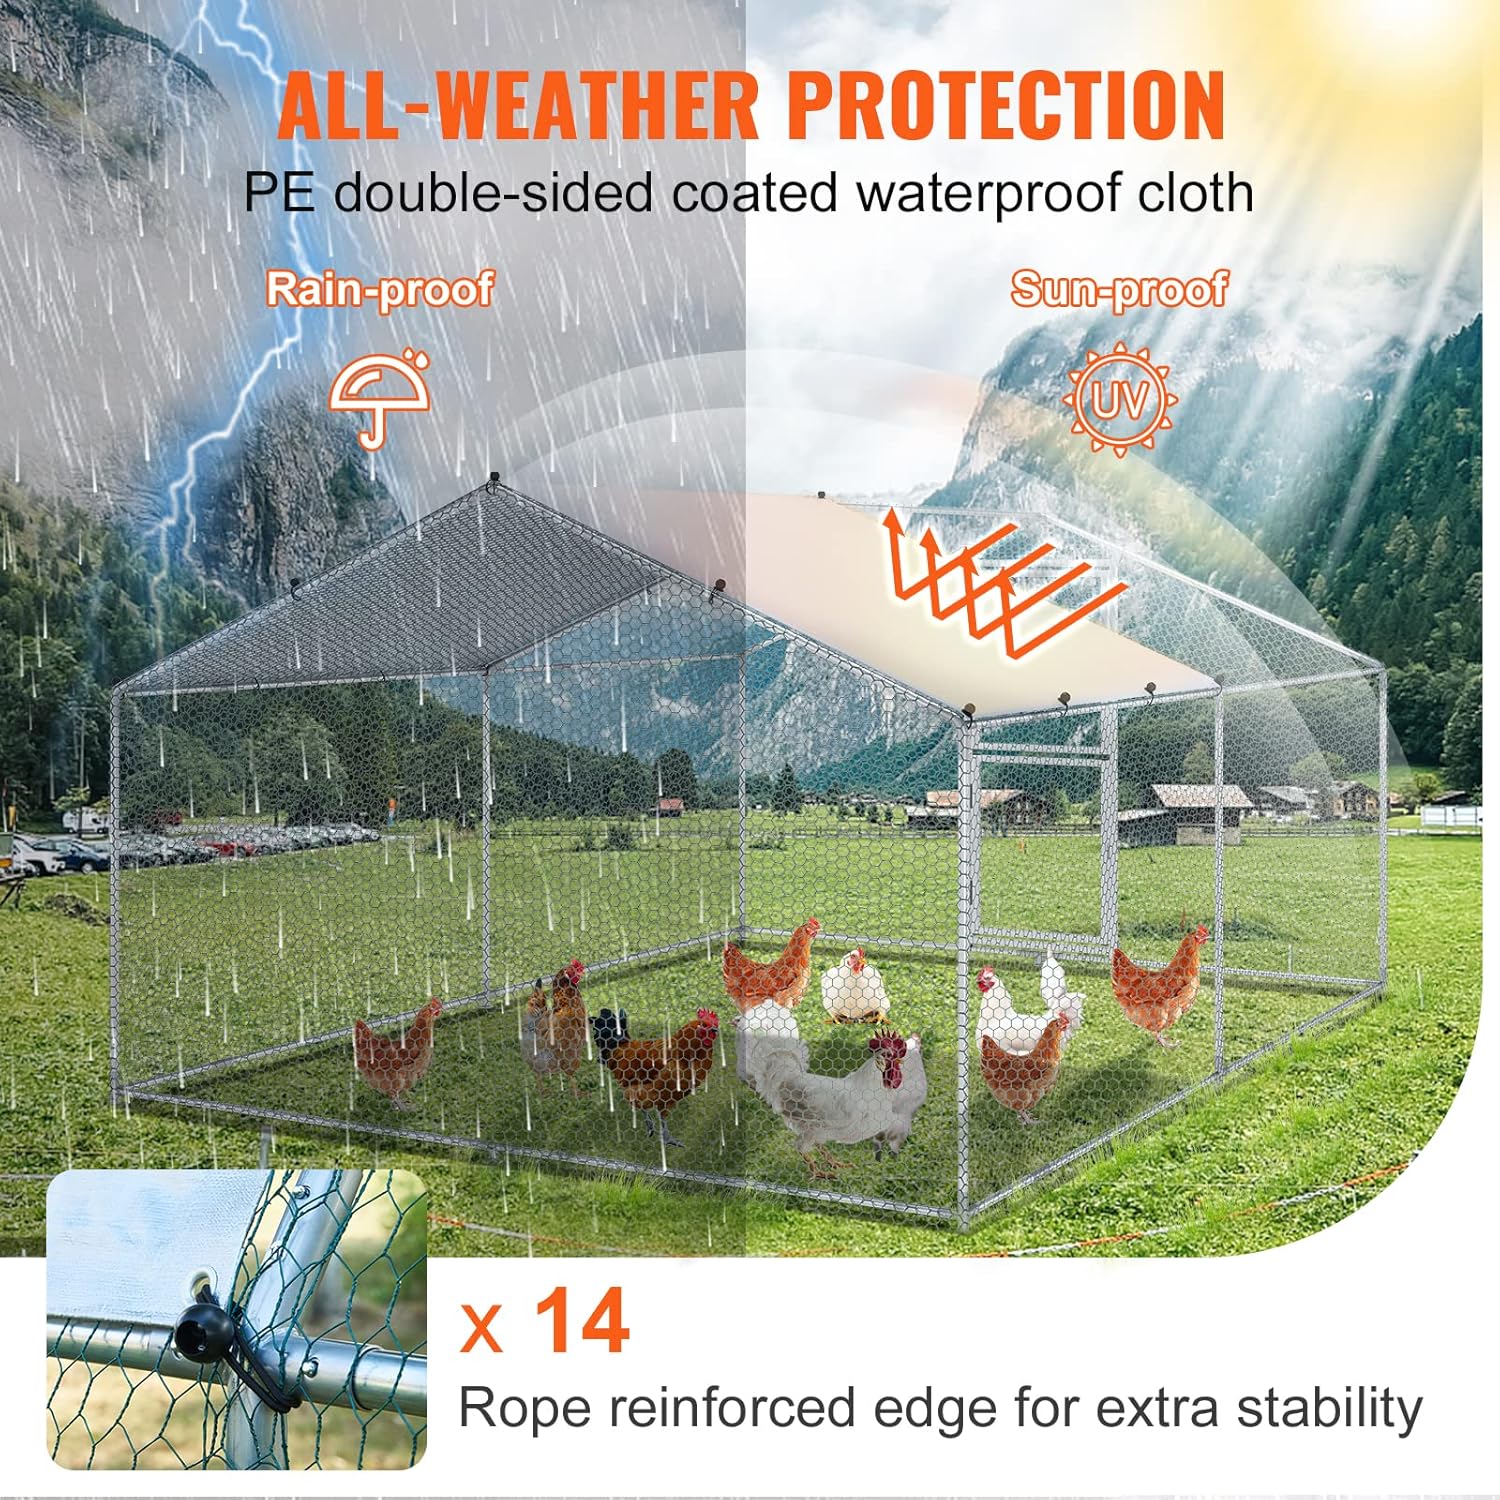
Figure 4: The PE tarp provides all-weather protection for the coop.
Ogólne sprzątanie
Periodically inspect the coop for cleanliness. Remove animal waste and debris regularly. Clean the wire mesh and frame as needed with water and a mild, animal-safe cleaning solution. Ensure all parts are dry before reintroducing animals.
Rozwiązywanie problemów
Jeśli podczas montażu lub użytkowania napotkasz jakiekolwiek problemy, prosimy o kontakt.view the assembly steps and ensure all components are correctly installed and secured. For persistent problems or missing parts, please contact VEVOR customer support.
Specyfikacje
| Funkcja | Szczegół |
|---|---|
| Wymiary produktu (dł. x szer. x wys.) | 157.5 x 118.1 x 78.7 cala (400 x 300 x 200 cm) |
| Rozmiar drzwi | 26.6 x 67.0 cala (67.5 x 170 cm) |
| Waga produktu | 103 funtów (48 kg) |
| Materiał główny | Alloy Steel (Galvanized Frame) |
| Tarp Material | PE Double-sided Coated |
| Gap Size (Mesh) | 24 milimetrów |
| Styl | Spire Roof with Split Door |
| Zalecenie dotyczące rasy | Duże rasy |
| Konkretne zastosowania | Outdoor Poultry Cage (Hen House, Duck Coop, Rabbit Cage, etc.) |

Figure 5: Product dimensions and material specifications.
Gwarancja
Ten produkt VEVOR jest dostarczany z 1 rok gwarancji. Zachowaj dowód zakupu na wypadek roszczeń gwarancyjnych.
Obsługa klienta
For any questions, assistance, or to report missing parts, please contact VEVOR customer support.
- Wsparcie online: Visit the official VEVOR Store on Amazon for support resources and contact information.
- Zwroty: Ten produkt można łatwo zwrócić w ciągu 30 dni.


