Wstęp
This manual provides essential information for the safe and efficient operation of your Dual MCR 4 Portable DAB+/FM Radio. This device offers both digital DAB+ and analog FM radio reception, ensuring a wide range of listening options. Its color TFT display enhances usability by showing station names and additional information. With intuitive controls, auxiliary input, and headphone jack, the MCR 4 is designed for versatile and enjoyable audio experiences.
Informacje dotyczące bezpieczeństwa
- Przeczytaj uważnie wszystkie instrukcje przed użyciem urządzenia.
- Trzymaj urządzenie z dala od wody, wilgoci i wysokich temperatur.
- Nie próbuj demontować ani modyfikować urządzenia. Wszelkie prace serwisowe zlecaj wykwalifikowanemu personelowi.
- Use only the provided power adapter or recommended battery types.
- Podczas pracy urządzenia należy zapewnić odpowiednią wentylację.
- Baterie należy utylizować zgodnie z lokalnymi przepisami.
Zawartość opakowania
Sprawdź, czy w przesyłce znajdują się wszystkie elementy:
- Dual MCR 4 Main Unit
- Zasilacz
- Instrukcja obsługi
Produkt ponadview
The Dual MCR 4 features a compact design with intuitive controls for easy access to its functions. Key components include:
- Kolorowy wyświetlacz TFT: Wyświetla informacje o stacji, czas i opcje menu.
- Pokrętło: For tuning, volume control, and menu navigation.
- Przyciski pamięci: To save and recall your favorite radio stations.
- Antena teleskopowa: Dla optymalnego odbioru sygnału radiowego.
- Wejście pomocnicze (AUX-IN): Located at the back, for connecting external audio devices.
- Gniazdo słuchawkowe: Located at the back, for private listening.
- Mechanical On/Off Switch: Located at the back, for direct power control.
- Passive Membrane: Located at the back, contributing to exceptional sound quality.
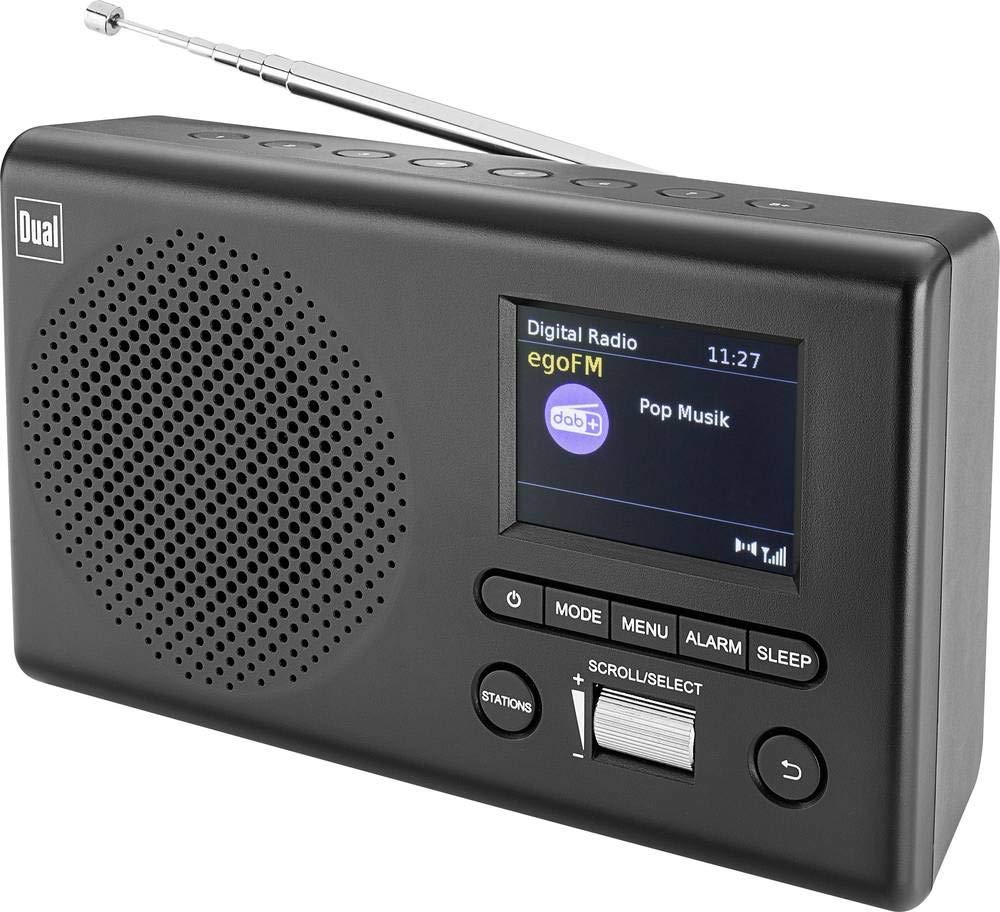
Obraz: Przód view of the Dual MCR 4 Portable DAB+/FM Radio, showing the color TFT display, rotary knob, and control buttons. The radio has a black and silver finish.
Organizować coś
1. Włączanie urządzenia
The Dual MCR 4 can be powered by either the included AC power adapter or batteries, offering portability.
- Korzystanie z zasilacza sieciowego: Connect the power adapter to the DC IN port on the back of the radio and plug the other end into a standard wall outlet.
- Korzystanie z baterii: Open the battery compartment on the bottom/back of the radio and insert the required batteries (type and quantity usually specified inside the compartment or in the full manual). Ensure correct polarity.
2. Regulacja anteny
Extend the telescopic antenna fully for optimal reception of both DAB+ and FM radio signals. Adjust its position for the best signal quality.
3. Initial Power On and Station Scan
After connecting power, switch on the radio using the mechanical ON/OFF switch at the back. The radio will typically perform an automatic station scan upon first use, searching for available digital (DAB+) and analog (FM) radio stations. This process may take a few moments.
Instrukcja obsługi
1. Podstawowa obsługa
- Włączanie/wyłączanie: Use the mechanical switch at the back. For standby, a dedicated button on the front might be available (refer to physical unit).
- Regulacja głośności: Rotate the main rotary knob to adjust the listening volume.
2. Tryb radia DAB+
- Selecting DAB+ Mode: Press the MODE button (if available) or navigate through the menu using the rotary knob until DAB+ mode is selected.
- Wybór stacji: After an automatic scan, use the rotary knob to scroll through the list of available DAB+ stations. Press the knob to confirm your selection.
- Zapisywanie ustawień wstępnych: Tune to your desired station. Press and hold a memory button (e.g., 1-5) until the display confirms the station is saved.
- Przywoływanie ustawień wstępnych: Briefly press the corresponding memory button to recall a saved station.
- Wyświetl informacje: The color TFT display will show station name, program information (DLS), and potentially station logos or slideshows.
3. Tryb radia FM
- Selecting FM Mode: Press the MODE button or navigate through the menu until FM mode is selected.
- Strojenie ręczne: Rotate the tuning knob to manually adjust the frequency.
- Automatyczne skanowanie: Press and hold the tuning knob or a dedicated scan button to automatically search for the next available FM station.
- Zapisywanie ustawień wstępnych: Tune to your desired FM station. Press and hold a memory button until the display confirms the station is saved.
- Przywoływanie ustawień wstępnych: Briefly press the corresponding memory button to recall a saved station.
4. Auxiliary Input (AUX-IN)
Connect an external audio device (e.g., smartphone, MP3 player) to the AUX-IN port on the back of the radio using a 3.5mm audio cable. Select AUX mode on the radio to play audio from the connected device.
5. Korzystanie ze słuchawek
For private listening, plug standard 3.5mm headphones into the headphone jack located on the back of the unit. The internal speaker will automatically mute.
Konserwacja
- Czyszczenie: Przetrzyj radio miękką, suchą ściereczką. Nie używaj środków czyszczących ani rozpuszczalników o działaniu ściernym.
- Składowanie: If storing for an extended period, remove batteries and store the unit in a cool, dry place.
- Pielęgnacja anteny: Obchodź się z anteną teleskopową ostrożnie, aby jej nie uszkodzić.
Rozwiązywanie problemów
| Problem | Możliwe rozwiązanie |
|---|---|
| Brak zasilania |
|
| Słaby odbiór radia |
|
| Brak dźwięku z głośników |
|
Specyfikacje
| Marka | Podwójny |
| Numer modelu | 76074 |
| Kolor | Czarny, Srebrny |
| Technologia strojenia | DAB+, FM |
| Technologia łączności | Auxiliary (AUX-IN) |
| Cechy specjalne | Portable, Color TFT Display |
| Kompatybilne urządzenia | Headphones, External Audio Devices (via AUX-IN) |
| Źródło zasilania | Zasilanie sieciowe (zasilanie sieciowe), zasilanie bateryjne |
| Zawarte komponenty | Main Unit, Power Adapter, User Manual |
| Zalecane zastosowanie | Muzyka |
Gwarancja i wsparcie
For warranty information and technical support, please refer to the specific warranty card included with your product or contact Dual customer service. The included user manual provides detailed instructions and contact information.


