1. Wprowadzenie
This user manual provides comprehensive instructions for the operation, setup, maintenance, and troubleshooting of your TOPVISION Portable Projector, model TP-98. Please read this manual thoroughly before using the projector to ensure proper functionality and to maximize your viewdoświadczenie. Zachowaj tę instrukcję na przyszłość.
2. Koniec produktuview
The TOPVISION TP-98 projector is designed to deliver a high-quality visual experience with its advanced features and versatile connectivity. It is suitable for both home entertainment and professional presentations.
2.1 Główne cechy
- Native 1080P Full HD Resolution: Provides clear and detailed images, supporting 4K video input.
- Wysoka jasność: 9500 Lumens for vibrant and bright projections.
- Duży rozmiar wyświetlacza: Capable of projecting images up to 350 inches for an immersive viewzdobywania doświadczenia.
- Built-in Hi-Fi Stereo Speakers: Dual integrated speakers with SRS sound for enhanced audio.
- rozszerzony lamp Życie: dioda LEDamp designed for up to 150,000 hours of use.
- Wiele opcji łączności: Includes HDMI, USB, AV, and 3.5mm audio output ports.
- Wydajny system chłodzenia: Designed for low power consumption and reduced fan noise.
2.2 składniki produktu

Obraz 2.1: The TOPVISION TP-98 Portable Projector shown with its included carrying case. The projector is white with a black control panel on top and a prominent lens on the front. The carrying case is black with the TOPVISION logo.

Obraz 2.2: Zbliżenie view of the TOPVISION projector's control panel located on the top surface. It features buttons for power, menu navigation, source selection, and volume control, designed for intuitive operation.
3. Konfiguracja
3.1 Umieszczenie
For optimal projection, place the projector on a stable, flat surface. Ensure there is adequate ventilation around the unit. The distance from the screen will determine the image size. Refer to the "Display Adjustment" section for recommended projection distances.

Obraz 3.1: Diagram illustrating the relationship between projection distance and screen size. It shows that a 45-inch display requires approximately 2 meters, a 120-inch display requires 3.5 meters, a 240-inch display requires 5 meters, and a 350-inch display requires 8 meters.
3.2 Połączenie zasilania
- Podłącz przewód zasilający do portu wejściowego zasilania projektora.
- Podłącz drugi koniec przewodu zasilającego do standardowego gniazdka elektrycznego.
- The power indicator light on the projector will illuminate, indicating it is ready for use.
4. Instrukcja obsługi
4.1 Włączanie/wyłączanie zasilania
- To power on the projector, press the power button on the control panel or the remote control.
- Aby wyłączyć, naciśnij ponownie przycisk zasilania. Potwierdź wyłączenie, jeśli pojawi się monit.
4.2 Wybór źródła
After powering on, select your desired input source (HDMI, USB, AV) using the 'Source' button on the control panel or remote. Navigate through the options using the arrow keys and confirm with 'OK'.
4.3 Nawigacja po menu
Use the 'Menu' button to access settings such as picture mode, sound settings, and system preferences. Use the arrow keys to navigate and 'OK' to select. 'Exit' or 'Return' button to go back.
5. Łączność
The TOPVISION projector offers a variety of ports for connecting different devices:
- HDMI (x2): For connecting laptops, game consoles (PS4, Xbox), TV boxes, and other HDMI-enabled devices.
- USB (x2): Do podłączania dysków flash USB w celu odtwarzania multimediów files bezpośrednio.
- AV: Do podłączania starszych urządzeń za pomocą kabla AV.
- Wyjście audio 3.5 mm: Do podłączenia zewnętrznych głośników lub słuchawek.

Obraz 5.1: An illustration demonstrating the various connectivity options of the TOPVISION projector. It highlights HDMI, USB, and AV inputs, along with a line out. Below, icons show compatibility with mobile phones/tablets, USB disks, laptops, Chromecast, audio devices, Fire TV Stick, Xbox/PS4, and DVD players.

Obraz 5.2: A visual guide detailing how to connect various devices to the projector. It shows: (a) iOS devices requiring a Lightning to HDMI adapter, (b) iOS devices using an Airplay/Miracast dongle for wireless connection, (c) Android phones using a Miracast dongle for wireless connection, and (d) PCs/laptops/PS4/TV Boxes connecting directly via an HDMI cable.
Uwaga dotycząca serwisów streamingowych: Due to copyright restrictions, direct streaming of content from apps like Netflix, Prime Video, or Hulu is not supported via direct phone connection. To view these services, connect a laptop, Chromecast, wireless dongle, TV Stick, or Roku device to the projector's HDMI port.
6. Regulacja wyświetlacza
6.1 Regulacja ostrości
Rotate the focus ring located near the projector lens until the projected image appears sharp and clear. This adjustment compensates for different projection distances.
6.2 Korekcja trapezowa
If the projected image appears trapezoidal (wider at the top or bottom), use the keystone correction dial (usually located near the focus ring) to adjust the image geometry. This corrects the distortion when the projector is not perfectly perpendicular to the screen. The projector supports ±30 degrees keystone correction.
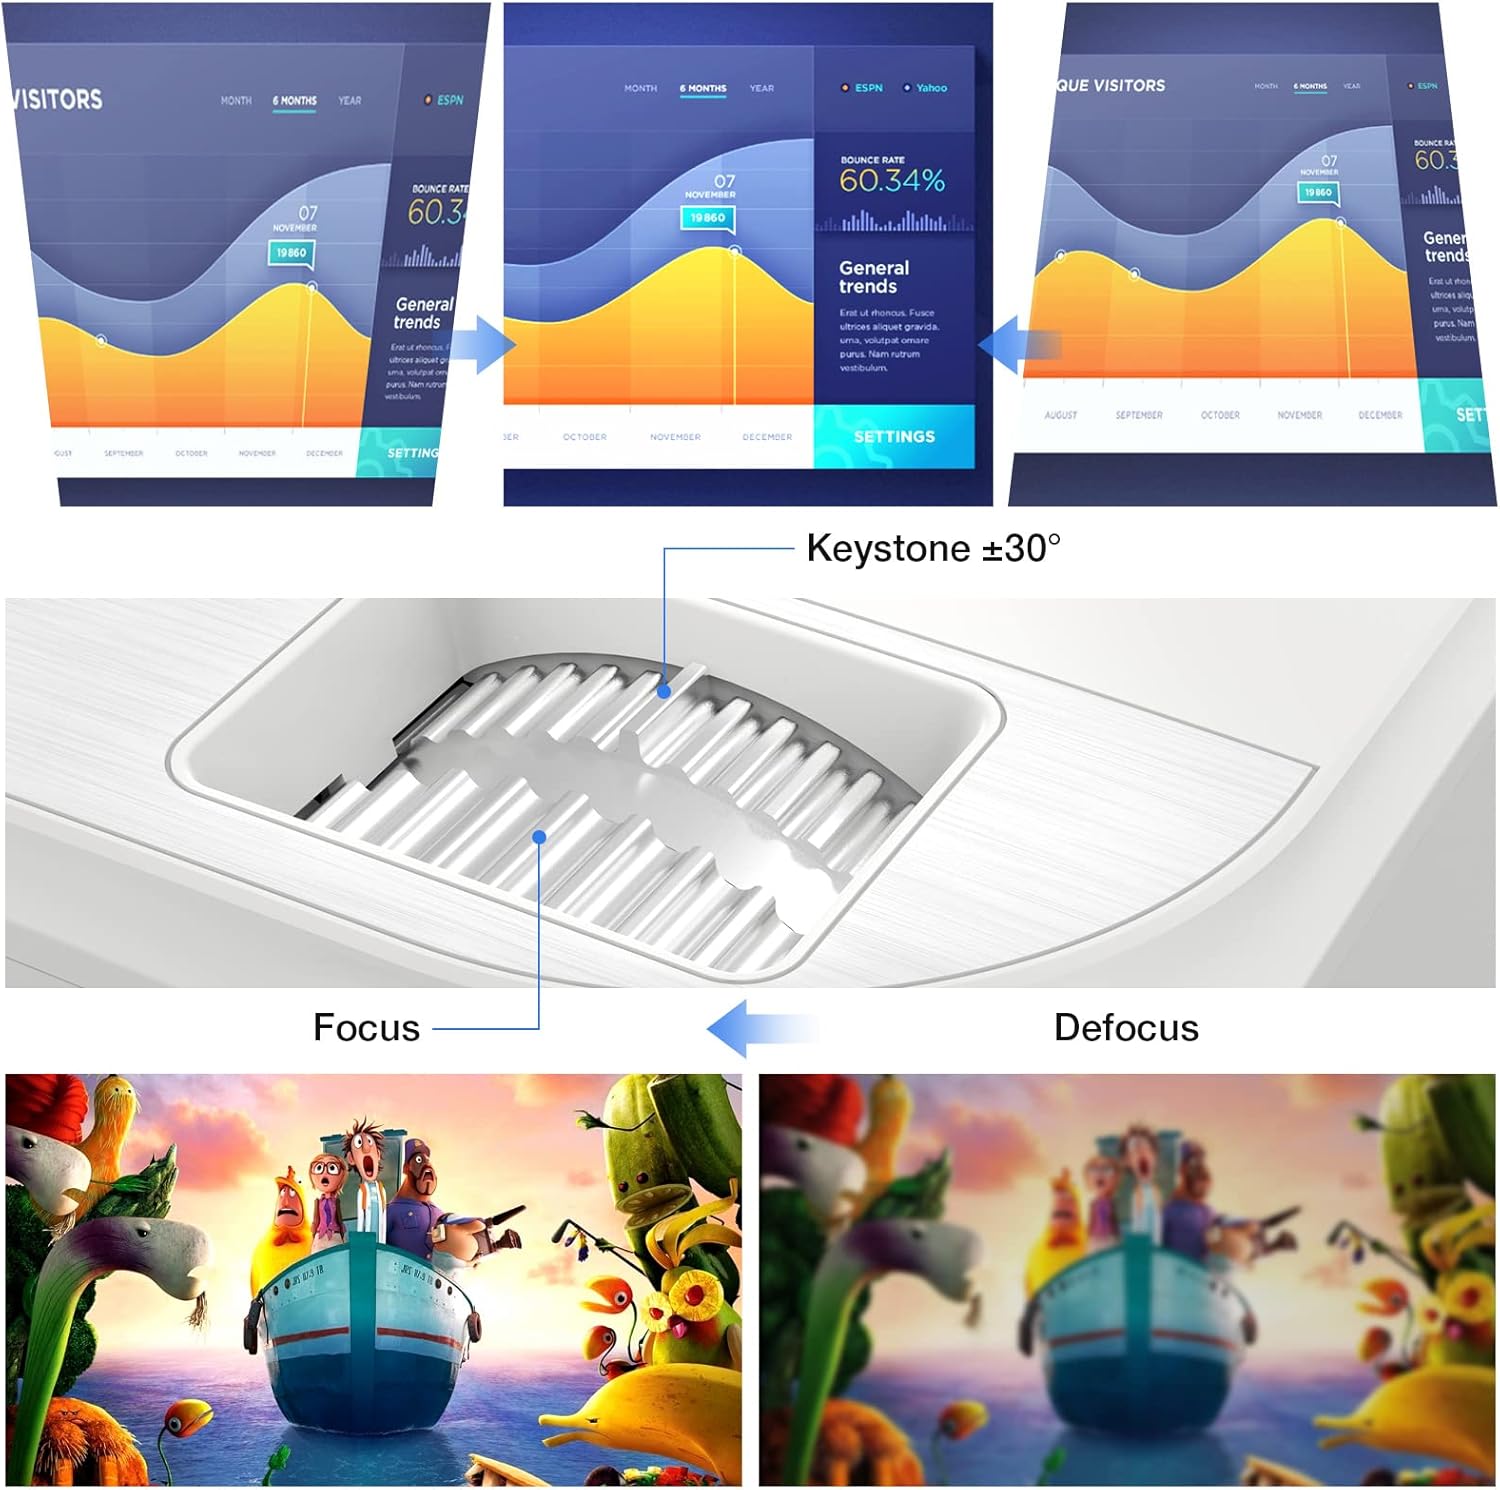
Obraz 6.1: A diagram illustrating the focus and keystone adjustment mechanisms on the projector. It shows the keystone dial for correcting trapezoidal distortion (up to ±30 degrees) and the focus ring for sharpening the image, with visual examples of focused versus defocused projections.
7. Konserwacja
7.1 Czyszczenie
- Obiektyw: Używaj miękkiej, niepozostawiającej włókien ściereczki przeznaczonej specjalnie do soczewek optycznych. Nie używaj środków ściernych.
- Korpus projektora: Przetrzyj powierzchnię miękką, suchą ściereczką. W przypadku uporczywych zabrudzeń delikatnie przetrzyj.amp Można użyć ściereczki, ale należy uważać, aby do urządzenia nie dostał się żaden płyn.
- Otwory wentylacyjne: Regularly check and clean the ventilation ports to prevent dust buildup, which can affect cooling performance. Use a soft brush or compressed air.
7.2 Łamp Życie
Dioda LED projektora lamp has an estimated lifespan of 150,000 hours, providing long-term, consistent performance without frequent lamp części zamienne.
7.3 Układ chłodzenia
The projector features an optimized cooling system to maintain stable operating temperatures and minimize fan noise. Ensure proper airflow around the projector by not blocking the ventilation openings.
8. Rozwiązywanie Problemów
| Problem | Możliwa przyczyna | Rozwiązanie |
|---|---|---|
| Brak wyświetlanego obrazu | Luźny kabel zasilający; Nieprawidłowe źródło sygnału; Urządzenie nie jest prawidłowo podłączone. | Check power connection; Select correct input source (HDMI, USB, AV); Ensure source device is powered on and connected securely. |
| Obraz jest rozmazany | Nie ustawiono ostrości; Projektor znajduje się zbyt blisko/daleko od ekranu. | Wyreguluj pierścień ostrości; Dostosuj odległość projekcji. |
| Obraz ma kształt trapezu | Projektor nie jest ustawiony prostopadle do ekranu. | Use keystone correction dial to adjust. |
| Brak dźwięku | Volume too low; Muted; External speakers not connected; Source device audio settings. | Increase volume; Unmute projector; Connect external speakers if desired; Check audio output settings on source device. |
| Pilot nie działa | Baterie są rozładowane/nieprawidłowo włożone; Przeszkoda między pilotem a projektorem. | Replace batteries; Ensure clear line of sight to IR receiver on projector. |
9. Specyfikacje
| Funkcja | Szczegół |
|---|---|
| Marka | TOPVISION |
| Numer modelu | TP-98 |
| Rozdzielczość natywna | 1920 x 1080P Pełna rozdzielczość HD |
| Maksymalna rozdzielczość wyświetlacza | Supports 4K UHD |
| Jasność | 9500 lumenów |
| Współczynnik kontrastu | 12000:1 |
| Lamp Życie | 150,000 godzin |
| Rozmiar projekcji | 45 - 350 cala |
| Korekcja trapezowa | ±30 stopni |
| Łączność | 2x HDMI, 2x USB, 1x AV, 1x 3.5mm Audio Out |
| Wymiary produktu | 30 dł. x 25 szer. x 11 wys. cm |
| Waga | 4.3 kilogramów |
| Typ wyświetlacza | LCD |
| Cechy specjalne | Built-in Stereo Speakers, Touch Sensitive Panel |
10. Gwarancja i wsparcie
TOPVISION provides a 3-year free repair service for this product. Additionally, lifetime professional technical support is available. If you encounter any issues or require assistance, please do not hesitate to contact TOPVISION customer service.
For support, please refer to the contact information provided on the TOPVISION official webwitryny lub dokumentacji zakupu.


