1. Wprowadzenie
This manual provides comprehensive instructions for the safe and effective operation of the VEVOR 4550 Stud Welder Kit. This 800 VA, 110V spot welding system is designed for automotive body repair, specifically for pulling dents and attaching studs. Please read this manual thoroughly before use to ensure proper function and safety.
2. Informacje dotyczące bezpieczeństwa
WARNING: Electric shock, fire, and serious injury can result from improper use. Always follow safety guidelines.
- Always wear appropriate personal protective equipment (PPE), including welding helmet with proper shade, safety glasses, welding gloves, and protective clothing.
- Ensure the work area is well-ventilated to avoid inhaling welding fumes.
- Trzymać materiały łatwopalne z dala od obszaru spawania.
- Nie należy używać spawarki wamp lub w wilgotnych warunkach.
- Upewnij się, że zasilanie jest zgodne z wymaganiami spawarki (110 V).
- The unit features thermal protection that activates when the main transformer temperature reaches approximately 95 °C (203 °F) to prevent overheating. Allow the unit to cool down if this protection engages.
- Przed przystąpieniem do prac konserwacyjnych lub wymianą akcesoriów należy odłączyć zasilanie.
3. Koniec produktuview i komponenty
The VEVOR 4550 Stud Welder Kit is designed for efficient dent repair. Key components and features include:
- Heat-Proof Repair Gun: Constructed with durable ABS material and featuring a pure copper electrode for excellent performance and longevity.
- Upgraded Slide Hammer: A heavy-duty slide hammer with a quick-release chuck, cast iron slide weight, and a comfortable non-slip grip for effective dent pulling.
- Ergonomiczna konstrukcja: Features a super sensitive trigger and an easy-to-handle D-handle design for comfortable, one-handed operation.
- Ochrona termiczna: Built-in overload relay to prevent overheating, enhancing safety and product lifespan.
Zawartość zestawu:
- 1 x Multifunctional Pull Hammer
- 500 x 2mm Studs
- 1 x Stud Electrode
- 1 x Internal Stud Lock
- 1 x External Stud Lock
- 1 x Storage Case
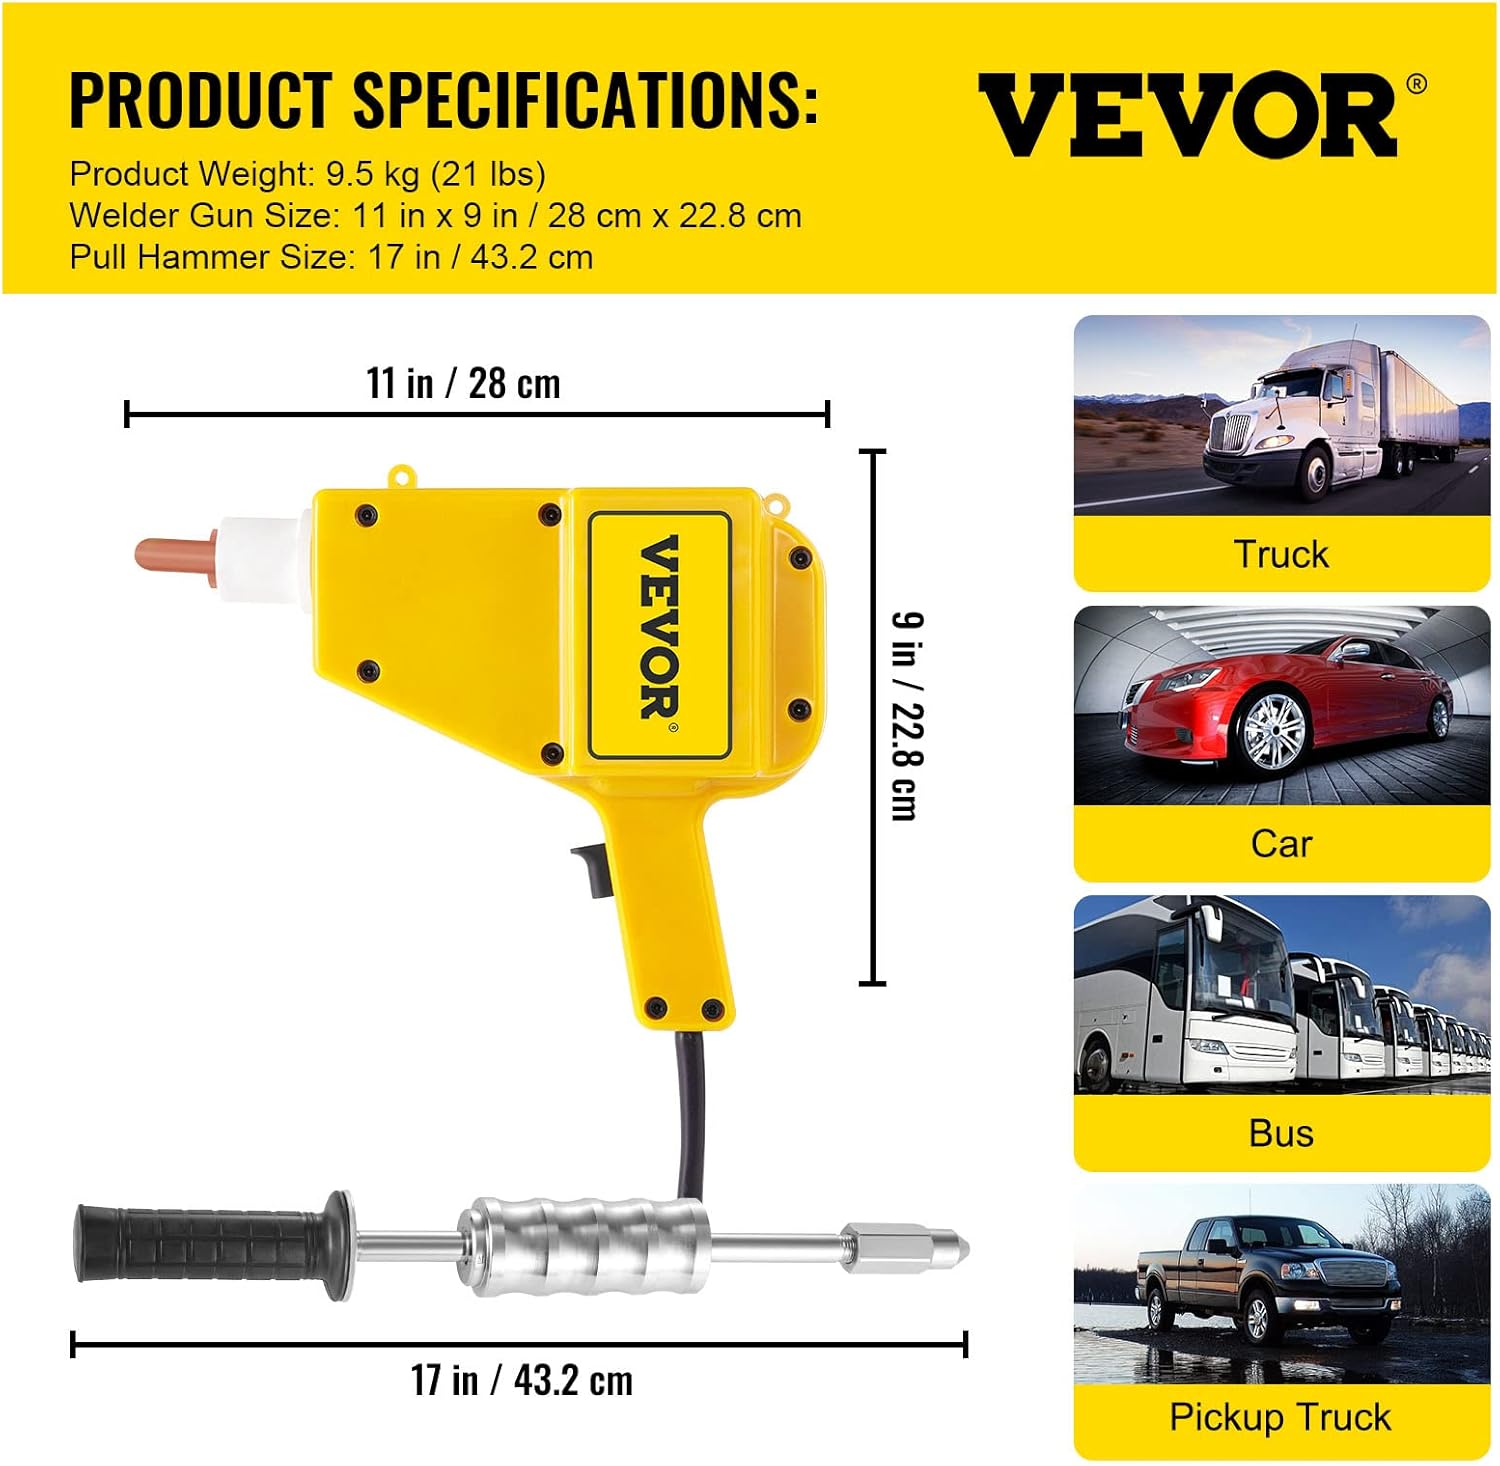
Figure 1: VEVOR 4550 Stud Welder Kit showing the welder gun, slide hammer, and various accessories within its storage case.
4. Konfiguracja
- Rozpakować: Ostrożnie wyjmij wszystkie elementy z opakowania i sprawdź, czy nie są uszkodzone.
- Podłączenie zasilania: Connect the welder's power cord to a grounded 110V power outlet. Ensure the outlet is capable of handling the 800 VA power requirement.
- Montaż elektrod: Insert the appropriate stud electrode into the front of the welding gun. Ensure it is securely seated.
- Stud Loading: Load a 2mm stud into the stud lock mechanism on the electrode.
- Przygotowanie stanowiska pracy: Clean the dented metal surface thoroughly to remove any paint, rust, or contaminants. This ensures a good electrical connection for welding.

Figure 2: Detail of the welder gun's pure copper electrode and durable ABS body construction.
5. Instrukcja obsługi
Follow these steps for effective dent pulling using the VEVOR 4550 Stud Welder Kit:
- Position the Stud: Place the tip of the stud, which is held by the electrode, firmly against the cleaned dented area of the metal panel.
- Rozpocznij spawanie: Press the trigger on the welder gun. The unit will instantly weld the stud to the metal surface. Release the trigger once the weld is complete.
- Attach Slide Hammer: Securely attach the multifunctional pull hammer to the welded stud. The quick-release chuck ensures a firm grip.
- Wyciągnij wgniecenie: Use the slide hammer to gently and repeatedly pull the stud outwards, gradually working the dent out of the panel. Apply controlled force to avoid over-pulling or damaging the metal.
- Remove Stud: Once the dent is sufficiently pulled, twist or cut the stud off the panel. Grind down any remaining stud material for a smooth finish.
- Powtarzać: For larger dents, repeat the process by welding multiple studs across the affected area and pulling them incrementally.

Figure 3: The upgraded slide hammer being used to pull a dent, illustrating its effectiveness.
6. Konserwacja
Regular maintenance ensures the longevity and optimal performance of your VEVOR 4550 Stud Welder Kit:
- Czyszczenie: After each use, wipe down the welder gun and accessories with a clean, dry cloth. Remove any metal dust or debris from the electrode area.
- Kontrola elektrody: Periodically inspect the stud electrode for wear or damage. Replace if necessary to ensure consistent welding performance.
- Kontrola kabla: Check all power cables and connections for signs of wear, cuts, or damage. Do not use the unit if cables are compromised.
- Składowanie: Store the kit in its provided case in a dry, clean environment, away from moisture and extreme temperatures.
7. Rozwiązywanie Problemów
If you encounter issues with your VEVOR 4550 Stud Welder Kit, refer to the following common problems and solutions:
| Problem | Możliwa przyczyna | Rozwiązanie |
|---|---|---|
| Spawarka nie włącza się. | No power supply; faulty power cord; tripped circuit breaker. | Sprawdź połączenie zasilania, obejrzyj przewód zasilający, zresetuj wyłącznik automatyczny. |
| Studs do not weld securely. | Poor contact with workpiece; dirty surface; worn electrode. | Ensure firm contact; clean workpiece surface; replace electrode. |
| Urządzenie przegrzewa się i wyłącza. | Excessive continuous use; insufficient cooling. | Allow the unit to cool down. The thermal protection system will automatically reset once the temperature drops below 95 °C (203 °F). |
| Slide hammer does not grip studs. | Chuck mechanism dirty or damaged. | Clean the chuck; inspect for damage and replace if necessary. |

Figure 4: Illustration of the thermal protection feature, indicating the temperature threshold for activation.
8. Specyfikacje
| Funkcja | Specyfikacja |
|---|---|
| Numer modelu | 4550 |
| Marka | WIĘZIĆ |
| Wejście Voltage | 110 V |
| Transformator VA | 800 VA |
| Maksymalny prąd | 1600A |
| Waga produktu | 9.5 kg (21 funta) |
| Welder Gun Dimensions | 11 cala x 9 cala / 28 cm x 22.8 cm |
| Pull Hammer Length | 17 cala / 43.2 cm |
| Thermal Protection Activation | 95 °C (203 °F) |
| Material (Gun Body) | ABS |
| Material (Electrode) | Czysta miedź |

Figure 5: Visual representation of the welder gun and pull hammer dimensions, along with product weight.
9. Gwarancja i wsparcie
Aby uzyskać informacje o gwarancji, pomocy technicznej lub części zamiennych, prosimy o bezpośredni kontakt z działem obsługi klienta VEVOR. Skorzystaj z danych kontaktowych dołączonych do opakowania produktu lub odwiedź oficjalną stronę internetową VEVOR. webstrona.


