Wstęp
This manual provides instructions for the setup, operation, and maintenance of your Zelotes T20 Ergonomic Vertical Mouse. Please read this manual thoroughly before using the product to ensure proper function and longevity.
Produkt ponadview
The Zelotes T20 is an ergonomic vertical mouse designed to promote a natural hand and wrist posture, reducing strain during extended use. It features adjustable DPI settings and multiple programmable buttons for enhanced control.

Figure 1: Zelotes T20 Ergonomic Vertical Mouse. This image displays the overall design of the mouse, highlighting its vertical orientation and LED lighting.
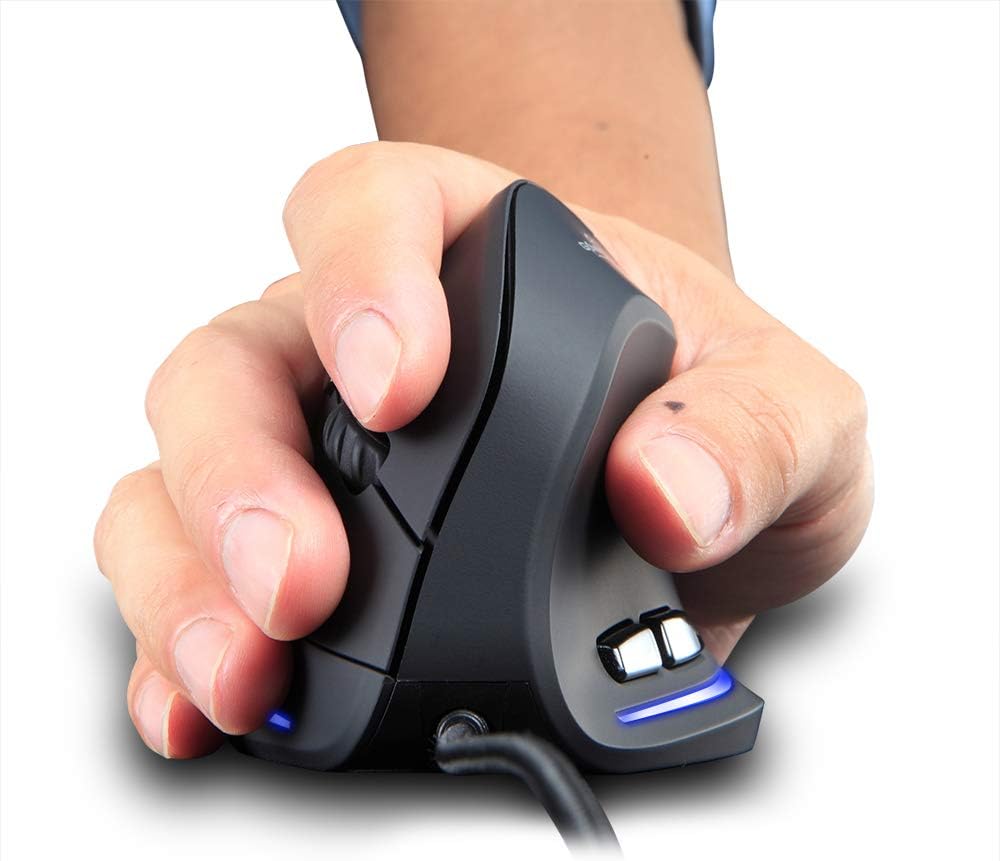
Figure 2: Proper hand placement on the Zelotes T20 mouse. This image illustrates how the vertical design allows for a natural handshake grip, intended to reduce wrist strain.

Figure 3: Ergonomic comparison. This diagram contrasts the natural wrist posture with a vertical mouse against the twisted posture often associated with traditional horizontal mice, emphasizing fatigue reduction.
Zawartość opakowania
Sprawdź, czy w opakowaniu znajdują się wszystkie elementy:
- 1 x Zelotes Ergonomic Vertical Mouse
- 1 x Instrukcja obsługi (ten dokument)
Organizować coś
- Podłącz mysz: Plug the USB cable of the Zelotes T20 mouse into an available USB port on your computer.
- Instalacja sterownika: The mouse is plug-and-play. Your operating system should automatically detect and install the necessary drivers. No additional software installation is typically required.
- Usuń folię ochronną: Before use, locate and remove the protective film from the "Bigfoot pads" on the underside of the mouse for optimal gliding performance.

Figure 4: Underside of the mouse. This image shows the Teflon material pads and indicates the location of the protective film that should be removed before initial use.
Instrukcja obsługi
Funkcje przycisków
The Zelotes T20 mouse features 6 buttons for various functions:
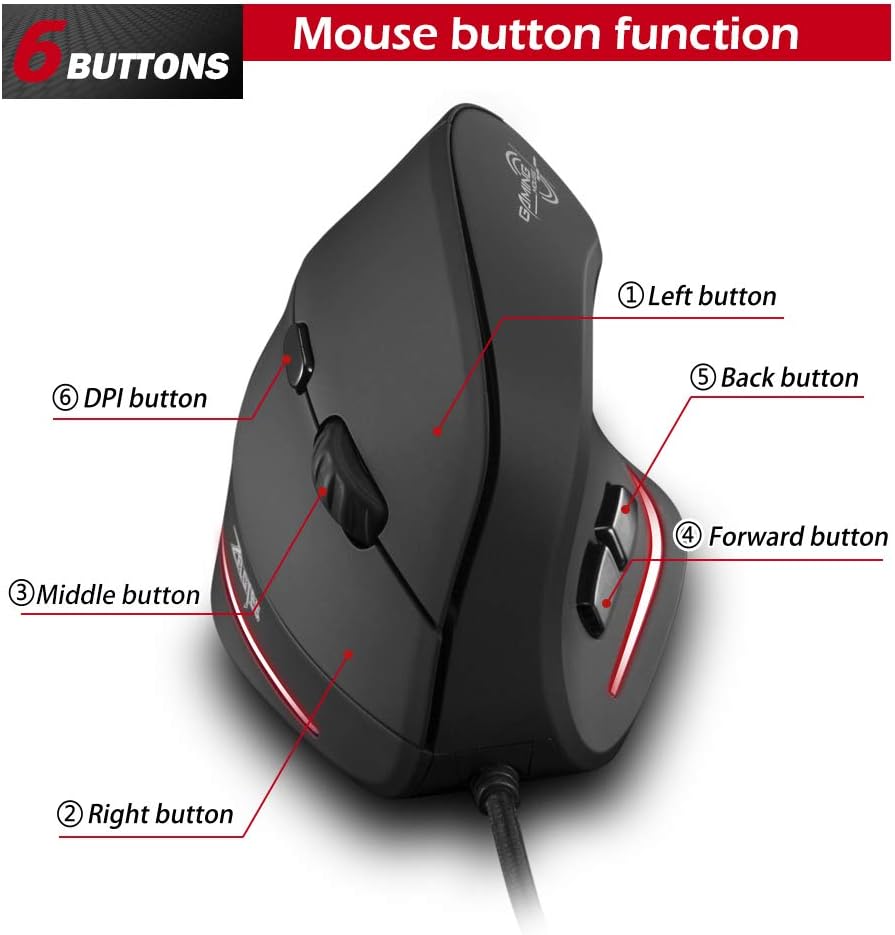
Figure 5: Mouse button layout. This diagram labels each of the six buttons: Left, Right, Middle (scroll wheel click), Forward, Back, and DPI adjustment button.
- Lewy przycisk: Standardowa funkcja lewego kliknięcia.
- Prawy przycisk: Standardowa funkcja prawego przycisku myszy.
- Środkowy przycisk (kółko przewijania): Clickable scroll wheel for middle-click functions.
- Przycisk do przodu: Nawiguje do przodu w web przeglądarki lub file odkrywcy.
- Przycisk Wstecz: Porusza się wstecz web przeglądarki lub file odkrywcy.
- Przycisk DPI: Dostosowuje czułość myszy (DPI).
Regulacja DPI (czułości)
The mouse offers four adjustable DPI settings to suit different tasks and preferences. Press the DPI button (Button 6 in Figure 5) to cycle through the settings. Each DPI level is indicated by a specific LED light color:
- 1200 DPI: Blue light hint
- 1600 DPI: Dark purple light hint
- 2400 DPI: Red light hint
- 3200 DPI: Light purple light hint
The light will stay on for approximately 3 seconds when switching DPI settings to indicate the current level.

Figure 6: DPI adjustment and LED indicators. This image illustrates the DPI button and the color coding for each of the four sensitivity settings.
Using Forward/Back Keys
The dedicated Forward and Back buttons (Buttons 4 and 5 in Figure 5) provide quick navigation. These buttons are designed to streamline browsing through web pages or folders, reducing the need for on-screen clicks.

Figure 7: Forward and Back navigation buttons. This image highlights the placement of the forward and back buttons, designed for convenient web I file nawigacja.
Konserwacja
- Czyszczenie: Do czyszczenia powierzchni myszy użyj miękkiej, suchej ściereczki. W przypadku uporczywych zabrudzeń, delikatnie przetrzyj powierzchnię.amp Można użyć ściereczki, aby mieć pewność, że do wnętrza myszy nie dostanie się żadna ciecz.
- Konserwacja czujnika: Utrzymuj czujnik optyczny, który znajduje się na spodzie myszy, w czystości i zapobiegaj gromadzeniu się kurzu lub zanieczyszczeń, aby zapewnić precyzyjne śledzenie ruchów.
- Pielęgnacja kabli: Aby zapobiec uszkodzeniom kabla USB, należy unikać jego ostrego zginania i nadmiernego ciągnięcia.

Figure 8: Mouse surface texture. This image provides a close-up view of the mouse's surface, described as smooth for comfortable handling.
Rozwiązywanie problemów
- Mysz nie odpowiada:
- Sprawdź, czy kabel USB jest prawidłowo podłączony do działającego portu USB w komputerze.
- Spróbuj podłączyć mysz do innego portu USB.
- Uruchom ponownie komputer.
- Niedokładne śledzenie:
- Wyczyść czujnik optyczny znajdujący się na spodzie myszy.
- Ensure you are using the mouse on a suitable surface (e.g., a mouse pad). Highly reflective or transparent surfaces may cause issues.
- Dostosuj ustawienie DPI za pomocą przycisku DPI.
- Buttons Not Functioning Correctly:
- Sprawdź, czy mysz jest prawidłowo podłączona.
- Przetestuj mysz na innym komputerze, aby ustalić, czy problem dotyczy myszy czy ustawień komputera.
Specyfikacje
| Funkcja | Szczegół |
|---|---|
| Model | T20 |
| Numer przycisku | 6 przyciski |
| System śledzenia | Optyczny |
| Długość kabla USB | 1.8m |
| Objętość roboczatage/Bieżący | 5 V/100 mA |
| Żywotność przycisku | 5 miliony razy |
| Roller Life | 1.2 million turns |
| Wymiary produktu (dł. x szer. x wys.) | 110 × 72 × 75 mm (4.33 × 2.83 × 2.95 cala) |
| Waga produktu | 160 ± 5 g (5.6 uncji) |
| Rozdzielczość (DPI) | 1200-1600-2400-3200 |
| Rate of Return (Polling Rate) | 125 Hz |
| Zgodność | Windows 2000/ME/XP (x64)/Vista/7/8/10, Mac OS X (over V10.4), Linux |

Figure 9: Product dimensions. This image provides detailed measurements of the mouse from various angles.
Gwarancja i wsparcie
Aby uzyskać informacje dotyczące gwarancji lub pomocy technicznej, zapoznaj się z oficjalną instrukcją producenta webOdwiedź stronę internetową lub skontaktuj się z działem obsługi klienta. Zachowaj paragon jako dowód zakupu.


