Wstęp
This manual provides essential information for the safe and efficient operation of your TX Automatic Wire Crimping Machine, Model 1.5T with horizontal mold. This high-speed, super mute terminal crimping machine is designed for high output and low maintenance, utilizing frequency conversion technology for electronic precision positioning. Please read this manual thoroughly before operating the machine.
Środki ostrożności
- Always ensure the machine is properly grounded before operation.
- Podczas pracy należy nosić odpowiedni sprzęt ochrony osobistej (PPE), w tym okulary ochronne.
- Nie obsługuj maszyny mokrymi rękami lub wamp warunki.
- Trzymaj ręce i luźną odzież z dala od ruchomych części.
- Przed przystąpieniem do prac konserwacyjnych lub regulacyjnych należy odłączyć zasilanie.
- Upewnij się, że miejsce pracy jest czyste, dobrze oświetlone i wolne od przeszkód.
Produkt ponadview
The TX Automatic Wire Crimping Machine is a robust tool designed for precise and efficient crimping of various terminals. Its advanced features ensure stable voltage, high speed, and high accuracy in crimping operations.

Rycina 1: Przód view of the TX Automatic Wire Crimping Machine, showing the control panel and crimping mechanism.
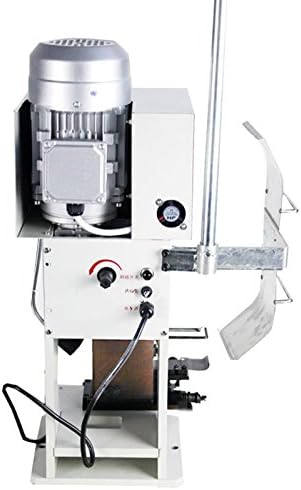
Rysunek 2: Strona view of the machine, highlighting the motor and power connections.
Organizować coś
Rozpakowywanie i kontrola
Carefully unpack the machine and all accessories. Inspect for any shipping damage. Report any damage to your supplier immediately.
Zawartość opakowania:
- 1 x Automatic Wire Crimping Machine
- 1 x podstawka podporowa
- 1 x Horizontal Mold with Tools (pre-installed or separate)
- Accessories (power cord, etc.)
Montaż
- Ustaw maszynę na stabilnej i równej powierzchni.
- Attach the support stand to the machine using the provided hardware. Ensure it is securely fastened.
- Verify that the horizontal mold is correctly installed. The machine is capable of fitting vertical, horizontal, and single grain molds. Ensure the correct mold type is in place for your application.
- Connect the power cord to the machine and then to a compatible power outlet (110V/60HZ for this model).

Figure 3: Illustration of various mold types compatible with the machine: vertical, horizontal, and single grain molds.
Instrukcja obsługi
Powering On and Initial Checks
- Należy upewnić się, że przestrzegane są wszystkie środki ostrożności.
- Włącz główny wyłącznik zasilania, zwykle zlokalizowany na panelu sterowania.
- Observe the display for any error codes or indicators.
Adjusting the Mold and Crimping Force
The machine features convenient and swift adjustment for the mold. Refer to the control panel and any specific markings for fine-tuning the crimping force and position to match your terminal and wire specifications. The crimping force is rated at 1500KG.

Rysunek 4: Szczegółowy view of the crimping mechanism, showing the area where terminals and wires are inserted.
Proces zaciskania
- Select the appropriate terminal and wire for your application.
- Insert the terminal into the mold.
- Carefully position the stripped wire into the terminal.
- Activate the crimping cycle using the foot pedal or control button. The machine will perform a high-speed, precise crimp.
- Remove the crimped terminal and inspect the quality of the crimp.

Rysunek 5: Examples of different types of crimped terminals, demonstrating the machine's versatility.
This machine is suitable for crimping DC terminals, AC terminals, single terminals, and continuous terminals.
Konserwacja
Regular maintenance ensures the longevity and optimal performance of your crimping machine. Always disconnect power before performing any maintenance.
Codzienna konserwacja:
- Clean the crimping area and mold after each use to remove wire debris and dust.
- Wipe down the exterior of the machine with a clean, dry cloth.
Konserwacja tygodniowa/miesięczna:
- Inspect all moving parts for wear and tear.
- Apply a light lubricant to pivot points and sliding surfaces as recommended by the manufacturer (if applicable).
- Check all electrical connections for tightness and signs of damage.
- Ensure the support stand is stable and all fasteners are secure.

Rysunek 6: View of the machine's base and lower mechanism, important for cleaning and lubrication.
Rozwiązywanie problemów
This section provides solutions to common issues you may encounter. For problems not listed here, please contact customer support.
| Problem | Możliwa przyczyna | Rozwiązanie |
|---|---|---|
| Maszyna nie włącza się. | Brak zasilania, luźny przewód zasilający, zadziałał wyłącznik automatyczny. | Sprawdź podłączenie zasilania, upewnij się, że gniazdko elektryczne działa, zresetuj wyłącznik automatyczny. |
| Poor crimp quality (loose or deformed). | Incorrect mold; improper crimping force setting; worn mold. | Verify mold type matches terminal; adjust crimping force; inspect and replace mold if worn. |
| Maszyna wydaje nietypowy dźwięk. | Brak smarowania, luźne elementy, ciało obce. | Lubricate moving parts; check and tighten fasteners; inspect for and remove any foreign objects. |
| Crimping cycle does not complete. | Obstruction in mechanism; sensor issue. | Clear any obstructions; contact support if sensor issue is suspected. |
Specyfikacje
| Parametr | Wartość |
|---|---|
| Model | LY 1.5T |
| Udar | 30mm |
| Moc | 110V/60HZ (for this model) |
| Waga | 49 kg |
| Wymiary (dł.*szer.*wys.) | Wymiary: 270*240*650mm |
| Moc silnika | 0.55 kW |
| Siła zaciskania | 1500 kg |
| Obowiązujące terminale | DC terminals, AC terminals, Single terminals, Continuous terminals |
| Tworzywo | Płyta stalowa |
Gwarancja i wsparcie
For warranty information, technical support, or to inquire about additional molds (vertical, horizontal, or single grain), please contact your original supplier or the manufacturer, TZ. Ensure you have your product model number (LY 1.5T) and purchase details available when seeking support.
The manufacturer is TZ. For specific inquiries regarding molds, please message your supplier directly as indicated in the product description.