1. Wprowadzenie
This manual provides comprehensive instructions for the installation, operation, and maintenance of your BlueBird A1390 Automatic Irrigation Tap Programmer. This device is designed to automate your garden watering schedule, ensuring efficient and consistent irrigation. Please read this manual thoroughly before using the product to ensure correct operation and to prevent damage.
2. Informacje dotyczące bezpieczeństwa
- Do not immerse the unit in water. The unit is designed to be weather-resistant, but not submersible.
- Używaj wyłącznie baterii alkalicznych AA 1.5 V. Nie mieszaj starych i nowych baterii ani różnych typów baterii.
- Aby zapobiec wyciekowi baterii, wyjmij je, jeśli urządzenie nie będzie używane przez dłuższy czas.
- Przechowywać w miejscu niedostępnym dla dzieci.
- Nie próbuj samodzielnie demontować ani naprawiać urządzenia. W celu uzyskania pomocy skontaktuj się z wykwalifikowanym personelem.
- Upewnij się, że wszystkie połączenia są solidne, aby zapobiec wyciekom.
3. Zawartość opakowania
Proszę sprawdzić, czy w paczce znajdują się następujące elementy:
- 1x BlueBird A1390 Automatic Irrigation Tap Programmer
- 1x Instrukcja obsługi (ten dokument)
Note: 2 AA 1.5V batteries are required for operation and are not included in the package.
4. Koniec produktuview
The BlueBird A1390 features two main rotary dials for setting irrigation frequency and duration, along with a battery indicator and an ON/OFF switch.
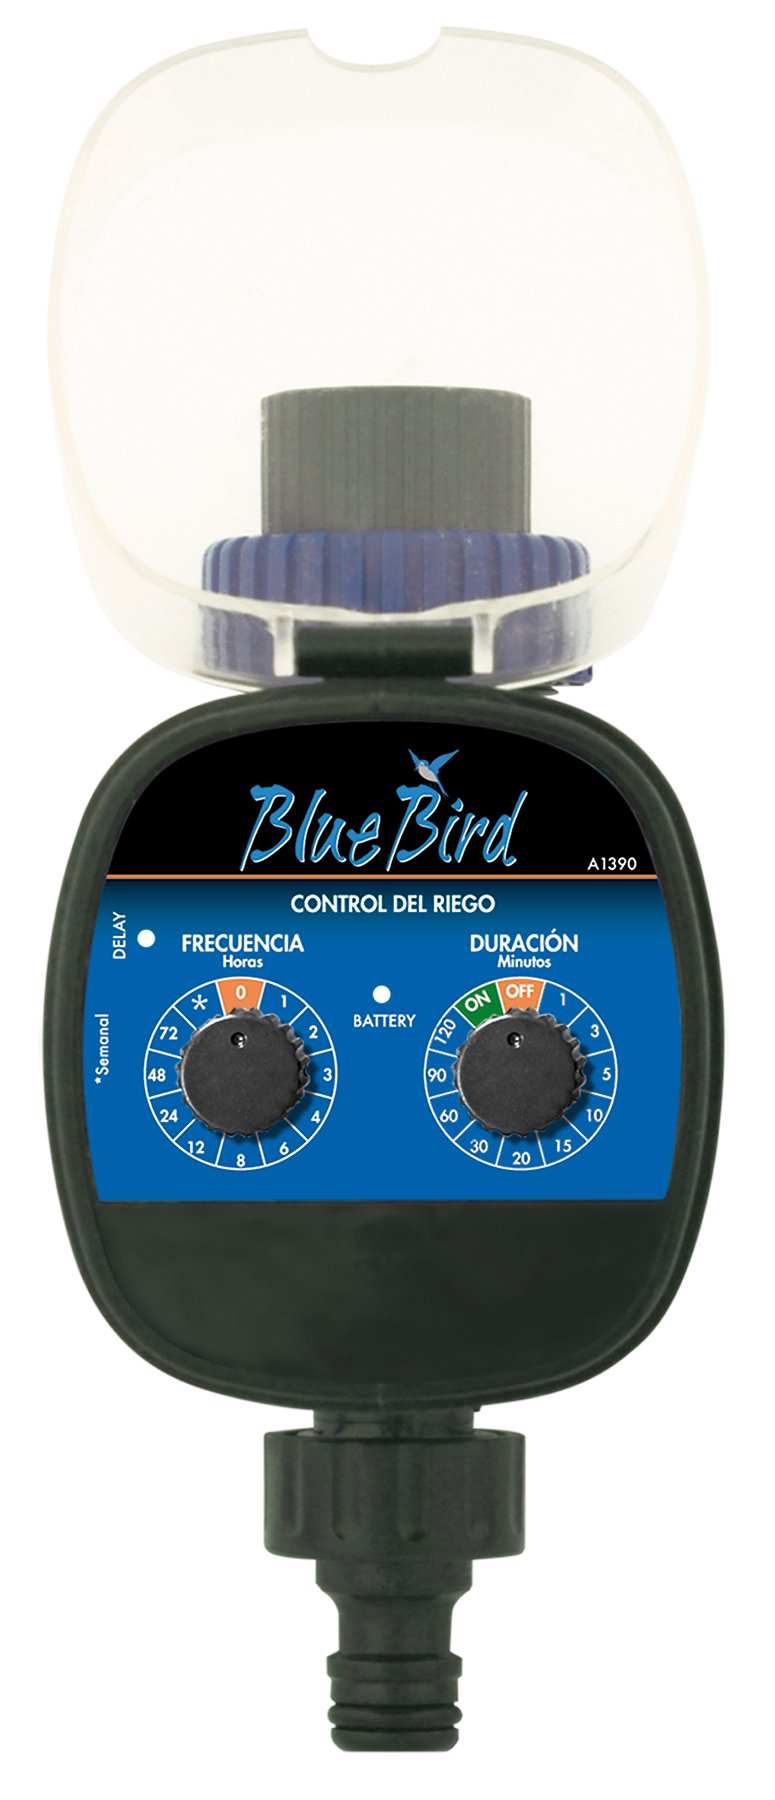
Rysunek 1: Przód view of the BlueBird A1390 Irrigation Programmer. The left dial controls irrigation frequency, and the right dial controls irrigation duration. A battery indicator light is located between the dials.
Składniki:
- Frequency Dial (Frecuencia): Sets how often the irrigation occurs. Options include 0 (off), 1, 2, 3, 4, 6, 8, 12, 24, 48, 72 hours, and a '*' setting for manual or weekly operation.
- Duration Dial (Duración): Sets how long each irrigation cycle lasts. Options include 0 (off), 1, 3, 5, 10, 15, 20, 30, 60, 90, 120 minutes.
- Przełącznik włącz / wyłącz: Located on the Duration Dial, allows for manual override or turning the unit off.
- Wskaźnik baterii: A light that indicates battery status.
- Komora baterii: Located at the rear of the unit (not visible in Figure 1).
- Wlot/wylot wody: Standard tap and hose connections.
5. Konfiguracja
5.1 Instalacja baterii
- Znajdź pokrywę komory baterii z tyłu urządzenia.
- Remove the cover by twisting or sliding it open.
- Włóż dwie (2) nowe baterie alkaliczne AA 1.5 V, zwracając uwagę na prawidłową biegunowość (+/-).
- Replace the battery compartment cover securely to maintain water resistance.
5.2 Connecting to the Tap
- Ensure your outdoor tap is turned off.
- Screw the BlueBird A1390 programmer onto your tap. Hand-tighten only to prevent damage.
- Connect your garden hose or irrigation system to the outlet of the programmer. Ensure a tight connection to prevent leaks.
- Slowly turn on your outdoor tap. Check for any leaks at the connections.
6. Instrukcja obsługi
The BlueBird A1390 is designed for simple, intuitive programming using its two rotary dials.
6.1 Setting Irrigation Frequency
- Obróć Pokrętło częstotliwości (left dial) to your desired irrigation interval.
- Dostępne ustawienia to:
- 0: No irrigation (off).
- 1, 2, 3, 4, 6, 8, 12, 24, 48, 72: Irrigation every X hours.
- *: This setting typically indicates a manual mode or a weekly cycle, depending on the specific model's internal logic. Refer to the example below for common usage.
6.2 Setting Irrigation Duration
- Obróć Duration Dial (right dial) to your desired watering time per cycle.
- Dostępne ustawienia to:
- OFF: No irrigation.
- NA: Continuous irrigation (use with caution).
- 1, 3, 5, 10, 15, 20, 30, 60, 90, 120: Irrigation for X minutes.
6.3ample Programowanie
To water every 6 hours for 10 minutes:
- Ustaw Pokrętło częstotliwości Do 6 (godziny).
- Ustaw Duration Dial Do 10 (protokół).
The programmer will automatically begin the cycle based on these settings. The first cycle will typically start shortly after programming, or after a short delay.
6.4 Ręczne włączanie/wyłączanie
To manually turn on the water, rotate the Duration Dial to the ON position. To stop manual watering, rotate the dial back to WYŁĄCZONY or a timed setting.
7. Konserwacja
7.1 Wymiana baterii
When the battery indicator light dims or the unit stops functioning, it's time to replace the batteries. Follow the steps in Section 5.1 for battery installation.
7.2 Czyszczenie
Clean the exterior of the programmer with a damp cloth. Do not use abrasive cleaners or solvents. Ensure no water enters the battery compartment or internal electronics.
7.3 Przechowywanie w zimie
Before the first frost, disconnect the programmer from the tap and hose. Remove the batteries. Store the unit indoors in a dry, frost-free location to prevent damage from freezing water.
8. Rozwiązywanie Problemów
| Problem | Możliwa przyczyna | Rozwiązanie |
|---|---|---|
| Unit does not turn on/display. | Rozładowane lub nieprawidłowo zainstalowane baterie. | Wymień baterie, zwracając uwagę na prawidłową biegunowość. |
| Woda nie płynie. | Tap is off; programmer set to '0' or 'OFF'; low water pressure; clogged filter. | Ensure tap is fully open. Check frequency/duration settings. Verify water pressure. Clean any filters. |
| Unit leaks at connections. | Loose connections; missing or damaged washer. | Tighten connections. Check and replace washers if necessary. |
| Irrigation schedule is incorrect. | Incorrect frequency or duration settings. | Re-check and adjust the Frequency and Duration Dials according to your desired schedule. |
9. Specyfikacje
- Model: A1390
- Marka: Niebieski ptak
- Producent: Altadex
- Źródło zasilania: 2 x AA 1.5V Alkaline Batteries (not included)
- Częstotliwość nawadniania: 0, 1, 2, 3, 4, 6, 8, 12, 24, 48, 72 hours, or '*' (manual/weekly)
- Czas trwania nawadniania: OFF, ON, 1, 3, 5, 10, 15, 20, 30, 60, 90, 120 minutes
- Wymiary produktu: Około 19.4 x 10.6 x 10 cm
- Waga produktu: Około 280 g
- GTIN (UPC): 8426375113909
10. Gwarancja i wsparcie
This product is covered by a standard manufacturer's warranty. For specific warranty details, please refer to the documentation provided at the time of purchase or contact your retailer. For technical support or inquiries, please contact the seller or manufacturer directly.


