1. Wprowadzenie
Thank you for choosing the Lenco PDR-030 DAB+/FM Portable Digital Radio. This manual provides essential information for setting up, operating, and maintaining your device. The PDR-030 offers high-quality digital radio reception (DAB+) and traditional FM radio, along with features such as an integrated rechargeable battery for portability, an RDS display, station memory, and an alarm clock function.
Zawartość zestawu:
- Lenco PDR-030 Digital Radio
- AC Power Adapter (220 Volt)
- Instrukcja obsługi
2. Ważne informacje dotyczące bezpieczeństwa
- Aby uniknąć pożaru lub porażenia prądem, nie wystawiaj urządzenia na działanie deszczu i wilgoci.
- Sprawdź, czy zasilacz ma odpowiednią głośnośćtage pasuje do lokalnego źródła zasilania.
- Nie otwierać casing. Wszelkie prace serwisowe powierzaj wykwalifikowanemu personelowi.
- Unikać umieszczania urządzenia w pobliżu źródeł ciepła lub w bezpośrednim świetle słonecznym.
- Handle the integrated battery with care. Do not attempt to replace it yourself.
- Trzymaj urządzenie z dala od silnych pól magnetycznych.
3. Koniec produktuview
Familiarize yourself with the main components and controls of your Lenco PDR-030 radio.
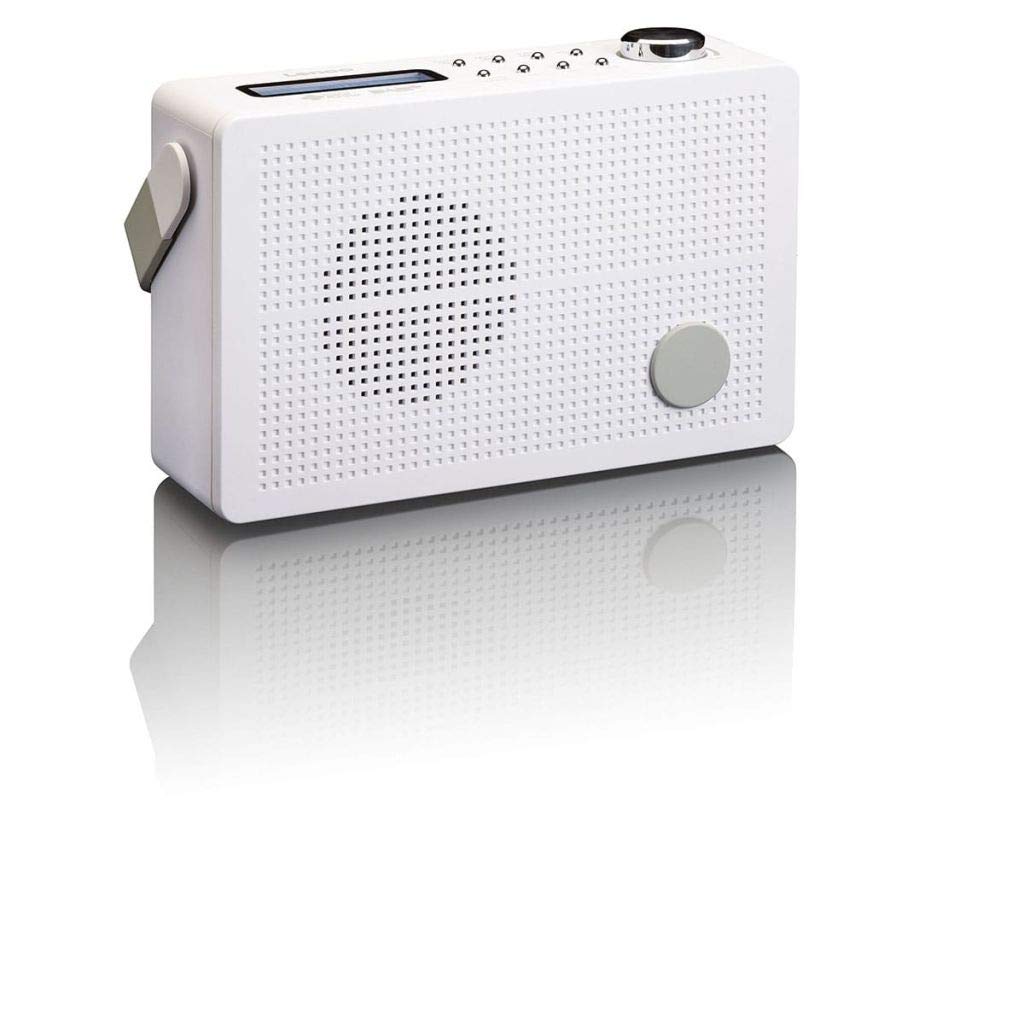
Rysunek 3.1: Front Panel of Lenco PDR-030 Radio. Features include a blue backlit LCD display, power/source button, alarm, sleep, info/menu, preset buttons, select/snooze, scan, previous, next buttons, and a rotary volume knob.
Główne elementy sterujące i funkcje:
- Wyświetlacz: Two-line illuminated LCD for time, date, station name, and information.
- Przycisk zasilania/źródła: Turns the radio on/off and switches between DAB+ and FM modes.
- Pokrętło głośności: Reguluje poziom wyjściowy audio.
- Antena teleskopowa: Dla optymalnego odbioru sygnału radiowego.
- Gniazdo słuchawkowe (3.5 mm): Do prywatnego słuchania.
- Alarm/Sleep/Info/Menu/Preset Buttons: For various functions including setting alarms, sleep timer, accessing information, menu navigation, and managing station presets.
- Select/Snooze/Scan/Prev/Next Buttons: For station tuning, menu selection, and snooze function.
4. Konfiguracja
4.1 Zasilanie radia
The PDR-030 can be powered by the included AC adapter or its integrated rechargeable battery.
- Zasilanie prądem zmiennym: Connect the supplied 220V AC power adapter to the DC input jack on the radio and then to a wall outlet. The radio will automatically begin charging the internal battery.
- Moc baterii: The integrated Lithium-ion battery allows for portable use. Ensure the battery is sufficiently charged before use without the AC adapter.
4.2 Konfiguracja anteny
Extend the telescopic antenna fully for optimal reception of both DAB+ and FM signals. Adjust its position for the best signal quality.
4.3 Initial Power On and Station Scan
- Naciśnij Źródło prądu przycisk, aby włączyć radio.
- Upon first use, the radio will automatically enter DAB+ mode and perform a full scan for available digital radio stations. This may take a few minutes.
- Po zakończeniu skanowania radio dostroi się do pierwszej dostępnej stacji.
5. Instrukcja obsługi
5.1 Włączanie/wyłączanie zasilania
Naciśnij Źródło prądu przycisk włączania i wyłączania radia.
5.2 Wybór trybu (DAB+/FM)
Naciśnij Źródło button repeatedly to switch between DAB+ and FM radio modes.
5.3 Stacje strojenia
- Tryb DAB+:
- Po pierwszym skanowaniu użyj Poprzedni I Następny przyciski umożliwiające poruszanie się po liście dostępnych stacji DAB+.
- To perform a new full scan, press the Menu button, navigate to "Full Scan" using Poprzedni/Następnyi naciśnij Wybierać.
- Tryb FM:
- Naciśnij Skandować przycisk, aby automatycznie wyszukać następną dostępną stację FM.
- For manual tuning, press and hold the Poprzedni or Następny przyciski do precyzyjnego dostrojenia częstotliwości.
5.4 Saving and Recalling Preset Stations
Radio umożliwia zapisanie do 10 stacji DAB+ i 10 stacji FM.
- Aby zapisać ustawienie wstępne:
- Dostrój się do żądanej stacji.
- Naciśnij i przytrzymaj Ustawienie wstępne Naciskaj przycisk, aż na wyświetlaczu pojawi się napis „Preset Store”.
- Użyj Poprzedni/Następny przyciski umożliwiające wybór numeru ustawienia wstępnego (1-10).
- Naciskać Wybierać aby potwierdzić i zapisać stację.
- Aby przywołać ustawienie wstępne:
- Naciśnij Ustawienie wstępne naciśnij przycisk krótko.
- Użyj Poprzedni/Następny przyciski umożliwiające wybór żądanego numeru ustawienia wstępnego.
- Naciskać Wybierać to tune to the preset station.
5.5 Regulacja głośności
Obróć Pokrętło głośności zgodnie z ruchem wskazówek zegara, aby zwiększyć głośność, i przeciwnie do ruchu wskazówek zegara, aby ją zmniejszyć.
5.6 RDS Functionality (FM Mode)
In FM mode, the RDS (Radio Data System) function displays information such as station name, program type, and other broadcast data on the two-line LCD display.
5.7 Funkcja budzika
The PDR-030 can be used as an alarm clock with two separate alarm times.
- Ustawianie alarmu:
- Naciśnij Alarm przycisk.
- Używać Poprzedni/Następny aby wybrać Alarm 1 lub Alarm 2, a następnie naciśnij Wybierać.
- Follow the on-screen prompts to set the alarm time, duration, source (Buzzer or Radio), frequency (Daily, Once, Weekdays, Weekends), and volume.
- Ensure the alarm is set to "On" and press Wybierać zapisać.
- Funkcja drzemki: Gdy zabrzmi alarm, naciśnij Drzemka naciśnij przycisk, aby tymczasowo wyciszyć dźwięk na określony czas.
- Wyłącznik czasowy: Naciśnij Spać Naciskaj przycisk wielokrotnie, aby ustawić timer uśpienia (np. 15, 30, 45, 60 minut), po którym radio wyłączy się automatycznie.
5.8 Podłączenie słuchawek
Connect 3.5mm stereo headphones to the headphone jack for private listening. The internal speaker will be muted automatically.
6. Konserwacja
6.1 Czyszczenie
Wipe the radio's exterior with a soft, dry cloth. Do not use abrasive cleaners, waxes, or solvents as they may damage the finish. Ensure no liquids enter the device.
6.2 Pielęgnacja baterii
The integrated Lithium-ion battery is designed for long life. To maximize battery lifespan:
- Unikaj częstego całkowitego rozładowywania akumulatora.
- Jeśli radio będzie przechowywane przez dłuższy czas, naładuj akumulator do około 50% i przechowuj go w chłodnym, suchym miejscu.
- Do not attempt to replace the battery yourself. Contact qualified service personnel if battery issues arise.
7. Rozwiązywanie Problemów
| Problem | Możliwa przyczyna | Rozwiązanie |
|---|---|---|
| Brak zasilania | Zasilacz sieciowy nie jest podłączony lub jest uszkodzony; bateria jest rozładowana. | Check AC adapter connection. Charge the battery. |
| Słaby odbiór DAB+/FM | Antena nie jest wysunięta; obszar o słabym sygnale; zakłócenia. | Fully extend and adjust the telescopic antenna. Move the radio to a location with better signal. Avoid placing near other electronic devices. |
| Brak dźwięku | Głośność jest zbyt niska; słuchawki są podłączone; wyciszenie jest włączone. | Increase volume. Disconnect headphones. Check if mute is active (if applicable). |
| Alarm nie włącza się | Alarm not activated; alarm volume too low; incorrect time setting. | Ensure alarm is set to "On". Check alarm volume. Verify current time and alarm time settings. |
8. Specyfikacje
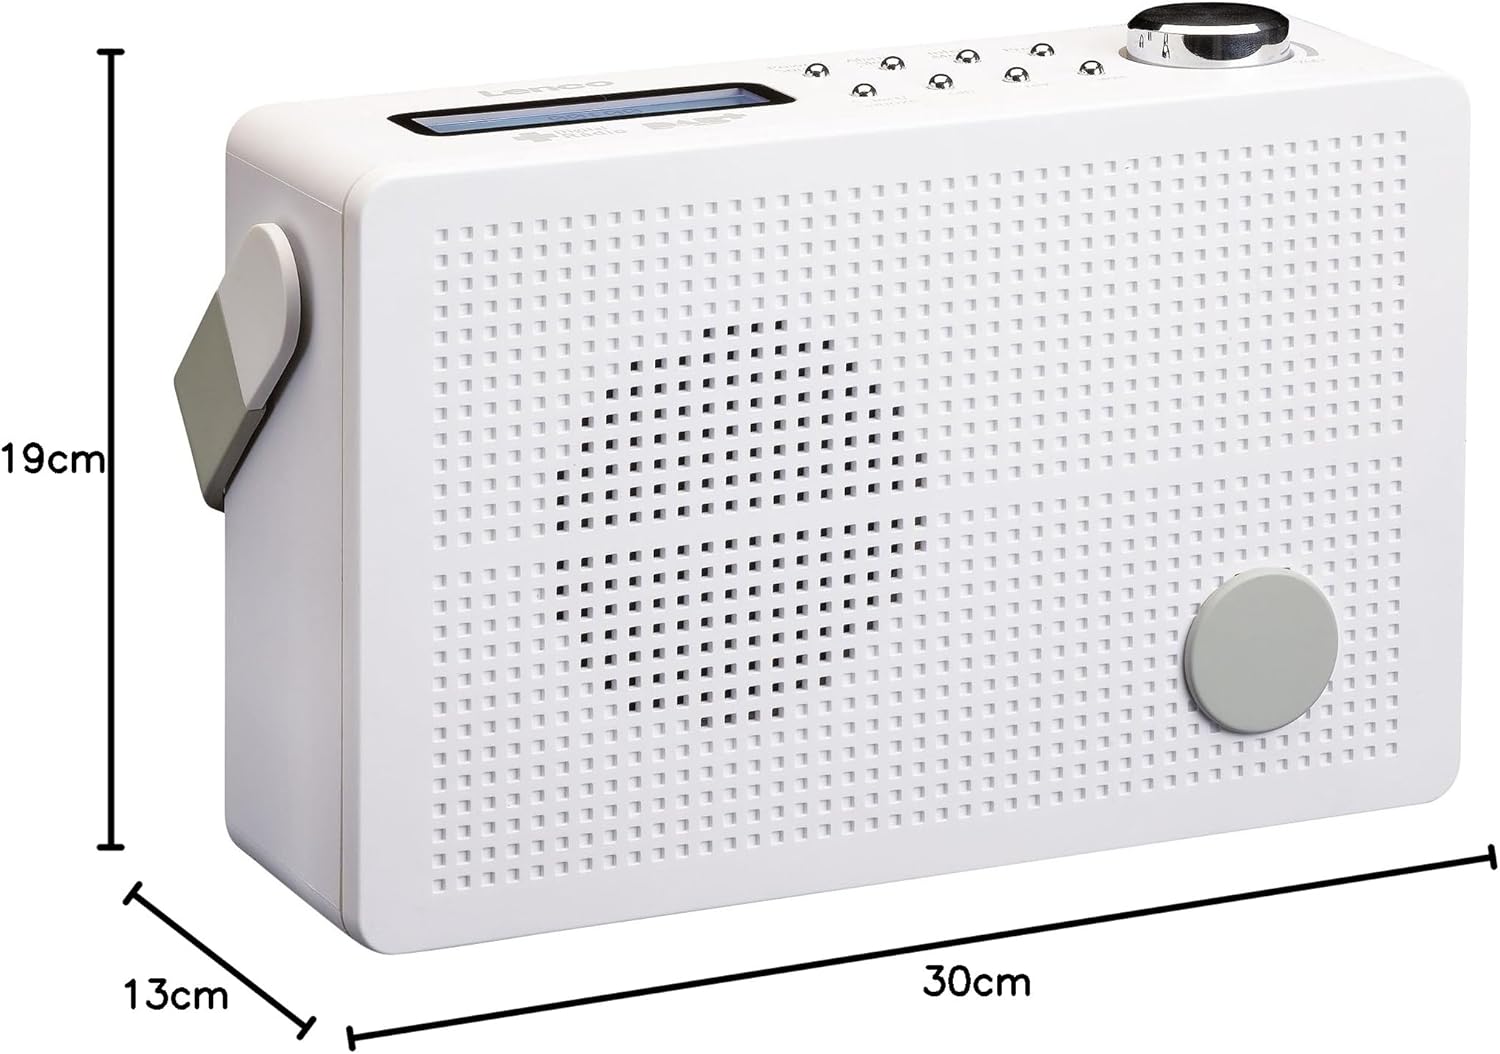
Rysunek 8.1: Lenco PDR-030 Dimensions.
| Funkcja | Szczegół |
|---|---|
| Numer modelu | PDR-030 |
| Technologia tunera | DAB+, FM (Ukw) |
| Źródło zasilania | Battery-Powered (Integrated Lithium-ion), AC Adapter |
| AC Objętośćtage | 220 wolty |
| Wymiary produktu (szer. x gł. x wys.) | 21.4 x 6.5 x 13.8 cm (approx. 22.5 x 8.5 x 15 cm as per another spec) |
| Waga przedmiotu | 9 g (Note: This seems incorrect, likely 670g from description) |
| Typ materiału | Plastikowy |
| Interfejs sprzętowy | 3.5 mm Audio (Headphone Jack) |
| Cechy specjalne | Portable, RDS Display, Alarm Clock, Station Memory (10 DAB+, 10 FM) |
Note: Some dimensions and weight specifications provided by the manufacturer may vary slightly. The description states 670 grams for weight, while specifications list 9g. Please refer to the product packaging for the most accurate information.
9. Gwarancja i wsparcie
Lenco products are designed for reliability and performance. This product typically comes with a 24-month manufacturer's warranty from the date of purchase, covering defects in materials and workmanship. Please retain your proof of purchase for warranty claims.
For technical support, service, or warranty inquiries, please refer to the contact information provided on the Lenco official website or your local retailer. Do not attempt to repair the device yourself.
Aby uzyskać więcej informacji, odwiedź stronę Lenco Store on Amazon.


