1. Wprowadzenie
This manual provides essential information for the safe installation, operation, and maintenance of your Ducasa Ducaverre White 1200W Glass Radiant Panel Heater. Please read these instructions carefully before use and retain them for future reference.
1.1 Informacje dotyczące bezpieczeństwa
- Bezpieczeństwo elektryczne: Always ensure the heater is connected to a properly grounded electrical outlet. Do not operate with a damaged cord or plug.
- Umieszczenie: Maintain a safe distance from flammable materials (curtains, furniture) as indicated in the installation section. Do not cover the heater.
- Narażenie na działanie wody: Do not install the heater near water sources (bathrooms, laundry rooms) unless specifically rated for such environments. Avoid direct water spray.
- Dzieci i osoby wrażliwe: To urządzenie może być używane przez dzieci w wieku 8 lat i starsze oraz osoby o ograniczonych zdolnościach fizycznych, sensorycznych lub umysłowych lub nieposiadające doświadczenia i wiedzy, jeśli są nadzorowane lub poinstruowane w zakresie bezpiecznego korzystania z urządzenia i rozumieją związane z tym zagrożenia. Dzieci nie mogą bawić się urządzeniem. Czyszczenie i konserwacja użytkownika nie mogą być wykonywane przez dzieci bez nadzoru.
- Konserwacja: Przed przystąpieniem do czyszczenia lub wykonywania prac konserwacyjnych należy odłączyć urządzenie od zasilania.
1.2 Zawartość opakowania
Sprawdź, czy w opakowaniu znajdują się wszystkie elementy:
- Ducasa Ducaverre 1200W Glass Radiant Panel Heater
- Uchwyt(y) do montażu na ścianie
- Śruby montażowe i kołki ścienne
- Instrukcja obsługi (ten dokument)
2. Konfiguracja i instalacja
Proper installation is crucial for the safe and efficient operation of your heater. If you are unsure about any step, consult a qualified electrician.
2.1 Montaż na ścianie
The Ducasa Ducaverre heater is designed for wall mounting. Choose a suitable location away from direct drafts, windows, and areas where it might be accidentally covered. Ensure there is sufficient clearance around the heater as specified in the diagram below.
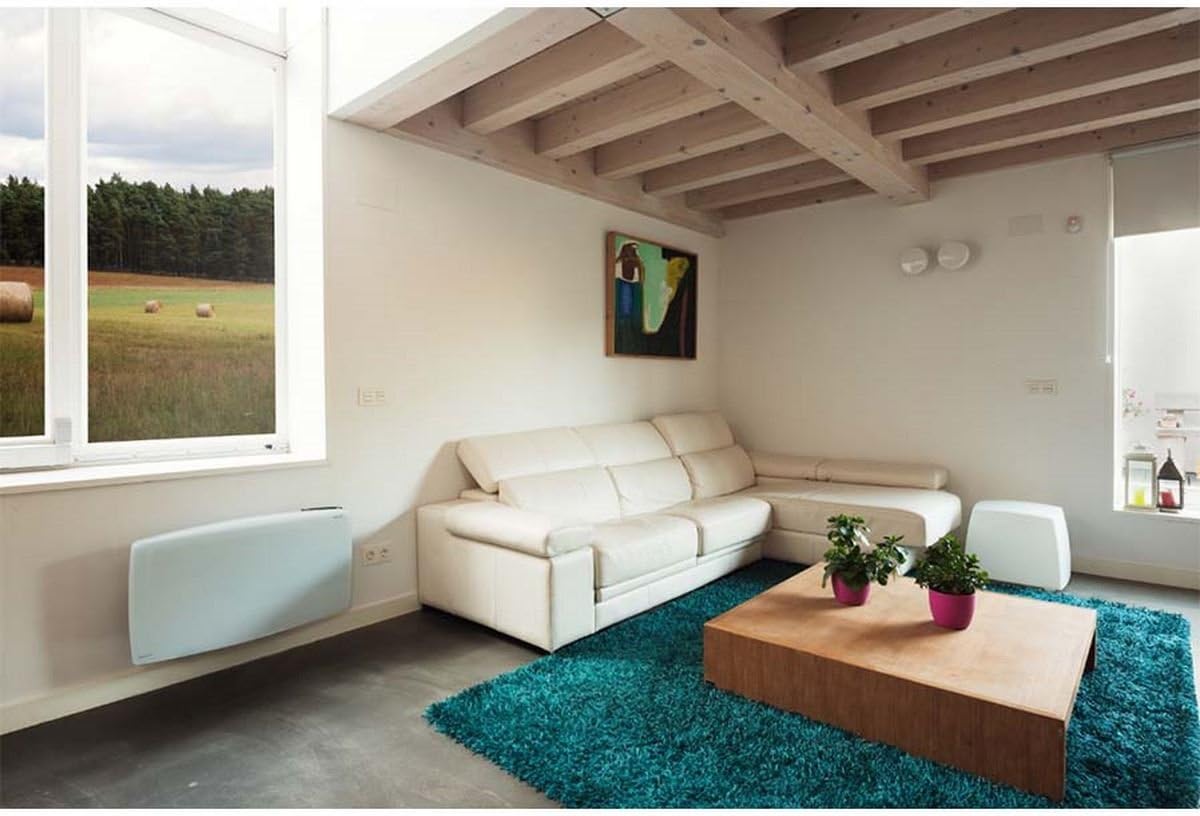
Obraz 1: Ducasa Ducaverre 1200W Glass Radiant Panel Heater mounted on a wall in a modern living room setting. The heater is white and rectangular, positioned low on the wall, illustrating a typical installation scenario.
- Cechowanie: Hold the mounting bracket against the wall at the desired height. Use a pencil to mark the drilling points.
- Wiercenie: Wywierć otwory w zaznaczonych punktach wiertłem odpowiednim do rodzaju ściany. Włóż kołki rozporowe.
- Zamocuj wspornik: Przymocuj uchwyt montażowy do ściany za pomocą dołączonych śrub. Upewnij się, że jest wypoziomowany i solidnie zamocowany.
- Montaż grzejnika: Carefully lift the heater and hook it onto the mounting bracket. Ensure it clicks securely into place. Some models may require additional screws to fix the heater to the bracket from below.
2.2 Podłączenie elektryczne
Once mounted, connect the heater to a standard electrical outlet. Ensure the outlet is easily accessible and rated for the heater's power consumption (1200W). Do not use extension cords or multi-plugs unless absolutely necessary and only if they are rated for the heater's power.
3. Instrukcja obsługi
Your Ducasa Ducaverre heater features an intuitive control panel for setting temperature and operating modes.

Obraz 2: Zbliżenie view of the black control panel located on the top right side of the white Ducasa Ducaverre heater. The panel features a digital display and several buttons labeled 'OK', '+', '-', 'MODE', and 'PROG', indicating user interface for settings and programming.
3.1 Panel sterowania ponadview
- Wyświetlacz cyfrowy: Shows current temperature, set temperature, and operating mode.
- Przycisk TRYB: Cycles through operating modes (Comfort, Eco, Frost Protection, Program).
- Przyciski '+' / '-': Zmień ustawienia temperatury lub przejdź do opcji menu.
- Przycisk OK: Potwierdza wybór.
- Przycisk PROG: Accesses programming functions.
3.2 Ustawianie godziny i dnia
Before using programmed modes, set the current time and day:
- Naciśnij i przytrzymaj TRYB button until the time setting appears.
- Używać '+' or '-' aby ustawić godzinę, naciśnij OK.
- Powtórz dla minut i dnia tygodnia.
3.3 tryby pracy
- Tryb Komfort (C): Maintains your desired set temperature. Use '+' or '-' do regulacji temperatury.
- Eco Mode (E): Maintains a temperature typically 3-4°C lower than the Comfort setting, saving energy.
- Frost Protection Mode (F): Utrzymuje minimalną temperaturę (np. 7°C) zapobiegając zamarzaniu.
- Program Mode (P): Działa według ustalonego tygodniowego harmonogramu ogrzewania.
3.4 Programming a Weekly Schedule
To set a custom heating schedule:
- Naciśnij ŻARCIE button. The display will show the current day and a time segment.
- Używać TRYB to select the desired operating mode (Comfort, Eco, Frost Protection) for that specific hour.
- Używać '+' to advance to the next hour or '-' wrócić.
- Repeat for all 24 hours of the day.
- Naciskać ŻARCIE again to move to the next day.
- Once all days are programmed, press OK aby zapisać i wyjść.
4. Konserwacja
Regularne czyszczenie zapewnia optymalną wydajność i wydłuża żywotność grzejnika.
4.1 Czyszczenie
- Odłącz zasilanie: Always unplug the heater from the electrical outlet before cleaning.
- Zewnętrzny: Wipe the glass panel and exterior surfaces with a soft, damp ściereczką. Nie używaj środków czyszczących o działaniu ściernym, rozpuszczalników ani silnych środków chemicznych, ponieważ mogą one uszkodzić wykończenie.
- Pył: Use a soft brush or vacuum cleaner with a brush attachment to remove dust from air inlets and outlets.
- Wysuszenie: Przed ponownym podłączeniem grzejnika należy upewnić się, że jest on całkowicie suchy.
4.2 Przechowywanie
If storing the heater for an extended period, ensure it is clean and dry. Store it in its original packaging or a protective cover in a cool, dry place, away from direct sunlight and extreme temperatures.
5. Rozwiązywanie Problemów
Jeśli masz problemy z ogrzewaniem, zapoznaj się z poniższymi typowymi problemami i rozwiązaniami:
- Ogrzewanie się nie włącza:
- Sprawdź, czy przewód zasilający jest prawidłowo podłączony do sprawnego gniazdka.
- Sprawdź, czy wyłącznik automatyczny nie zadziałał.
- Ensure the heater is not in standby mode.
- Heater is on but not heating:
- Check the set temperature; it might be lower than the ambient room temperature.
- Ensure the heater is not in Frost Protection mode if you expect higher heat output.
- Verify that no objects are obstructing the air vents.
- Niezwykłe dźwięki:
- Minor expansion/contraction noises are normal during heating and cooling cycles.
- If noises are loud or persistent, disconnect power and contact support.
- Kody błędów: If an error code appears on the display, note the code and consult the manufacturer's support or a qualified technician.
If the problem persists after attempting these solutions, disconnect the heater from the power supply and contact customer support.
6. Specyfikacje
- Model: Ducasa Ducaverre 1200W
- Typ: Glass Radiant Panel Heater
- Moc wyjściowa: 1200 W
- Tomtage: 230 V ~ 50 Hz (standard europejski)
- Tworzywo: Szklany panel przedni
- Instalacja: Naścienny
- Wymiary: Zapoznaj się z opakowaniem produktu lub instrukcją producenta. webmiejsce na dokładne pomiary.
- ASIN: B01HZMXDAY

Obraz 3: A full, slightly angled view of the Ducasa Ducaverre 1200W Glass Radiant Panel Heater. The heater is white with a sleek glass surface, and the 'ducasa' brand name is visible on the top right, along with the small digital control panel.
7. Gwarancja i wsparcie
Your Ducasa Ducaverre heater is covered by a manufacturer's warranty. Please refer to the warranty card included with your purchase or visit the official Ducasa webna stronie szczegółowe warunki.
For technical assistance, spare parts, or warranty claims, please contact Ducasa customer support through their official channels. Have your product model and ASIN (B01HZMXDAY) ready when contacting support.


