1. Wprowadzenie
This manual provides detailed instructions for the assembly, operation, and maintenance of your Sharkoon VS4-W Series ATX/MicroATX Mid-Tower PC Case, model SHA-VS4-WBK. Please read this manual thoroughly before beginning installation to ensure proper setup and to maximize the lifespan of your product.
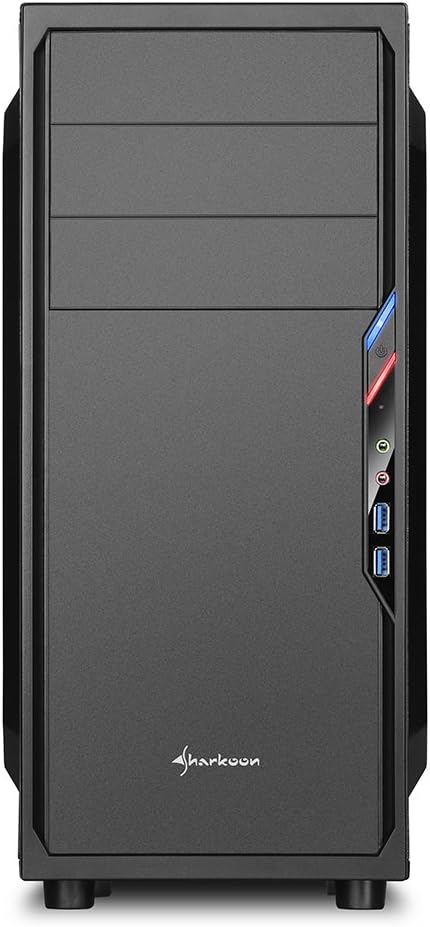
The Sharkoon VS4-W Series is designed for users seeking a cost-effective and functional PC case. It features a full-black aesthetic with an acrylic side window panel, offering a clear view of your internal components. The case supports ATX and Micro-ATX motherboards and provides ample space for various components, including multiple storage drives and long graphics cards.
2. Koniec produktuview
2.1. Główne cechy
- Acrylic side window panel for component visibility.
- Full-black interior and exterior design.
- Support for ATX and Micro-ATX motherboards.
- Three 5.25-inch drive bays, two with tool-less mechanisms.
- Seven drive bays for storage: three 3.5-inch and four 2.5-inch.
- Generous expansion card space, up to 385mm with 2.5-inch cage removed.
- Cable management space behind the motherboard tray due to a bulged side panel design.
- Supports CPU coolers up to 160mm in height.
- Front I/O panel with 2x USB 3.0 and 2x USB 2.0 ports, plus HD Audio.
- Pre-installed 120mm front fan and 120mm blue LED rear fan.
2.2. Identyfikacja komponentów


3. Konfiguracja i instalacja
3.1. Przygotowanie sprawy
- Rozpakuj obudowę komputera i usuń wszystkie materiały opakowaniowe.
- Połóż obudowę na stabilnej, płaskiej powierzchni.
- Remove the side panels by unscrewing the thumbscrews at the rear of the case.
3.2. Instalacja płyty głównej
- Zainstaluj osłonę I/O dostarczoną wraz z płytą główną w wycięciu z tyłu obudowy.
- Ensure standoffs are correctly aligned for your ATX or Micro-ATX motherboard. Install additional standoffs if necessary.
- Ostrożnie umieść płytę główną w obudowie, wyrównując ją z dystansami i osłoną portu I/O.
- Przymocuj płytę główną za pomocą śrub.
3.3. Instalacja zasilania
- Mount the power supply unit (PSU) in the designated area at the bottom rear of the case.
- Przymocuj zasilacz za pomocą śrub znajdujących się z tyłu obudowy.
- Route necessary power cables through the cable management cutouts.
3.4. Instalacja napędu
- 5.25-inch Drives: For tool-less bays, slide the drive in until it clicks into place. For other bays, secure with screws.
- 3.5-inch Drives: Slide the 3.5-inch drives into the designated bays and secure them.
- 2.5-inch Drives: Mount 2.5-inch SSDs/HDDs onto the dedicated mounting points.
3.5. Instalacja karty rozszerzeń
- Remove the necessary PCI slot covers from the rear of the case.
- Insert your graphics card or other expansion cards into the appropriate PCI-E slots on the motherboard.
- Secure the cards with screws. For longer graphics cards, the 2.5-inch drive cage can be removed to provide up to 385mm of space.
3.6. Zarządzanie kablami
Utilize the space behind the motherboard tray and the various cable routing holes to organize cables. This improves airflow and aesthetics.
4. Instrukcja obsługi
Once all components are installed and connected, replace the side panels and secure them with the thumbscrews. Connect your peripherals (monitor, keyboard, mouse, etc.) to the motherboard's I/O ports. Connect the power cable to the PSU and a wall outlet. Press the power button on the front panel to start your system.
5. Konserwacja
5.1. Czyszczenie
- Regularly clean dust filters (if present) to maintain optimal airflow.
- Usuń kurz z wewnętrznych podzespołów i wentylatorów za pomocą sprężonego powietrza.
- Przetrzyj zewnętrzną część obudowy miękką szmatką.amp płótno. Unikaj ściernych środków czyszczących.
5.2. Konserwacja wentylatora
Ensure fans are free from obstructions and spinning correctly. If a fan becomes noisy or stops working, consider replacing it to maintain proper cooling.
6. Rozwiązywanie Problemów
6.1. System się nie włącza
- Check all power connections, including the PSU to the wall, and internal connections to the motherboard and components.
- Sprawdź, czy kabel przycisku zasilania obudowy jest prawidłowo podłączony do złącza na przednim panelu płyty głównej.
- Sprawdź, czy przełącznik zasilacza jest w pozycji „ON”.
6.2. Poor Airflow/Overheating
- Clean any dust filters and internal components.
- Ensure fans are operating correctly and oriented for optimal airflow (intake/exhaust).
- Ulepsz zarządzanie kablami, aby zmniejszyć przeszkody w przepływie powietrza.
6.3. Front Panel USB/Audio Not Working
- Verify that the front panel USB and HD Audio cables are securely connected to the corresponding headers on your motherboard.
7. Specyfikacje
| Nazwa modelu | VS4-W Series |
| Numer modelu produktu | SHA-VS4-WBK |
| Typ sprawy | Mid Tower |
| Tworzywo | Stal, plastik, akryl |
| Kolor | Czarny |
| Zgodność płyty głównej | ATX, Micro-ATX |
| Zatoki na dyski 5.25" | 3 (2 with tool-less mechanism) |
| 3.5" Internal Drive Bays | 3 |
| Zatoki na dyski 2.5" | 4 |
| Gniazda rozszerzeń PCI | 7 |
| Maks. Długość karty graficznej | 310mm (385mm with 2.5" cage removed) |
| Maks. Wysokość chłodnicy procesora | 160mm |
| Maks. Długość zasilacza | 260mm |
| Przednie porty we / wy | 2x USB 3.0, 2x USB 2.0, HD Audio (Mic/Headphone) |
| Fabrycznie zainstalowane wentylatory | Front: 1x 120mm, Rear: 1x 120mm Blue LED |
| Metoda chłodzenia | Chłodzenie powietrzem |
| Wymiary produktu (dł. x szer. x wys.) | Wymiary 44.5 x 20 x 43 cm |
| Waga przedmiotu | 3.5 kilogramów |
8. Gwarancja i wsparcie
Aby uzyskać informacje dotyczące gwarancji i pomocy technicznej, zapoznaj się z oficjalną stroną Sharkoon webOdwiedź witrynę lub skontaktuj się z lokalnym sprzedawcą. Zachowaj dowód zakupu na wypadek reklamacji.
Official Sharkoon Webstrona: www.sharkoon.com


