Ważne instrukcje bezpieczeństwa
Please read these instructions carefully before operating your ONKYO A-912 Integrated AmpLifik. Zachowaj tę instrukcję do wykorzystania w przyszłości.
- Źródło zasilania: Podłącz urządzenie wyłącznie do źródła zasilania prądem przemiennym o mocytage wskazany na tylnym panelu.
- Wentylacja: Zapewnij odpowiednią wentylację. Nie blokuj otworów wentylacyjnych. Pozostaw wystarczająco dużo miejsca wokół urządzenia, aby zapewnić prawidłowy przepływ powietrza.
- Woda i wilgoć: Nie wystawiaj urządzenia na działanie deszczu, wilgoci, kapania ani zachlapania. Nie stawiaj na urządzeniu przedmiotów wypełnionych płynami, takich jak wazony.
- Ciepło: Nie umieszczaj urządzenia w pobliżu źródeł ciepła, takich jak grzejniki, kratki wentylacyjne, piece lub inne urządzenia (w tym amp(lifiers) wytwarzające ciepło.
- Serwisowanie: Nie próbuj samodzielnie naprawiać tego produktu. Wszelkie czynności serwisowe należy powierzyć wykwalifikowanemu personelowi serwisowemu.
- Czyszczenie: Przed czyszczeniem odłącz urządzenie od gniazdka ściennego. Do czyszczenia użyj suchej ściereczki.
Zawartość opakowania
Sprawdź, czy w przesyłce znajdują się następujące elementy:
- ONKYO A-912 Zintegrowany Ampjednostka lifier
- Przewód zasilający AC
- Instrukcja obsługi (ten dokument)
Elementy sterujące na panelu przednim
The front panel provides access to essential controls for operating your ampliyfikator.

Obraz: Przód view of the ONKYO A-912 Integrated Amplifier. This image displays the power button, input selector, volume control, tone adjustments, and headphone jack.
- Przycisk zasilania: Obraca amplifier włączony lub wyłączony.
- Selektor wejścia: Allows you to choose the audio source (e.g., CD, Tuner, Line, Phono).
- Regulacja głośności: Reguluje ogólną głośność wyjściową.
- Regulacja tonów niskich/wysokich: Dostosowuje odpowiedź częstotliwościową niskich i wysokich.
- Kontrola równowagi: Reguluje balans kanału lewego i prawego.
- Gniazdo słuchawkowe: Do podłączenia słuchawek.
Połączenia na tylnym panelu
The rear panel houses all input and output terminals for connecting your audio components.
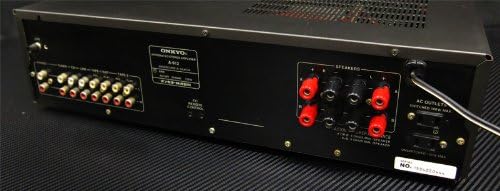
Obraz: Tył view of the ONKYO A-912 Integrated Amplifier. This image shows the speaker terminals, various RCA input jacks (CD, Tuner, Line, Phono), and the AC power inlet.
- Terminale głośnikowe: Connect your passive speakers here. Ensure correct polarity (+ to + and - to -).
- Input Jacks (CD, Tuner, Line, Phono): Connect your audio source components using RCA cables. The Phono input is specifically for turntables.
- Terminal uziemiający: For connecting the ground wire from a turntable, if applicable.
- Wejście AC: Podłącz tutaj dołączony przewód zasilający prądem zmiennym.
Przewodnik po konfiguracji
1. Połączenie głośnika
Connect your speakers to the speaker terminals on the rear panel. Ensure that the positive (+) terminal on the amplifier connects to the positive (+) terminal on the speaker, and the negative (-) terminal on the amplifier connects to the negative (-) terminal on the speaker. Use high-quality speaker wire for optimal sound.
2. Audio Component Connection
Connect your audio source components (e.g., CD player, tuner, turntable) to the corresponding input jacks on the rear panel using RCA audio cables. For a turntable, connect it to the 'Phono' input and ensure the ground wire (if present) is connected to the ampzacisk uziemienia urządzenia.
3. Podłączenie zasilania
Once all audio connections are made, connect the supplied AC power cord to the AC inlet on the amplifier's rear panel, then plug the other end into a wall outlet.
Instrukcja obsługi
Włączanie/wyłączanie
Aby włączyć urządzenie, naciśnij przycisk zasilania na panelu przednim. ampWłączanie i wyłączanie urządzenia. Wskaźnik zasilania będzie się świecić, gdy urządzenie będzie włączone.
Wybór źródła wejścia
Rotate the Input Selector knob on the front panel to choose the desired audio source (e.g., CD, Tuner, Line, Phono) that you have connected.
Regulacja głośności
Turn the large Volume control knob clockwise to increase the volume and counter-clockwise to decrease it.
Korzystanie z kontroli tonów
Use the Bass and Treble knobs to fine-tune the low and high frequencies of the audio output to your preference. The Balance knob adjusts the relative volume between the left and right speakers.
Korzystanie ze słuchawek
Plug your headphones into the Headphone Jack on the front panel. This will typically mute the main speaker output.
Pielęgnacja i konserwacja
- Czyszczenie: Przetrzyj urządzenie miękką, suchą ściereczką. Nie używaj środków czyszczących o właściwościach ściernych, wosków ani rozpuszczalników.
- Wentylacja: Ensure that the ventilation openings are not blocked by dust or debris. Periodically clean them if necessary.
- Składowanie: Jeśli urządzenie będzie przechowywane przez dłuższy czas, należy odłączyć je od gniazdka elektrycznego i przykryć, aby chronić je przed kurzem.
Rozwiązywanie problemów
Jeśli masz problemy ze swoim amplifier, refer to the following table for possible causes and solutions.
| Problem | Możliwa przyczyna | Rozwiązanie |
|---|---|---|
| Brak zasilania | Przewód zasilający nie jest podłączony; gniazdko ścienne nie jest aktywne | Ensure power cord is securely plugged in; Check wall outlet with another device. |
| Brak dźwięku | Incorrect input selected; Speaker wires loose; Volume too low; Headphones connected | Select correct input source; Check speaker connections; Increase volume; Disconnect headphones. |
| Zniekształcony dźwięk | Source component issue; Speaker impedance mismatch; Volume too high | Check source component; Ensure speakers match amplifier impedance; Reduce volume. |
| Brzęczący hałas | Ground loop; Loose connections; Nearby interference | Ensure proper grounding for turntable; Check all cable connections; Move unit away from other electronic devices. |
Specyfikacje
- Marka: Onkyo
- Model: A-912
- Producent: Onkyo
- Wymiary opakowania: Wymiary 45.5 x 35 x 14.9 cm
- Waga przedmiotu: 7.19 kilogramów
- Wymagane baterie: NIE
- ASIN: B00FRBU74G
- Data pierwszej dostępności: 10 października 2013 r.
Gwarancja i obsługa klienta
For warranty information or technical assistance, please refer to the warranty card included with your product or visit the official Onkyo webZachowaj paragon jako dowód zakupu na wypadek reklamacji.