Phanteks Eclipse G300A Innovative Computer Hardware Design

INSTRUCTIONS
Thank you for choosing Phanteks. Please take a moment to carefully go through the manual. This manual will walk you through all of the features the Eclipse G300A has to offer and installation steps to build a full system.
This manual is for the following models:
- PH-EC300GA_DBK01 Satin Black | 1x D-RGB Fan Back
- PH-EC300GA_DBK02 Satin Black | 3x D-RGB Fans Front
Phanteks will not take responsibility for any damages incurred due to incorrect installation or usage of this product.
INCLUDED ACCESSORIES

FRONT I/O
FAN & RADIATOR SUPPORT
CLEARANCE
- CPU cooler height 160 mm 3
- GPU length 65 mm with front fans
- Powersupply 210 mm
- E-ATX up to 260 mm width
360 FRONT AIO COOLER
- Because of the special front bracket, the front supports a radiator up to 360. When using this option, the maximum GPU length is335mm.
240 TOP AIO COOLER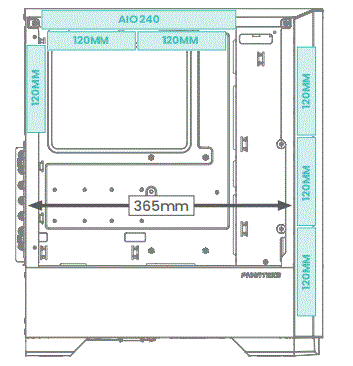
- The top supports a radiator up to 240. When using this option, the maximum GPU length is 365mm with 3 front 120mm fans.
REMOVE EXTERNAL PANELS
LEFT SIDE PANEL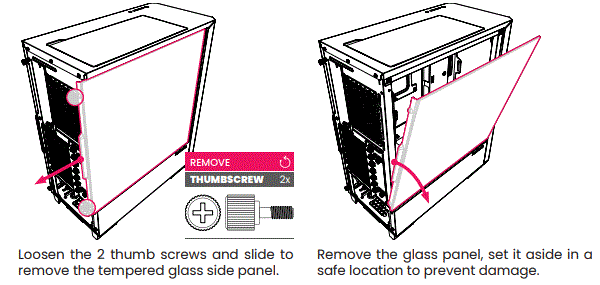
CAUTION
- Make sure to hold the side panel while sliding it outwards to prevent any damage when removing
REINSTALL SIDE PANEL
When returning the left side panel, align the bottom right with the slit in the chassis. Slide the panel forward and secure with 2 thumb screws at the back.
RIGHT SIDE PANEL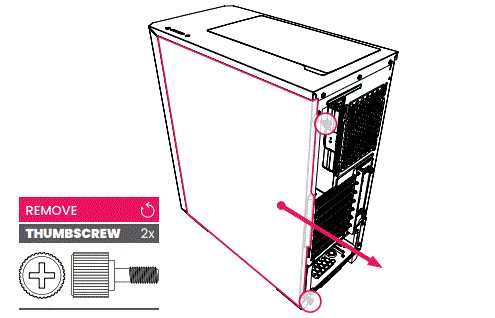 Loosen the 2 captive thumb screws and slide to remove the right side panel.
FRONT PANEL & DUST FILTERS
 Remove front panel by pulling the panel from below.
HARDWARE INSTALLATION
MOTHERBOARD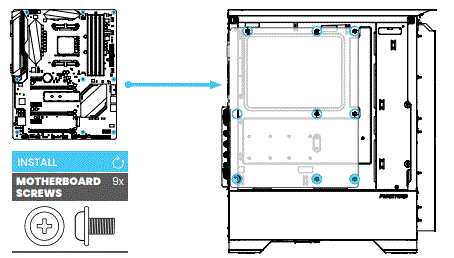 Install the ATX motherboard using 9x motherboard screws.
For M-ATX Motherboards follow the motherboard instructions to move the stand-offs to the correct position.
POWERSUPPLY Slide in the power supply from the side and secure it with the 4x PSU screws. It is recommended to connect all needed cables beforehand
STORAGE | 2.5” SSD 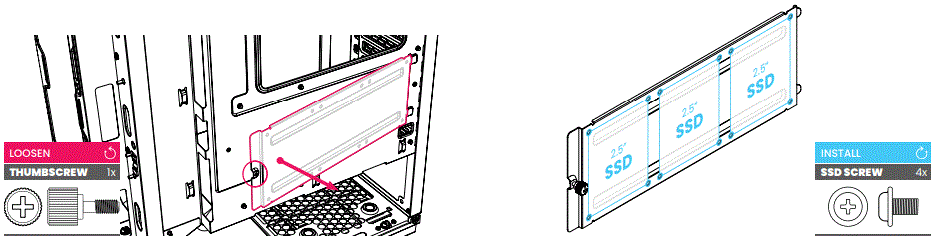
- Loosen the thumb screw on the SSD backplate to remove it, for easy installation of the 2.5” SSD’s.
- The backplate can hold up to 3x 2.5” SSD’s. Use 4x SSD screws per SSD to secure it in location.
STORAGE | 3.5” HDD
- Lay the chassis on it’s side for easy access.
- Hold the 3.5” HDD into place and secure it with 4x HDD screws from the bottom.
FRONT I/O
Connect the front I/O cables to the allocated connectors on the motherboard to use all front I/O buttons and inputs.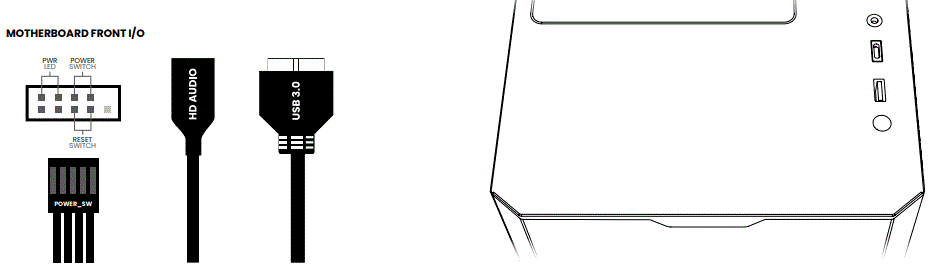
D-RGB CABLES
- D-RGB CONTROL
The D-RGB fan needs a controller to function. Connect to an ARGB-equipped motherboard with the included D-RGB Motherboard adapter or use a Phanteks D-RGB Controller. The Phanteks D-RGB Controller is sold separately (PH-CTHUB_DRGB_01). - D-RGB EXPANSION
More Phanteks D-RGB lighting products can be daisy-chained easily with the JST-connector.
OPTIONAL UPGRAD
VERTICAL GPU BRACKET (PH-VGPUKT4.0_03R)
- The G300A chassis supports the Phanteks Vertical GPU Bracket.
- The Vertical GPU Bracket supports 3 and 4 slot GPU’s with access to the GPU connectors on slot 1 and 2.
- It can be easily installed in the PCI slot area. Follow the instructions that are included with the Vertical GPU bracket
SUPPORT & WARRANTY
As a Phanteks customer, you are priority number one. We have a dedicated team across the globe to deliver the experience you deserve.
CUSTOMER CARE
RMA and Technical Support Americas
Hours: Monday-Friday 9:00-5:00 PST
Phone number: +1(909)598-2115
Email: support@phanteksusa.com
Facebook: @Phanteks
RMA and Technical Support International
Email: support@phanteks.com
Facebook: @Phanteks
For spare parts and optional upgrades please visit:
www.axpertec.com (EU) | www.phanteksusa.com (US)
Documents / Resources
 |
Phanteks Eclipse G300A Innovative Computer Hardware Design [pdf] Installation Guide Eclipse G300A Innovative Computer Hardware Design, Eclipse G300A, Innovative Computer Hardware Design, Hardware Design, Design |


