PARADOX RTX3 Wireless Expansion Module Instruction Manual

Introduction
The RTX3 is a 2-way, 32 zone wireless expansion module which enables EVO and SP Series control panels to support wireless hardware such as sirens, motion detectors, water detectors, and remote controls.
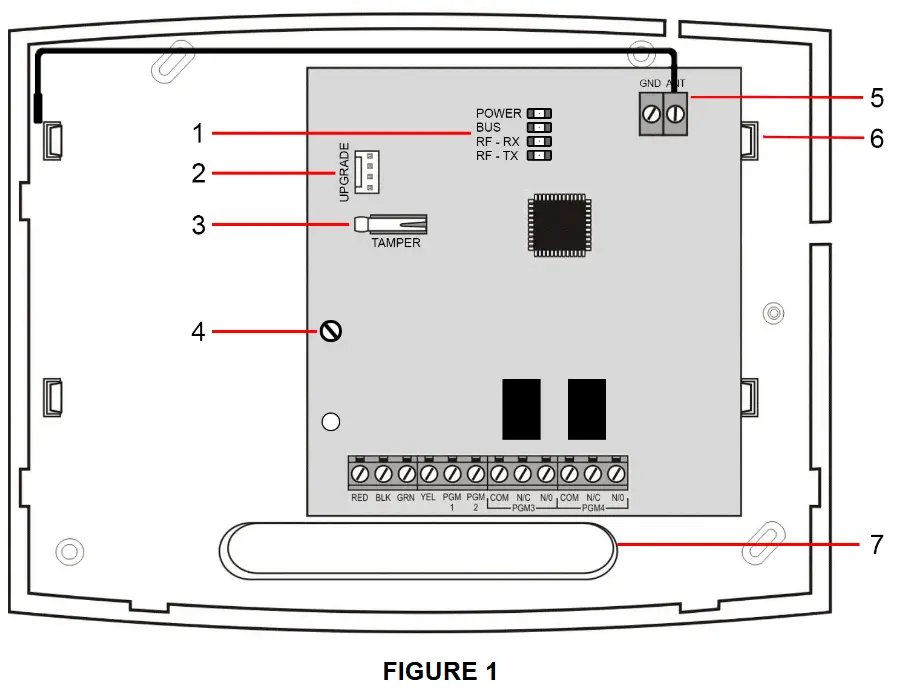
- LED display
- Firmware upgrade serial connector
- Anti-tamper switch
- PCB screw
- Antenna
- Mounting clips (2)
- Wiring slot
Installation

Installation Notes
Refer to the Figure 2 for the following connections and instructions.
- Control panel Digiplex connection.
- Use a relay if the current draw exceeds 150mA on PGM1 or PGM2. Connect the RTX3’s RED connector to the relay’s RED connector, and the RTX3’s PGM connector (PGM1 or PGM2) to the relay’s BLK connector.
- Connect PGM3 and PGM4 to external power supplies if additional power is required. A PS25 is recommended. Connect the PGM’s N.O. connector to the external power supply’s “+” connection. Connect the power supply’s “-” connector to the device’s “-” connector. Connect the PGM’s COM connector to the device’s “+” connector.
Write down the serial number of all wireless modules used with the RTX3.
System Reset for EVO Panels
- Press and hold the [0] key.
- Enter the [INSTALLER CODE ].
- Enter section [4001].
- Enter the module [SERIAL NUMBER ].
System Reset restores the RTX3’s factory settings.
LED Feedback

Programming RTX3 for SP Series Panels
When connected to a SP Series control panel, RTX3 settings are programmed through control panel programming sections. For detailed instructions refer to the SP Series Programming Guide.
Notes:
• Only one RTX3 module can be connected to a SP Series panel.
Programming for EVO Series Panels
Program RTX3 settings for EVO panels with either a keypad or BabyWare PC software.
Programming RTX3 with a Keypad
When connected to an EVO panel, program RTX3 settings through the keypad by entering Module Programming Mode.
To enter Module Programming mode:
- Press and hold the [0] key.
- Enter the [INSTALLER CODE ].
- Enter section [4003].
- Enter the module [SERIAL NUMBER ].
- Enter the required [DATA ].
After Programming RTX3 for EVO Control Panels
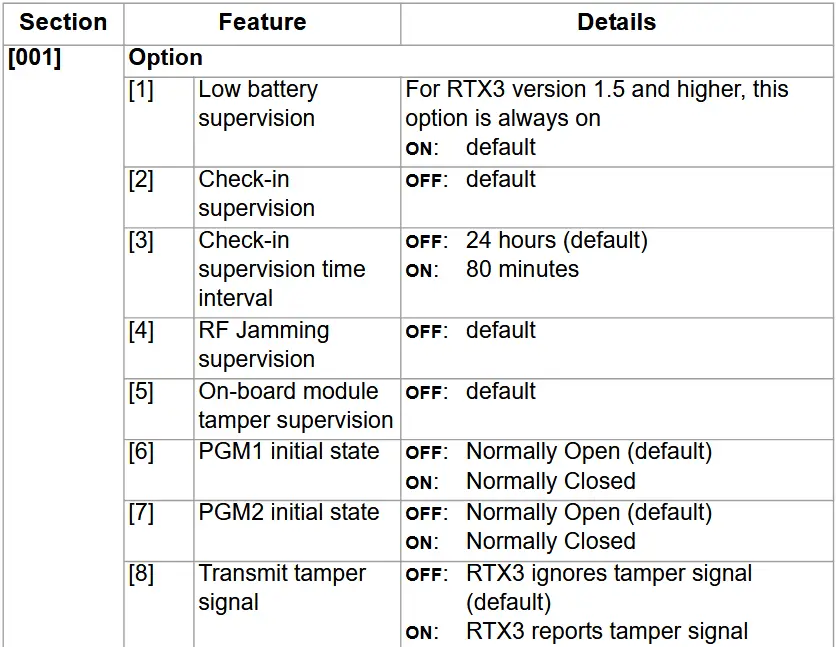
Program the zones, PGMs, sirens and remote controls into the EVO panel. Refer to EVO section [3034] and RTX3 section [001] options [2] and [3] for wireless transmitter supervision options. Requirement: Configure all wireless sirens in an EVO system to a single RTX3.
RTX3 Programming Sections for EVO Panels
PGM Programming for EVO
This applies to EVO panels version 6.90 and below.
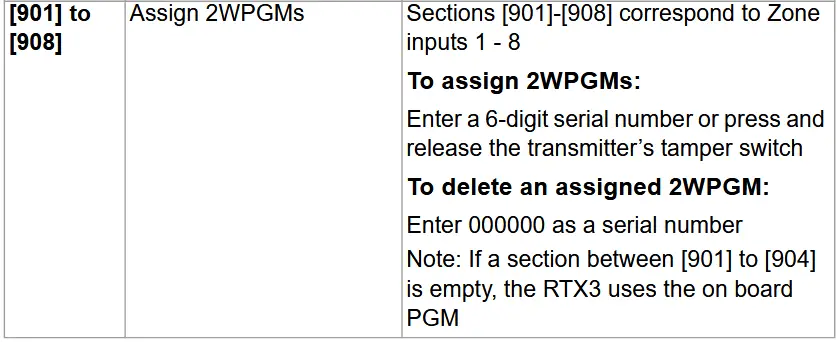
- Enter section [0901] – [0932].
- Enter the 8-digit serial number and 3-digit output number.
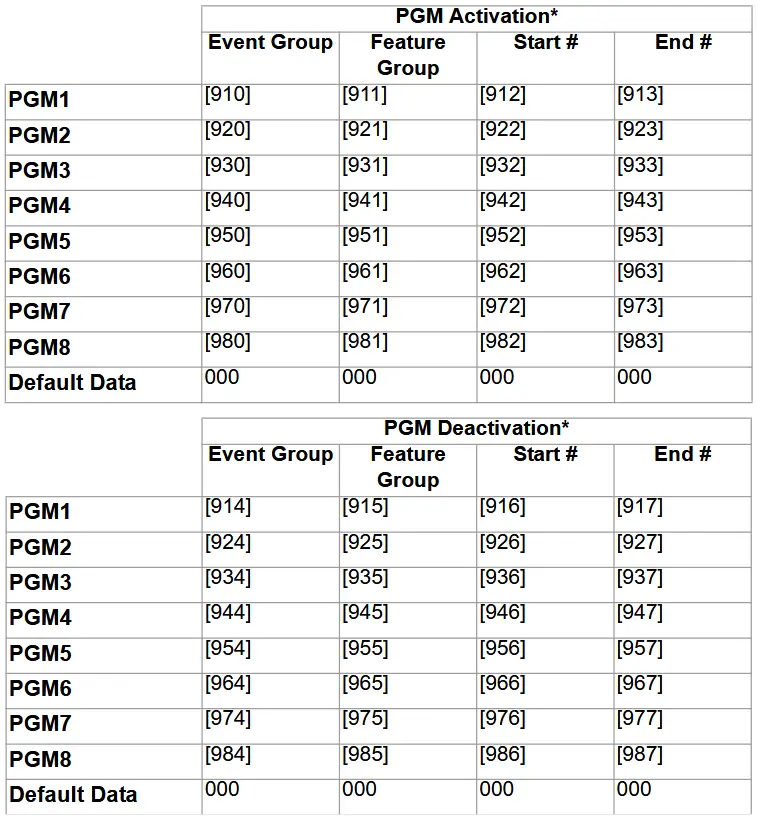
- Enter the 3-digit Event Group, Feature Group, Start # and End # for PGM activation.
- Enter the 3-digit Event Group, Feature Group, Start #, and End # for PGM deactivation.
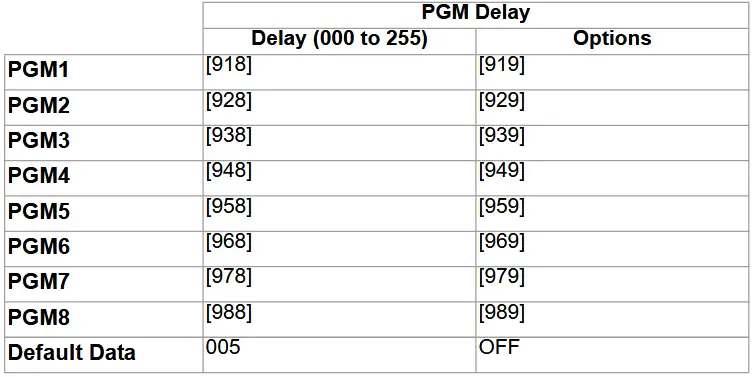
- Define the PGM Delay Value (001 to 255 x 1 sec./min.). Default set to 15 minutes.
- Set your PGM options, refer to the table below.
Note: Supervision is not provided to devices connected to the PGM.
PGM Option Programming for EVO
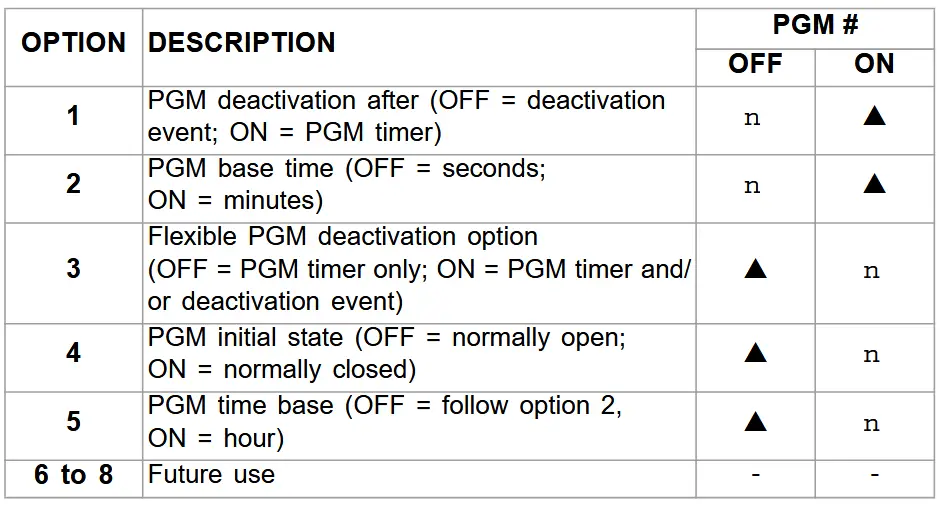
The following options apply to sections [919], [929]…[989]:
Option [1]: PGM deactivation after, refer to table.
Option [2]: PGM Base Time: On = minutes; Off = seconds (default)
Option [8]: Flexible PGM deactivation**, refer to table
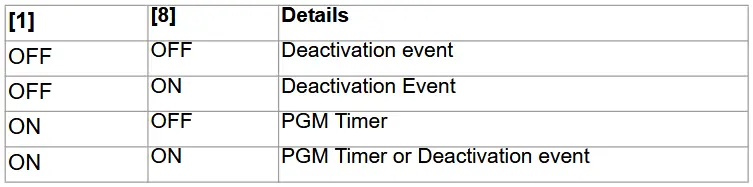
* For a complete list of events, refer to the PGM programming section of your EVO Programming Guide.
** In order to use the “Flexible PGM deactivation” option [8], the PGM deactivation after option [1] must be ON.
Firmware Upgrade
Upgrade RTX3 firmware using a serial connection (307USB). For firmware upgrade instructions see the Firmware Upgrade Instructions document at: Paradox.com > Software > BabyWare.
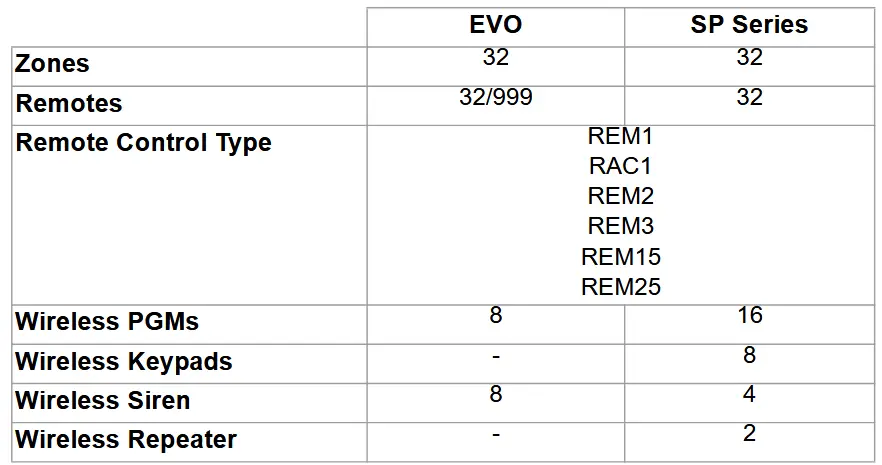
Hardware Compatibility
Technical Specifications

FCC and Industry Canada Compliance Statement
This device complies with FCC Rules Part 15 and with Industry Canada license exempt RSS standard(s). Operation is subject to two conditions:
- This device may not cause harmful interference
- This device must accept any interference that may be received or that may cause undesired operation.
This Class B digital apparatus complies with Canadian ICES-003.
FCC ID: KDYRTX3
IC: 2438A-RTX3
FCC WARNING
This equipment has been tested and found to comply with the limits for a Class B digital device, pursuant to Part 15 of the FCC Rules. These limits are designed to provide reasonable protection against harmful interference in a residential installation.
This equipment generates, uses and can radiate radio frequency energy and, if not installed and used in accordance with the instructions, may cause harmful interference to radio communications. However, there is no guarantee that interference will not occur in a particular installation. If this equipment does cause harmful interference to radio or television reception, which can be determined by turning the equipment off and on, the user is encouraged to try to correct the interference by one or more of the following measures:
- Reorient or relocate the receiving antenna.
- Increase the separation between the equipment and the receiver.
- Connect the equipment into an outlet different from that to which the receiver is connected.
- Consult the dealer or an experienced radio/TV technician for help.
Changes or modifications to this equipment not expressly approved by the party responsible for compliance (Paradox Security Systems Ltd.) could void the user’s authority to operate the equipment.
Warranty
For complete warranty information on this product, please refer to the Limited Warranty Statement which can be found on paradox.com/terms or contact your local distributor.
Patents
US, Canadian and international patents may apply. Paradox is a trademark or registered trademark of Paradox Security Systems (Bahamas) Ltd.
©2020 Paradox Security Systems (Bahamas) Ltd. All rights reserved. Specifications may change without prior notice.
RTX3-EI15 02/2020
Documents / Resources
 |
PARADOX RTX3 Wireless Expansion Module [pdf] Instruction Manual RTX3, RTX3 Wireless Expansion Module, Wireless Expansion Module, Expansion Module, Module |