![]() RT Multiple Target ADAS Measurement Solution
RT Multiple Target ADAS Measurement Solution
User Guide
Install
Mount the RT
We recommend using the RT-Strut (with the supplementary retaining strap system) in the centre of the rear footwells, or horizontally in the boot (trunk).

Position the antenna(s)
Mount the antenna(s) on the roof, at least 20 cm from the roof edge, or using the Dual Antenna Roof Mount. Make sure they are at least 1 m apart and the cables exit in the same direction.

Connect the cables
Plug in the main user cable to the device and connect antenna cables. The primary antenna should be the one closest to the device.

Supply power
We recommend using a UPS or dedicated battery to supply power. Your device will then be visible in NAVsuite when trying to connect.

Setup IP connection to device
Ensure your PC’s IP address settings enable you to connect via Ethernet, so you can move to configuration.

 Configure
Open NAVconfig and select “New Configuration”

Read existing configuration or use default settings
Select your device and the type of vehicle.

IMU orientation
Set the Y&Z axes of the device within the vehicle.

Primary antenna
Measure the antenna’s distance from the RT along the three-vehicle axes.

Secondary antenna
Enable, if mounted, and measure the distance from the primary antenna.

 Configure
Lateral and vertical no-slip
Input the distances of the steered and non-steered axles to the device.

GNSS corrections
Use the default settings, which work with our base stations, or change to match your own.

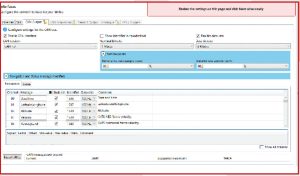
Modify ‘Interface’ settings
Configure your CAN output and acquisition settings, using CAN 2.0 or CAN-FD.
Use default settings
In the ‘Environment’ and ‘Advanced Tools’ for a quick start.

Write the configuration to your device
Select the correct IP for your unit and click commit. Once complete, save and finish your configuration.

 Calibrate/Warm-up
Use the ‘Warm up’ template in NAVdisplay to help visualize your calibration
Initialize
Drive in a straight line, accelerating through the set initialization speed. The default is 5 m/s (18 km/h).

Figures of 8
Complete several figures of eight manoeuvres in your vehicle, braking into turns and accelerating out.

Decreasing circles
Drive in a circle at a fixed speed, and decrease the radius of your turns in both clockwise and anti-clockwise directions.
 Slaloms
Complete a few slaloms, with short sharp turns.

Acceleration and braking
Apply hard acceleration and hard braking in a straight line, until at a complete stop (do not stall).

Commit settings to your device
Use NAVconfig and select “Improve Configuration” to apply the improved settings from your calibration to the device.

Re-initialize and complete quick warm-up
Repeat steps 2 and 3. Use NAVdisplay to check required performance level is reached.

 Analyze
Files are automatically saved internally from GPS start time, as YYMMDD_hhmmss.rd

Open NAVsolve and select your device
Select the desired file in preview
Process your file
Selecting whether you want simulated, forward, backward, or combined, amend other settings and click “Process”.
Export your data
Configure the file format for your desired output and click “Export”.
Need further assistance?
![]()
Go the support website: support.oxts.com
Or get in touch if you
can’t find what you need:
support@oxts.com
+44(0)1869814251
Documents / Resources
 |
OXTS RT Multiple Target ADAS Measurement Solution [pdf] User Guide RT, Multiple Target, ADAS Measurement Solution, RT Multiple Target ADAS Measurement Solution |


