Contents
hide
myFIRSTECH FTI-TLP3 Flash Module and Update Controller
Product Specifications
- Product Name: FTI-TLP3
- Compatibility: DL-TL7 Toyota 4Runner PTS AT w/SLC
- Install Type: 2022-24 Type 1x
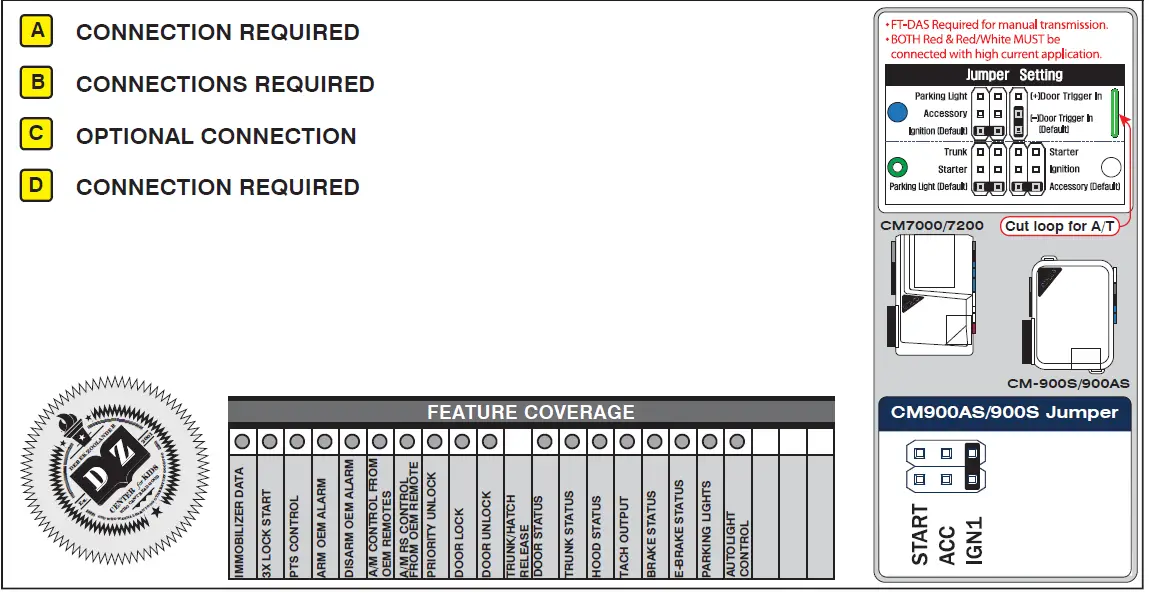
- Features: Lights control, Locks synchronization, DCM interface
Product Usage Instructions
Installation Process
- Before starting the installation, ensure you have the BLADE-AL(DL)-TL7 firmware, flash module, and update controller.
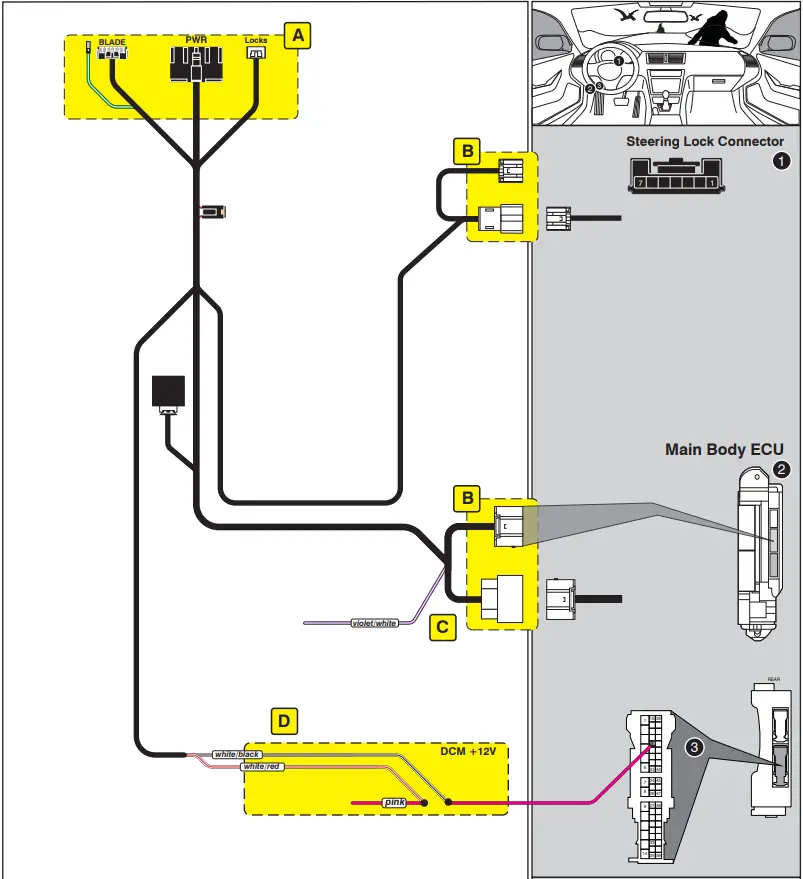
- Install Type 1X involves connecting the Main Body ECU in the driver side kick panel area, optional trunk/hatch connection, and DCM interface.
- Connect the vehicle CAN data through the 30-pin connection at the Main Body ECU.
- For DCM Interface Type 1x Install, interrupt power to the vehicle telematics module using the white/black & white/red BLADE connector relay wires.
Lights Control
- Use the pre-terminated green/white wire bundled with the BLADE connector for parking light and auto-light control.
- Replace the (-) pk light wire from the controller’s gray I/O connector with the specified wire for status and diagnostic reporting.
Locks Synchronization
- Additional connections to the vehicle door locks are required for proper synchronization with the OEM remotes. Use the 6-pin lock connector for correct operation.
- Connect to the control module lock output port to ensure smooth operation.
Idle Mode and Takeover Feature
- The FTI-TLP3 Harness does not support the Idle Mode feature. Refer to the full BLADE installation diagram for applicable wiring if needed.
- Takeover is not supported; the vehicle will shut down upon opening the driver’s door.
LED Programming Error Codes
- 1x: CAN error, confirm harness configuration.
- 2x: No IGN, confirm IGN power and harness configuration.
- 3x: IMMO/CAN error, confirm harness configuration.
- 4x: No VIN, module may default to base platform #2.
- 5x: Unknown VIN, module may default to base bplatform #2.
- 6x: OEM starter detected, cycle IGN. If issue persists, troubleshoot further.
FTI-TLP3: Vehicle Coverage and Preparation Notes

- This installation requires BLADE-AL(DL)-TL7 firmware, flash module and update controller before beginning the installation.
- Install Type 1X: Main Body ECU, driver side kick panel area, optional trunk/hatch connection, DCM interface required.
- CAN: Vehicle CAN data is gathered through the 30-pin connection at the Main Body ECU, no other connections are required.
- DCM Interface: Type 1x Install requires interrupting power to the vehicle telematics module using the white/black & white/red
- BLADE connector relay wires, included in the FTI-TLP3 harness assembly. Connect as illustrated.
- Lights: Parking light and auto-light control are handled using the pre-terminated green/white wire bundled with the BLADE connector. Remove the (-) pk light wire from the controllers gray I/O connector and replace with the one specified, for status and diagnostic reporting.
- Locks: This installation type requires additional connections to the vehicle door locks to ensure proper synchronization with the
- OEM remotes. The 6-pin lock connector is required for correct operation. Connect to the control module lock output port.
- Idle Mode is not a supported feature of the FTI-TLP3 Harness: The Idle Mode feature which allows the user to exit a running has been excluded from the FTI-TLP3 harness wiring. If this feature is desired, please refer to the full BLADE installation diagram for the applicable wiring and make the required connection to the vehicle PTS button.
TAKEOVER NOT SUPPORTED: THE VEHICLE WILL SHUT DOWN UPON OPENING DRIVER’S DOOR
FTI-TLP3 – DL-TL7 – Type 1x
LED Programming Error Codes
Module LED flashing RED during programming
- CAN error, confirm harness configuration
- No IGN, confirm IGN power and harness configuration
- IMMO/CAN error, confirm harness configuration
- No VIN, module may default to base platform #2
- Unknown VIN, module may default to base platform #2
- OEM starter detected, cycle IGN, if issue persists, remove and reprogram
CARTRIDGE INSTALLATION
- Slide cartridge into unit. Notice button under LED.
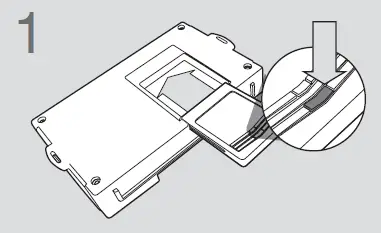
- Ready for Module Programming Procedure.
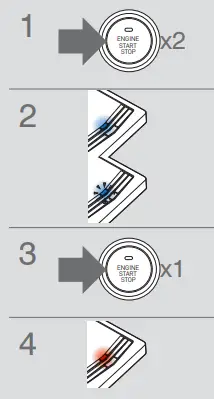
MODULE PROGRAMMING PROCEDURE
IMPORTANT: The hood must be closed
- Push start button twice [2x] to ON position.
- Wait, if LED turns solid BLUE for 2 seconds, proceed to step 7. 4If LED fl ashes BLUE rapidly, proceed to step 3.
- Push start button once [1x] to OFF position.
- Wait, LED will turn solid RED. (This may take up to 5 minutes.)
- Push start button twice [2x] to ON position.
- Wait, LED will turn solid BLUE for 2 seconds.
- Push start button once [1x] to OFF position.
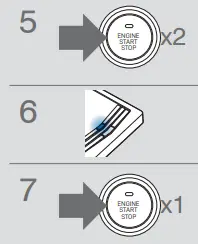
- Module Programming Procedure completed.
Documents / Resources
 |
myFIRSTECH FTI-TLP3 Flash Module and Update Controller [pdf] Instruction Manual FTI-TLP3, FTI-TLP3 Flash Module and Update Controller, Flash Module and Update Controller, Module and Update Controller, Update Controller, Controller |