1. Introduzzjoni
This manual provides detailed instructions for the safe and effective operation of your GVDA GD106B Digital Multimeter. This True RMS auto-ranging multimeter is designed for measuring DC/AC Voltage, DC/AC Current, Resistance, Capacitance, Diode, Continuity, NCV (Non-Contact Voltage), Live Wire detection, and Battery testing. Its compact design and comprehensive features make it an essential tool for electricians, hobbyists, and DIY enthusiasts.
2. Informazzjoni dwar is-Sigurtà
Dejjem osserva l-prekawzjonijiet ta' sigurtà meta tuża tagħmir għall-ittestjar elettriku. Jekk tonqos milli tagħmel dan, tista' tikkawża korriment jew ħsara lill-miter jew lit-tagħmir li jkun qed jiġi ttestjat.
- Teċċedix il-valuri massimi tad-dħul għal kwalunkwe funzjoni.
- Uża kawtela kbira meta taħdem bil-voltag'il fuq minn 30V AC RMS, 42V peak, jew 60V DC. Dawn il-volumitages joħolqu periklu ta' xokk.
- Dejjem skonnettja l-enerġija miċ-ċirkwit u armi l-kurrent kollu ta' vultaġġ għoli.tagIl-kapaċitaturi e qabel ma twettaq testijiet tar-reżistenza, tal-kontinwità, jew tad-dijodi.
- Inspect test leads for damaged insulation or exposed metal. Replace if damaged.
- Ensure the function switch is in the correct position for the desired measurement before connecting the test leads to the circuit.
- Tħaddimx il-miter jekk jidher li għandu l-ħsara jew jekk il-kaxxa tkun miftuħa.
- Remove test leads from the meter before opening the battery cover.
3. Prodott Aktarview u Komponenti
Familiarize yourself with the main components of your GVDA GD106B Digital Multimeter.

Figura 3.1: Quddiem view of the GVDA GD106B Digital Multimeter with its red and black test leads. The display shows "4000 Counts" and various measurement indicators. The rotary dial is set to OFF.
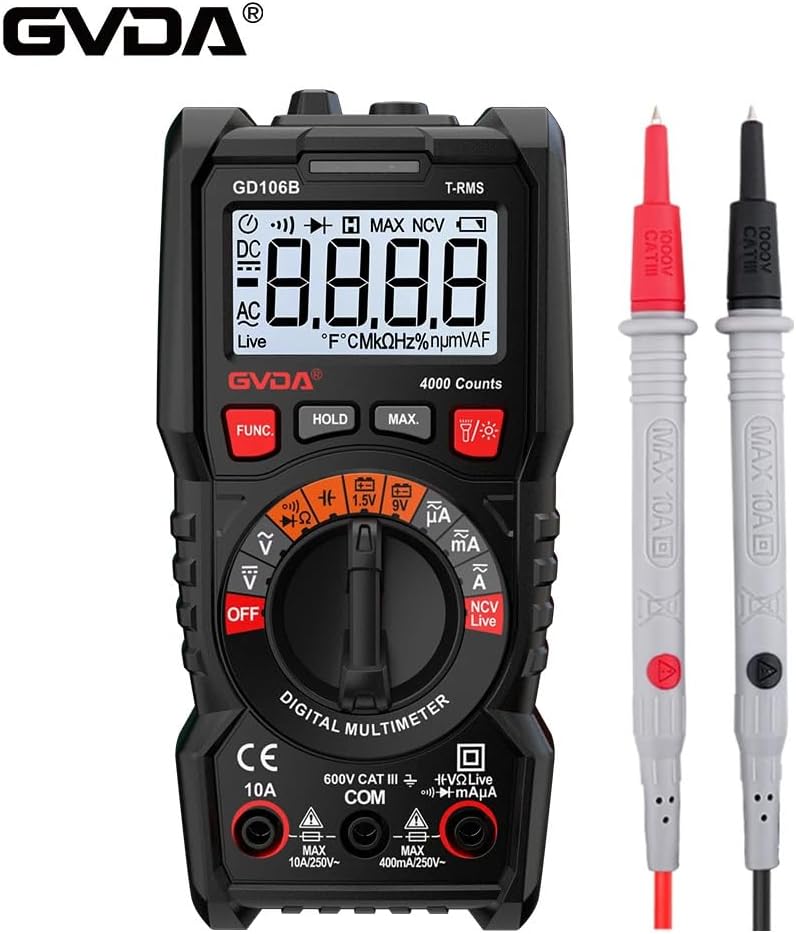
Figura 3.2: Ieħor view of the GVDA GD106B Digital Multimeter, highlighting the GVDA brand logo at the top left. The meter is shown with its test leads.
Komponenti Ewlenin:
- Display LCD: Juri l-qari tal-kejl, l-unitajiet, u l-indikaturi tal-funzjoni.
- Funzjoni tas-Swiċċ Rotatorju: Jagħżel il-funzjoni tal-kejl mixtieqa.
- Buttuni tal-Funzjoni: (FUNC, HOLD, MAX, Light/Flashlight) For additional features and mode selection.
- Ġakkijiet tad-dħul:
- COM Jack: Common input for all measurements (negative lead).
- Ġakk VΩmA: Input for Voltage, Resistance, Capacitance, Diode, Continuity, and small Current (mA/µA) measurements (positive lead).
- Ġakk 10A: Input for large Current (A) measurements (positive lead).
- Test Leads: Wajers aħmar (pożittiv) u iswed (negattiv) għall-konnessjoni maċ-ċirkwiti.
4. Setup
4.1 Installazzjoni tal-batterija
The GVDA GD106B Multimeter requires 2 x 1.5V AAA batteries (not included) for operation.
- Kun żgur li l-multimetru jkun MITFI u skonnettja l-wajers tat-test kollha mill-jacks tad-dħul.
- Sib l-għatu tal-kompartiment tal-batterija fuq wara tal-miter.
- Uża tornavit biex tħoll il-kamin li jżomm l-għatu tal-batterija.
- Neħħi l-għatu tal-batterija.
- Insert two 1.5V AAA batteries, observing the correct polarity (+ and -) as indicated inside the compartment.
- Erġa 'poġġi l-għatu tal-batterija u ssikka l-vit.

Figure 4.1: Image showing the open battery compartment of the multimeter, indicating where to insert two 1.5V AAA batteries.
5. Istruzzjonijiet Operattivi
Before making any measurement, ensure the test leads are correctly inserted into the appropriate input jacks and the rotary switch is set to the desired function.
5.1 Volt DC / ACtage Kejl
- Insert the red test lead into the VΩmA jack and the black test lead into the COM jack.
- Dawwar is-swiċċ li jdur għall- V~ (Volum ACtage) jew V- (DC Voltage) pożizzjoni. Il-miter se jaġġusta l-firxa awtomatikament.
- Qabbad il-wajers tat-test b'mod parallel maċ-ċirkwit jew il-komponent li tixtieq tkejjel.
- Aqra l-voltage valur fuq il-wiri LCD.
5.2 DC/AC Current Measurement
- For currents up to 400mA, insert the red test lead into the VΩmA jack. For currents up to 10A, insert the red test lead into the 10A jack. Insert the black test lead into the COM jack.
- Dawwar is-swiċċ li jdur għall- mA~ (Kurrent AC) jew mA- (DC Current) position. Use the FUNC button to switch between AC and DC if needed.
- Disconnect power to the circuit. Open the circuit where you want to measure current.
- Qabbad il-multimetru f'serje maċ-ċirkwit.
- Applika l-enerġija liċ-ċirkwit u aqra l-valur tal-kurrent fuq id-displej LCD.
- Caution: Never connect the multimeter in parallel to a voltagsors elettroniku meta tkejjel il-kurrent, għax dan jista' jaħraq il-fjus jew jagħmel ħsara lill-miter.
5.3 Kejl tar-Reżistenza
- Insert the red test lead into the VΩmA jack and the black test lead into the COM jack.
- Dawwar is-swiċċ li jdur għall- Ω pożizzjoni.
- Ensure the circuit or component is de-energized and discharged.
- Qabbad il-wajers tat-test mal-komponent biex tkejjel ir-reżistenza tiegħu.
- Aqra l-valur tar-reżistenza fuq id-displej LCD.
5.4 Kejl tal-Kapaċitanza
- Insert the red test lead into the VΩmA jack and the black test lead into the COM jack.
- Dawwar is-swiċċ li jdur għall- Kapaċità position (often shared with Ω or Diode, use FUNC to select).
- Kun żgur li l-kapaċitatur ikun skarikat kompletament qabel ma tittestjah.
- Qabbad il-wajers tat-test mat-terminals tal-kapaċitatur.
- Aqra l-valur tal-kapaċità fuq il-wiri LCD.
5.5 Diode Test and Continuity Measurement
- Insert the red test lead into the VΩmA jack and the black test lead into the COM jack.
- Dawwar is-swiċċ li jdur għall- Dajowd/Kontinwità position. Use the FUNC button to toggle between Diode test and Continuity.
- Test tad-Diode: Connect the red lead to the anode and the black lead to the cathode of the diode. The display will show the forward voltage drop. Reverse the leads; the display should show OL (Open Loop) for a good diode.
- Test ta' Kontinwità: Connect the test leads across the circuit or component. If the resistance is below approximately 50Ω, the buzzer will sound, indicating continuity.
5.6 NCV (Mhux Kuntatt Voltage) Kejl
Il-funzjoni NCV tippermettilek li tiskopri AC voltage without direct contact with the conductor.
- Dawwar is-swiċċ li jdur għall- NCV pożizzjoni.
- Mexxi l-ponta ta' fuq tal-multimetru qrib il-konduttur jew is-sokit.
- Jekk AC voltage is detected, the meter will beep and the NCV indicator light will flash. The intensity of the beeping and flashing indicates the strength of the detected field.

Figure 5.1: Demonstrates the NCV (Non-Contact Voltage) measurement function, with the multimeter held near a wall outlet detecting an electrical field.
5.7 Live Wire Test
This function helps identify live wires in an AC circuit.
- Insert the red test lead into the VΩmA jack. The black lead is not needed for this test.
- Dawwar is-swiċċ li jdur għall- Live pożizzjoni.
- Touch the red test lead to the wire or terminal you suspect is live.
- Jekk volum ħajtage is detected, the display will show "Live" and the meter will beep.

Figure 5.2: The multimeter is shown performing a live wire detection test by inserting the red test lead into a power strip socket.
5.8 Battery Test (1.5V/9V)
- Insert the red test lead into the VΩmA jack and the black test lead into the COM jack.
- Dawwar is-swiċċ li jdur għall- 1.5V or 9V battery test position.
- Connect the red test lead to the positive terminal of the battery and the black test lead to the negative terminal.
- Aqra l-batterija voltage fuq il-wiri.
5.9 Funzjonijiet Speċjali
- Data Hold (HOLD button): Agħfas biex tiffriża l-qari attwali fuq id-displej. Agħfas mill-ġdid biex tirrilaxxa.
- Maximum Measurement (MAX button): Press to display the maximum value measured since the function was activated.
- Backlight/Flashlight (Light button): Press to turn on the display backlight. Long press to activate the built-in flashlight.
- RMS Veru: The meter provides True RMS measurements for AC voltage and current, ensuring accurate readings for non-sinusoidal waveforms.
- Medda awtomatika: The meter automatically selects the appropriate measurement range, simplifying operation.
6. Manutenzjoni
6.1 Tindif
Imsaħ il-każ bl-adamp drapp u deterġent ħafif. Tużax abrażivi jew solventi. Żomm it-terminals tad-dħul ħielsa mill-ħmieġ u l-umdità.
6.2 Sostituzzjoni tal-batterija
When the "Low Battery Indication" icon appears on the display, replace the batteries as described in Section 4.1. Prompt battery replacement ensures accurate readings and proper operation.
6.3 Tifi Awtomatiku
To conserve battery life, the multimeter will automatically power off after a period of inactivity. Press any button or turn the rotary switch to wake it up.
7 Issolvi l-problemi
| Problema | Kawża Possibbli | Soluzzjoni |
|---|---|---|
| Il-miter ma jixgħelx. | Batteriji mejta jew installati ħażin. | Iċċekkja l-polarità tal-batterija jew ibdel il-batteriji. |
| Jintwera "OL" (Tagħbija żejda). | Measurement exceeds selected range or meter's maximum input. | Ensure the correct function is selected. For auto-ranging, this indicates the value is beyond the meter's capability. |
| Qari mhux korrett. | Funzjoni magħżula ħażina, konnessjoni ħażina tal-wajer tat-test, jew batterija baxxa. | Verify function switch position. Check test lead connections. Replace batteries if low battery indicator is on. |
| L-ebda ħoss ta' kontinwità. | Circuit resistance is too high, or continuity function not selected. | Ensure continuity mode is active (use FUNC button). Check if the circuit is truly continuous. |
8. Speċifikazzjonijiet
| Parametru | Valur |
|---|---|
| DC Voltage | 400mV/4V/40V/400V/600V (±0.5%+3) |
| AC Voltage | 4V/40V/400V/600V (±1.0%+3) |
| Kurrent DC | 400uA/4000uA/40mA/400mA/4A/10A (±1.2%+3) |
| Kurrent AC | 400uA/4000uA/40mA/400mA/4A/10A (±1.5%+3) |
| Reżistenza | 400Ω/4kΩ/40kΩ/400kΩ (±1.0%+3); 4MΩ/40MΩ (±1.2%+3) |
| Kapaċità | 4nF/40nF/400nF/4µF/40µF/400µF/4mF (±4.0%+5) |
| Protezzjoni tal-Fjusis | Fjus F400mA/250V; Fjus F10A/250V |
| Jgħodd | 4000 Għadd |
| Live Wire Test | Iva |
| Kejl NCV | Iva |
| Test tal-batterija | 1.5V/9V |
| Test tad-Diode | Iva |
| Kejl tal-Kontinwità | Iva |
| Kejl Massimu | Iva |
| Żamma tad-Data | Iva |
| RMS Veru | Iva |
| Indikazzjoni Baxxa tal-Batterija | Iva |
| Auto Power Mitfi | Iva |
| Dawl ta' wara | Iva |
| Flashlight | Iva |
| Firxa Auto | Iva |
| Provvista tal-Enerġija | 2x 1.5V AAA Batteries (not included) |
| Daqs tal-Prodott | 151mm x 75mm x 46mm |
| Piż tal-Prodott | 207g |
8.1 Kontenut tal-Pakkett

Figure 8.1: The complete package contents, including the GVDA GD106B Digital Multimeter, test leads, user manual, and gift box.
- 1 PC Digital Multimeter (GD106B)
- 1 Manwal għall-Utent tal-PC
- 1 PC Test Pen (Test Leads)
- 1 PC Gift Box
9. Garanzija u Appoġġ
Specific warranty information for the GVDA GD106B Digital Multimeter is not provided in the product description. Please refer to the seller or manufacturer's official website for warranty details and customer support contact information.
For technical assistance or inquiries, please contact your point of purchase or the GVDA customer service department.


