1. Pengenalan
This user manual provides detailed instructions for the installation, operation, and maintenance of your Xprinter XP-D200N Thermal Receipt Printer. The XP-D200N is a high-speed thermal printer designed for reliable and efficient receipt printing in various business environments. Please read this manual thoroughly before using the printer to ensure proper functionality and to prevent damage.
2. Maklumat Keselamatan
To ensure safe operation and prevent damage to the printer or injury to yourself, please observe the following safety precautions:
- Always use the provided power adapter. Using an incorrect adapter may damage the printer and void the warranty.
- Jangan dedahkan pencetak kepada air, kelembapan atau suhu yang melampau.
- Elakkan meletakkan pencetak di bawah cahaya matahari langsung atau berhampiran sumber haba.
- Do not attempt to disassemble or repair the printer yourself. Refer all servicing to qualified personnel.
- Pastikan pencetak diletakkan di atas permukaan yang stabil dan rata.
- Keep the printer away from dust and debris to maintain optimal performance.
3. Kandungan Pakej
Please check the contents of your package. If any items are missing or damaged, contact your vendor immediately.
- Xprinter XP-D200N Thermal Receipt Printer
- Penyesuai Kuasa
- Kord Kuasa
- Kabel USB
- Gulungan Kertas Termal (pemula)
- Manual Pengguna (dokumen ini)
4. Produk Lebihview
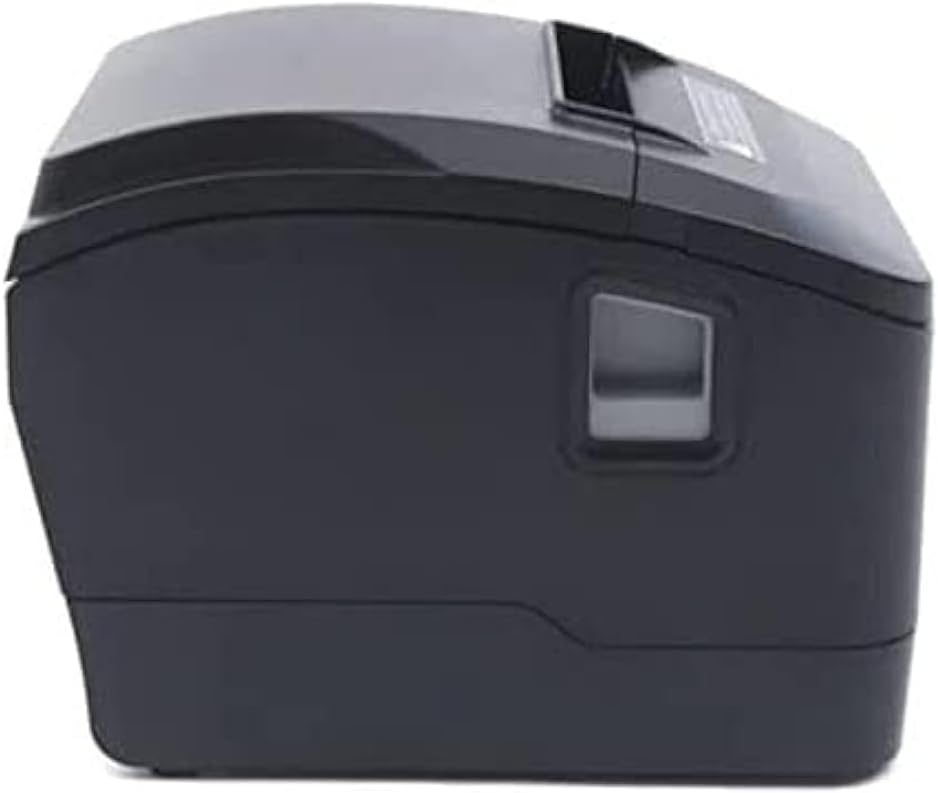
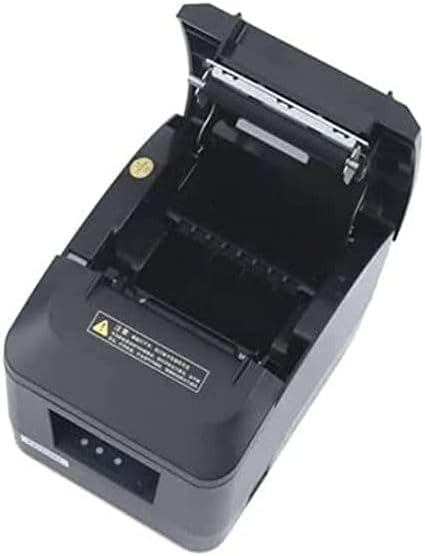
The Xprinter XP-D200N is a compact and efficient thermal receipt printer. Below are images illustrating its key components and design.
Rajah 4.1: Bahagian depan view of the Xprinter XP-D200N Thermal Receipt Printer. This image shows the sleek, black casing and the paper output slot.
Rajah 4.2: sebelah view of the Xprinter XP-D200N Thermal Receipt Printer. This perspective highlights the compact design and the power switch on the right side.

Rajah 4.3: Atas view of the Xprinter XP-D200N Thermal Receipt Printer with the cover open, revealing the thermal paper roll compartment and the print head mechanism. This view is essential for paper loading and maintenance.
5. Persediaan
5.1 Menyambung Kuasa
- Pastikan suis kuasa pencetak berada dalam kedudukan MATI.
- Connect the power adapter to the power input port on the back of the printer.
- Plug the power cord into the power adapter, then into a standard electrical outlet.
5.2 Menyambung ke Komputer
The XP-D200N supports both USB and LAN connectivity.
Sambungan USB:
- Connect one end of the USB cable to the USB port on the printer.
- Sambungkan hujung kabel USB yang lain ke port USB yang tersedia pada komputer anda.
Sambungan LAN (Ethernet):
- Connect an Ethernet cable to the LAN port on the printer.
- Sambungkan hujung kabel Ethernet yang satu lagi ke penghala rangkaian anda atau suis.
- Refer to the printer's advanced settings or driver utility for network configuration (e.g., IP address settings).
5.3 Memuatkan Kertas Terma
- Open the printer cover by pressing the release button or lifting the cover latch. (Refer to Figure 4.3).
- Insert the thermal paper roll into the compartment with the paper feeding from the bottom and the leading edge extending towards the front of the printer. Ensure the paper is aligned correctly.
- Tarik sedikit kertas keluar melepasi pemotong.
- Tutup penutup pencetak dengan kuat sehingga ia berbunyi klik pada tempatnya.
5.4 Pemasangan Pemandu
After connecting the printer, you will need to install the appropriate drivers on your computer. Drivers are typically provided on a CD included with the printer or can be downloaded from the official Xprinter webtapak. Ikut arahan pada skrin semasa pemasangan.
6. Arahan Operasi
6.1 Menghidupkan/Mematikan
- To power on: Ensure the power cord is connected, then flip the power switch to the ON position. The indicator light will illuminate.
- To power off: Flip the power switch to the OFF position.
6.2 Percetakan Asas
Once the printer is connected and drivers are installed, you can print receipts from your point-of-sale (POS) software or other applications. Select the Xprinter XP-D200N as your default printer in your application's print settings.
6.3 Petunjuk Status
The printer features indicator lights (usually on the front panel) that provide information about its status:
- Penunjuk Kuasa: Solid light indicates the printer is powered on.
- Penunjuk Ralat: Flashing or solid light indicates an error (e.g., paper out, cover open, print head overheat). Refer to the troubleshooting section.
- Penunjuk Kertas Keluar: Illuminates when the paper roll is empty or nearly empty.
7. Penyelenggaraan
7.1 Membersihkan Kepala Cetak
Pembersihan kepala cetak secara berkala memastikan kualiti cetakan yang optimum dan memanjangkan jangka hayat pencetak.
- Matikan pencetak dan cabut kord kuasa.
- Buka penutup pencetak.
- Gunakan kapas dengan ringan dampened with isopropyl alcohol (70% or higher) to gently wipe the thermal print head surface. Avoid touching the print head with bare hands.
- Allow the print head to dry completely before closing the cover and reconnecting power (approximately 2-3 minutes).
7.2 Pembersihan Am
Lap bahagian luar pencetak dengan lembut, damp kain. Jangan gunakan pembersih atau pelarut yang melelas.
7.3 Replacing the Paper Roll
When the paper out indicator illuminates or print quality degrades, it's time to replace the paper roll. Follow the steps in Section 5.3 "Loading Thermal Paper".
8. Penyelesaian masalah
| Masalah | Kemungkinan Punca | Penyelesaian |
|---|---|---|
| Pencetak tidak dihidupkan. | No power, faulty power adapter/cord. | Check power connections. Ensure power switch is ON. Test outlet. |
| No printing. | Paper out, cover open, incorrect driver, incorrect printer selected, cable disconnected. | Load paper, close cover, check USB/LAN connection, verify driver installation, select correct printer in software. |
| Poor print quality (faint, blank lines). | Dirty print head, low quality thermal paper, print head damage. | Clean print head (Section 7.1). Replace thermal paper. If problem persists, contact support. |
| Kertas jem. | Improper paper loading, foreign object. | Turn off printer, open cover, carefully remove jammed paper. Reload paper correctly. |
| Error indicator light is on/flashing. | General error, paper out, cover open. | Check for paper out, ensure cover is closed. Power cycle the printer. If error persists, consult manufacturer's support. |
9. Spesifikasi
| Jenama: | Xprinter |
| model: | XP-D200N |
| Jenis Pencetak: | Pencetak Resit Terma |
| Kaedah Cetak: | Terma Terus |
| Kelajuan Cetak: | 220 mm/sec (as per product description) |
| Saiz Media Maksimum: | 8 sm (80mm) |
| Ketersambungan: | USB, LAN (Ethernet) |
| Input Kuasa: | 24V – 2.5A |
| Output Pencetak: | Monokrom |
| Ciri Khas: | Sleek, Compact, Lightweight Design, High Print Quality, Durability, Low Noise, Automatic Paper Cutting |
| Dimensi Produk: | 18.4 x 14 x 13.5 cm |
| Berat Barang: | 1.63 kg |
10. Waranti dan Sokongan
The Xprinter XP-D200N Thermal Receipt Printer comes with a standard manufacturer's warranty. For specific warranty terms and conditions, please refer to the warranty card included with your product or visit the official Xprinter website. For technical support, driver downloads, or service inquiries, please contact your local dealer or the Xprinter customer support team through their official channels.
Untuk maklumat terkini dan sumber sokongan, sila lawati: www.xprinter.net


