1. Produk Lebihview
The Electrolux EEG48200L is an integrated dishwasher designed for efficient and quiet dishwashing. This appliance features a capacity of 14 place settings and operates at a low noise level of 44 decibels. It includes multiple wash programs and convenient loading options such as a cutlery drawer and a cutlery basket.
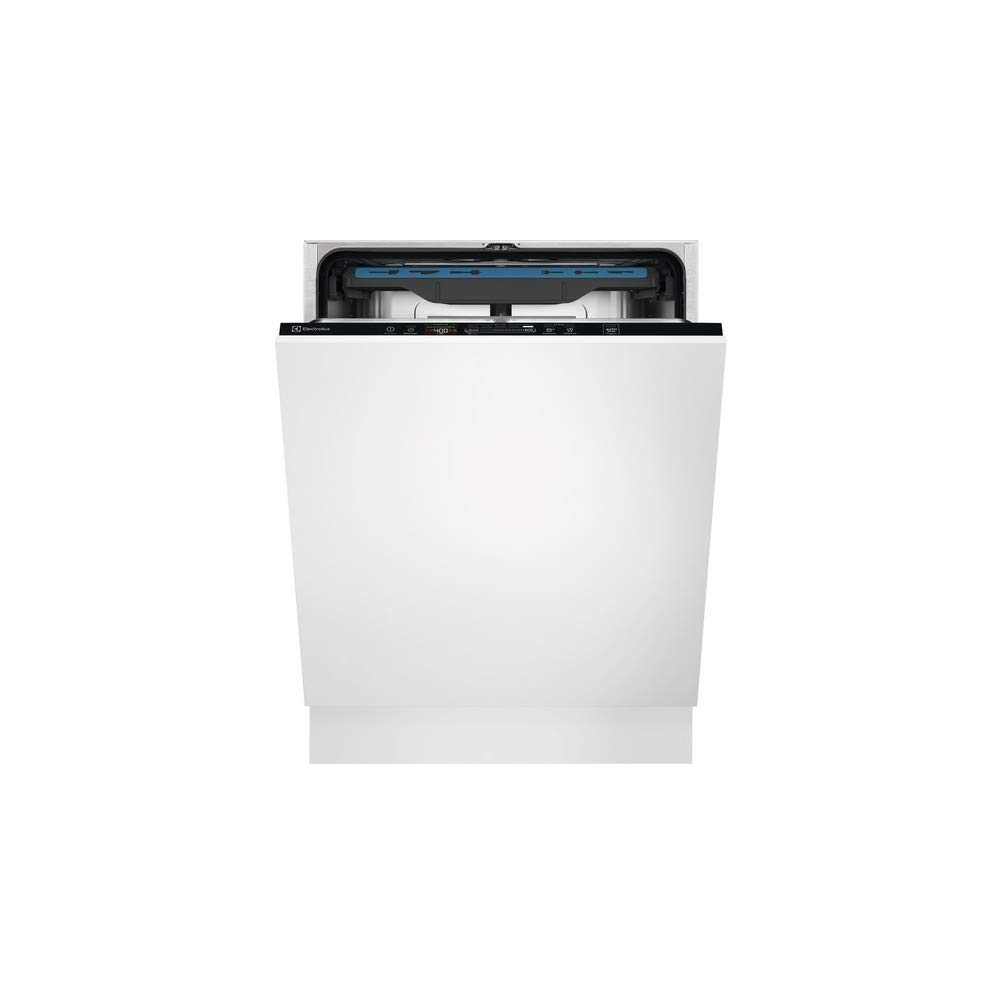
Rajah 1: Electrolux EEG48200L Integrated Dishwasher. This image shows the front view of the dishwasher, typically installed within kitchen cabinetry.
Ciri-ciri Utama:
- kapasiti: 14 tetapan tempat
- Tahap Bunyi: 44 Desibel
- Jenis Kawalan: Fully integrated controls
- Jenis Pemasangan: Bersepadu / Terbina dalam
- Komponen yang Disertakan: Cutlery basket, cutlery drawer
- Pilihan Kitaran: 8 program cucian
2. Pemasangan dan Persediaan
Proper installation is crucial for the safe and efficient operation of your Electrolux EEG48200L dishwasher. Ensure all connections are secure and meet local regulations.
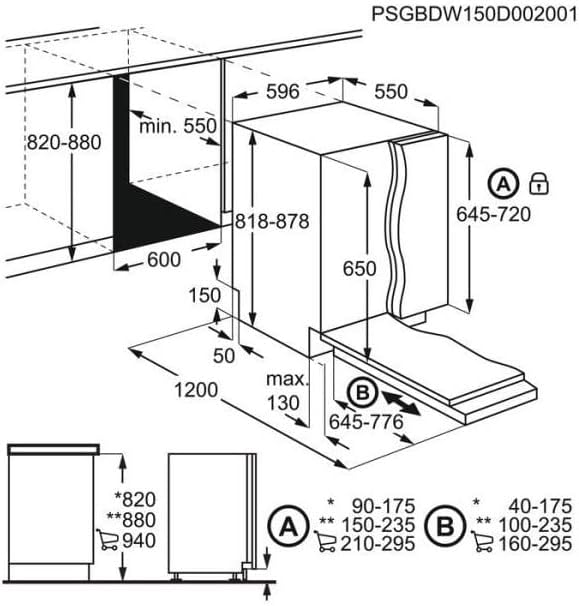
2.1. Dimensions and Cabinetry Requirements
Refer to the diagram below for detailed dimensions and cabinetry requirements for integrating your dishwasher.
Rajah 2: Installation dimensions for the Electrolux EEG48200L dishwasher. This diagram illustrates the required cabinet opening dimensions (width 600mm, height 820-880mm), dishwasher unit dimensions (width 596mm, height 818-878mm), and panel dimensions (height 645-720mm for panel A, 645-776mm for panel B). It also shows the adjustable feet and minimum clearances.
- Cabinet Opening Width: 600 mm
- Cabinet Opening Height: 820 - 880 mm
- Dishwasher Unit Dimensions (W x H): Approximately 596 mm x 818-878 mm
- Kedalaman: Minimum 550 mm for the cabinet.
- Front Panel Dimensions:
- Panel A (top): 645 - 720 mm height
- Panel B (bottom): 645 - 776 mm height
- Kaki boleh laras: Allows for height adjustment.
2.2. Sambungan Air dan Elektrik
Connect the water inlet hose to a cold or hot water supply (max 60°C) and the drain hose to a suitable drain. Ensure the electrical connection is properly grounded and matches the appliance's power requirements. Consult a qualified technician for installation if you are unsure.
3. Arahan Operasi
Follow these steps for optimal performance and cleaning results.
3.1. Memuatkan Mesin Cuci Pinggan
- Kikis zarah makanan yang besar dari pinggan sebelum dimuatkan.
- Letakkan barang yang lebih besar di bakul bawah dan barang yang lebih kecil dan halus di bakul atas.
- Utilize the dedicated cutlery drawer or basket for forks, knives, and spoons, ensuring they do not nest together.
- Pastikan lengan semburan boleh berputar dengan bebas dan tidak terhalang oleh pinggan mangkuk.
3.2. Menambah Detergen dan Bantuan Bilas
- Fill the detergent dispenser with the appropriate amount of dishwasher detergent according to the program selected and water hardness.
- Check the rinse aid indicator and refill the rinse aid dispenser when necessary to ensure streak-free drying.
- If your water is hard, ensure the salt reservoir is filled with dishwasher salt to prevent limescale buildup.
3.3. Memilih dan Memulakan Program Pencucian
- Tutup pintu mesin basuh pinggan mangkuk.
- Select the desired wash program using the control panel. The dishwasher offers 8 cycle options.
- Tekan butang Mula untuk memulakan kitaran.
- A light indicator on the floor may signal that the dishwasher is in operation.
- The dishwasher may automatically open its door at the end of the cycle to assist with drying.
4. Penyelenggaraan dan Penjagaan
Penyelenggaraan tetap memastikan jangka hayat dan kecekapan mesin basuh pinggan mangkuk anda.
4.1. Membersihkan Penapis
- Periodically check and clean the coarse and fine filters located at the bottom of the dishwasher tub.
- Remove any food debris to prevent blockages and ensure proper drainage.
4.2. Membersihkan Bahagian Dalam dan Luar Rumah
- Lap bahagian dalam dengan iklanamp kain untuk mengeluarkan sebarang sisa.
- Clean the exterior control panel and door with a soft, damp kain. Elakkan pembersih yang kasar.
4.3. Musim sejuk (jika berkenaan)
If the dishwasher is in an unheated area and there is a risk of freezing, drain all water from the appliance and disconnect the water supply. Consult the full manual for detailed winterization procedures.
5. Penyelesaian masalah
Before contacting customer service, refer to the following common issues and solutions.
5.1. Dishwasher Does Not Start
- Pastikan pintu ditutup sepenuhnya dan diselak.
- Periksa sama ada kord kuasa dipasang dengan selamat ke dalam salur keluar.
- Sahkan bahawa pemutus litar tidak tersandung.
- Confirm that a wash program has been selected and the Start button pressed.
5.2. Poor Cleaning Results
- Check if the spray arms are blocked or clogged.
- Ensure dishes are loaded correctly, allowing water to reach all surfaces.
- Verify that the detergent dispenser was filled correctly and the detergent is fresh.
- Bersihkan penapis.
- Check rinse aid and salt levels.
5.3. Water Not Draining
- Inspect the drain hose for kinks or blockages.
- Clean the filters to ensure no debris is obstructing the drain pump.
For more complex issues or persistent problems, please contact Electrolux customer service.
6. Spesifikasi
Detailed technical specifications for the Electrolux EEG48200L dishwasher.
| Ciri | Spesifikasi |
|---|---|
| Nama Model | EEG48200L |
| Jenama | Electrolux |
| Jenis Pemasangan | Bersepadu |
| Kapasiti | 14 Tetapan Tempat |
| Tahap Kebisingan | 44 Desibel |
| Dimensi Produk (L x W x H) | 54.99 x 59.59 x 81.79 cm (lebih kurang 55 x 59.6 x 81.8 cm) |
| Berat Barang | 37.08 Kilograms (approx. 37.1 kg) |
| Bilangan Pilihan Kitaran | 8 |
| Jenis Paparan | LED |
| Jenis Kawalan | Bersepadu Sepenuhnya |
| warna | putih |
| Komponen yang Disertakan | Cutlery basket, cutlery drawer |
| Jenis Selesai | Berkilat |
7. Waranti dan Sokongan
Untuk maklumat jaminan terperinci, sila rujuk kad jaminan yang disertakan dengan produk anda atau lawati Electrolux rasmi webtapak. Terma dan syarat waranti mungkin berbeza mengikut wilayah.
For technical assistance, spare parts, or customer service inquiries, please contact your local Electrolux customer support. Have your model number (EEG48200L) and serial number ready when contacting support.


