1. Аюулгүй байдлын чухал мэдээлэл
Please read this manual carefully before using the Midea M9 Robot Vacuum Cleaner and retain it for future reference. Adhere to all safety warnings and instructions to prevent injury or damage.
- Энэ төхөөрөмжийг 8 ба түүнээс дээш насны хүүхэд, бие бялдар, мэдрэхүйн болон оюун ухааны хомсдолтой эсвэл туршлага, мэдлэг дутмаг хүмүүс уг төхөөрөмжийг аюулгүй ашиглах зааварчилгаа, зааварчилгаа авсан тохиолдолд ашиглаж болно. .
- Хүүхдүүд төхөөрөмжтэй тоглохгүй байхын тулд тэднийг хянах ёстой.
- Цэвэрлэгээ болон хэрэглэгчийн засвар үйлчилгээг хараа хяналтгүй хүүхэд хийж болохгүй.
- Зөвхөн үйлдвэрлэгчийн өгсөн анхны цахилгаан адаптерийг ашиглана уу.
- Робот тоос сорогчийг нойтон орчинд эсвэл усны ойролцоо бүү ашиглаарай.
- Ensure the charging base is placed on a level surface against a wall, with clear space around it.
- Ашиглахын өмнө цэвэрлэгээний хэсгээс сул кабель, жижиг эд зүйлс эсвэл эмзэг зүйлсийг зайлуул.
2. Багцын агуулга
Verify that all items are present in the package. If any components are missing or damaged, contact customer support.
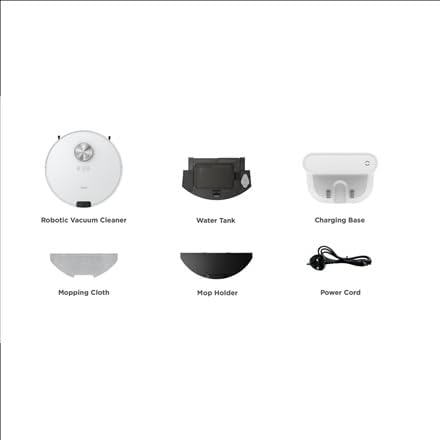
Зураг: Дууслааview of the Midea M9 Robot Vacuum Cleaner's package contents. This image displays the main robotic vacuum cleaner unit, a water tank, a charging base, a mopping cloth, a mop holder, and a power cord.
- Робот тоос сорогч
- Усны сав
- Цэнэглэх суурь
- Арчидаг даавуу
- Шүршигч
- Цахилгааны утас
3. Бүтээгдэхүүн дууссанview
3.1 Дээд View
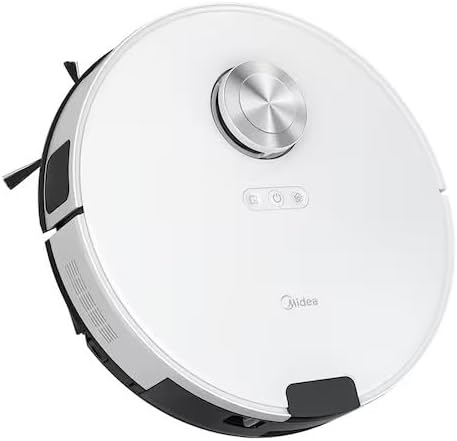
Зураг: Топ view of the Midea M9 Robot Vacuum Cleaner. This image shows the circular design of the robot, with a central LiDAR navigation sensor tower, power button, and other control indicators on its surface.
The top of the Midea M9 features the LiDAR navigation sensor, which allows the robot to map your home and navigate efficiently. It also includes control buttons for starting/pausing cleaning and returning to the charging base.
3.2 Доод тал View

Зураг: Доод талд view of the Midea M9 Robot Vacuum Cleaner. This image displays the two side brushes, the main rolling brush, the driving wheels, and the mopping pad attachment area.
The underside of the robot houses the main rolling brush, two side brushes for edge cleaning, driving wheels, and cliff sensors to prevent falls. The mopping pad attachment area is also visible.
4. Тохиргоо
4.1 Цэнэглэх суурийн байршил
- Цэнэглэгчийн суурийг хатуу, тэгш гадаргуу дээр хананд наалдуулан байрлуул.
- Ensure there is at least 0.5 meters (1.6 feet) of clear space on both sides of the charging base and 1.5 meters (4.9 feet) in front of it.
- Connect the power cord to the charging base and plug it into a power outlet.
4.2 Анхны цэнэглэлт
- Place the robot vacuum onto the charging base, ensuring the charging contacts align.
- Allow the robot to charge completely before its first use. This typically takes 4-6 hours. The indicator light on the robot will change to indicate a full charge.
4.3 Програмын холболт (заавал биш)
- Download the Midea Smart app from your mobile device's app store.
- Follow the in-app instructions to connect your Midea M9 Robot Vacuum Cleaner to your home Wi-Fi network. This enables advanced features like remote control, scheduling, and cleaning mode selection.
5. Ашиглалтын заавар
5.1 Цэвэрлэгээ эхлүүлэх/зогсоох
- Эхлэх: Press the power button on the robot or use the Midea Smart app. The robot will begin cleaning in Auto mode.
- Түр зогсоох: Press the power button again during cleaning.
- To Stop/Return to Base: Press and hold the power button for a few seconds, or use the 'Return to Base' function in the app.
5.2 цэвэрлэх горим
The Midea M9 offers various cleaning modes:
- Авто горим: Робот таны гэрийг бүхэлд нь ухаалгаар жолоодож, цэвэрлэнэ.
- Spot горим: Cleans a specific area more intensely. Place the robot in the center of the dirty area and activate Spot mode via the app.
- Ирмэгийн горим: The robot cleans along walls and furniture edges. Activate via the app.
5.3 Угаах функц
- Fill the water tank with clean water. Do not use detergents or cleaning solutions not approved by Midea.
- Attach the mopping cloth to the mop holder, then slide the mop holder with the cloth onto the water tank.
- Insert the assembled water tank and mop holder into the robot.
- The robot will automatically switch to mopping mode or combined vacuuming and mopping.
6. Засвар үйлчилгээ
Тогтмол засвар үйлчилгээ нь таны роботын тоос сорогчийн ашиглалтын хугацааг уртасгаж, оновчтой гүйцэтгэлийг баталгаажуулдаг.
6.1 Dustbin and Water Tank Cleaning
- Хэрэглэх бүрийн дараа хогийн савыг хоослох хэрэгтэй.
- Rinse the dustbin and filter with water as needed, ensuring they are completely dry before reinstallation.
- Empty and clean the water tank after each mopping session to prevent mold and odors.
6.2 Сойз цэвэрлэх
- Үндсэн сойз: Remove the main brush cover and lift out the brush. Use the cleaning tool to remove hair and debris. Clean weekly.
- Хажуугийн сойз: Check for tangled hair or debris. Remove and clean as needed. Replace if worn or damaged. Clean monthly.
6.3 Мэдрэгчийг цэвэрлэх
- Wipe the cliff sensors, wall sensors, and charging contacts with a clean, dry cloth monthly to ensure proper function.
7. Алдаа засах
Хэрэв танд асуудал тулгарвал дараах нийтлэг асуудал, шийдлүүдийг үзнэ үү.
| Асуудал | Боломжит шалтгаан | Шийдэл |
|---|---|---|
| Робот цэнэглэдэггүй | Charging contacts are dirty; Power adapter not connected; Robot not properly aligned with base. | Clean charging contacts; Ensure power adapter is plugged in; Realign robot on charging base. |
| Робот байнга гацдаг | Loose cables or small objects on the floor; Robot stuck on high thresholds. | Clear obstacles from cleaning path; Use virtual walls or no-go zones in the app. |
| Цэвэрлэгээний гүйцэтгэл муу | Хогийн сав дүүрсэн; Сойз орооцолдсон; Шүүлтүүр бөглөрсөн. | Хогийн савыг хоослох; Үндсэн болон хажуугийн сойзыг цэвэрлэх; Шүүлтүүрийг цэвэрлэх эсвэл солих. |
| Робот Wi-Fi-д холбогдож чадахгүй байна | Incorrect Wi-Fi password; Router too far; Only supports 2.4GHz Wi-Fi. | Verify password; Move robot closer to router; Ensure router is set to 2.4GHz. |
8. Техникийн үзүүлэлтүүд
| Онцлог | Дэлгэрэнгүй |
|---|---|
| Брэнд | Мидеа |
| Загварын нэр | Midea M9 |
| Хэмжээ (L x W x H) | 32 x 32 x 10 см |
| Жин | 4 кг |
| Онцлог шинж чанарууд | Smart mapping, Portable |
| Гадаргуугийн зөвлөмж | Хивс |
9. Баталгаат хугацаа ба дэмжлэг
Баталгаат хугацааны мэдээлэл болон техникийн дэмжлэг авахыг хүсвэл бүтээгдэхүүнтэй хамт ирсэн баталгаат картыг үзэх эсвэл албан ёсны Midea вэбсайтад зочилно уу. webсайт. Худалдан авалтын баримтаа худалдан авалтын баталгаа болгон хадгалаарай.


