ആമുഖം
This manual provides comprehensive instructions for the installation, operation, maintenance, and troubleshooting of the ASUS Prime H810M-E-CSM Intel H810 mATX Commercial CSM Motherboard. This motherboard is engineered for Intel Core Ultra (Series 2) processors, offering robust performance and essential features for commercial and AI PC applications.
സുരക്ഷാ വിവരങ്ങൾ
ഇൻസ്റ്റാളേഷനും പ്രവർത്തനവും നടത്തുമ്പോൾ ഇനിപ്പറയുന്ന സുരക്ഷാ മുൻകരുതലുകൾ എല്ലായ്പ്പോഴും പാലിക്കുക:
- ഏതെങ്കിലും ഘടകങ്ങളിൽ സ്പർശിക്കുന്നതിന് മുമ്പ് മതിൽ ഔട്ട്ലെറ്റിൽ നിന്ന് പവർ കോർഡ് വിച്ഛേദിക്കുക.
- ഘടകങ്ങൾക്ക് ഇലക്ട്രോസ്റ്റാറ്റിക് ഡിസ്ചാർജ് (ഇഎസ്ഡി) കേടുപാടുകൾ സംഭവിക്കുന്നത് തടയാൻ ആന്റി-സ്റ്റാറ്റിക് റിസ്റ്റ് സ്ട്രാപ്പ് ധരിക്കുക.
- സെൻസിറ്റീവ് ഭാഗങ്ങൾ സ്പർശിക്കാതിരിക്കാൻ ഘടകങ്ങൾ അവയുടെ അരികുകളിൽ തന്നെ കൈകാര്യം ചെയ്യുക.
- നിങ്ങളുടെ പിസി കേസിനുള്ളിൽ അമിതമായി ചൂടാകുന്നത് തടയാൻ ശരിയായ വായുസഞ്ചാരം ഉറപ്പാക്കുക.
- Refer to the specific component manuals for additional safety guidelines.
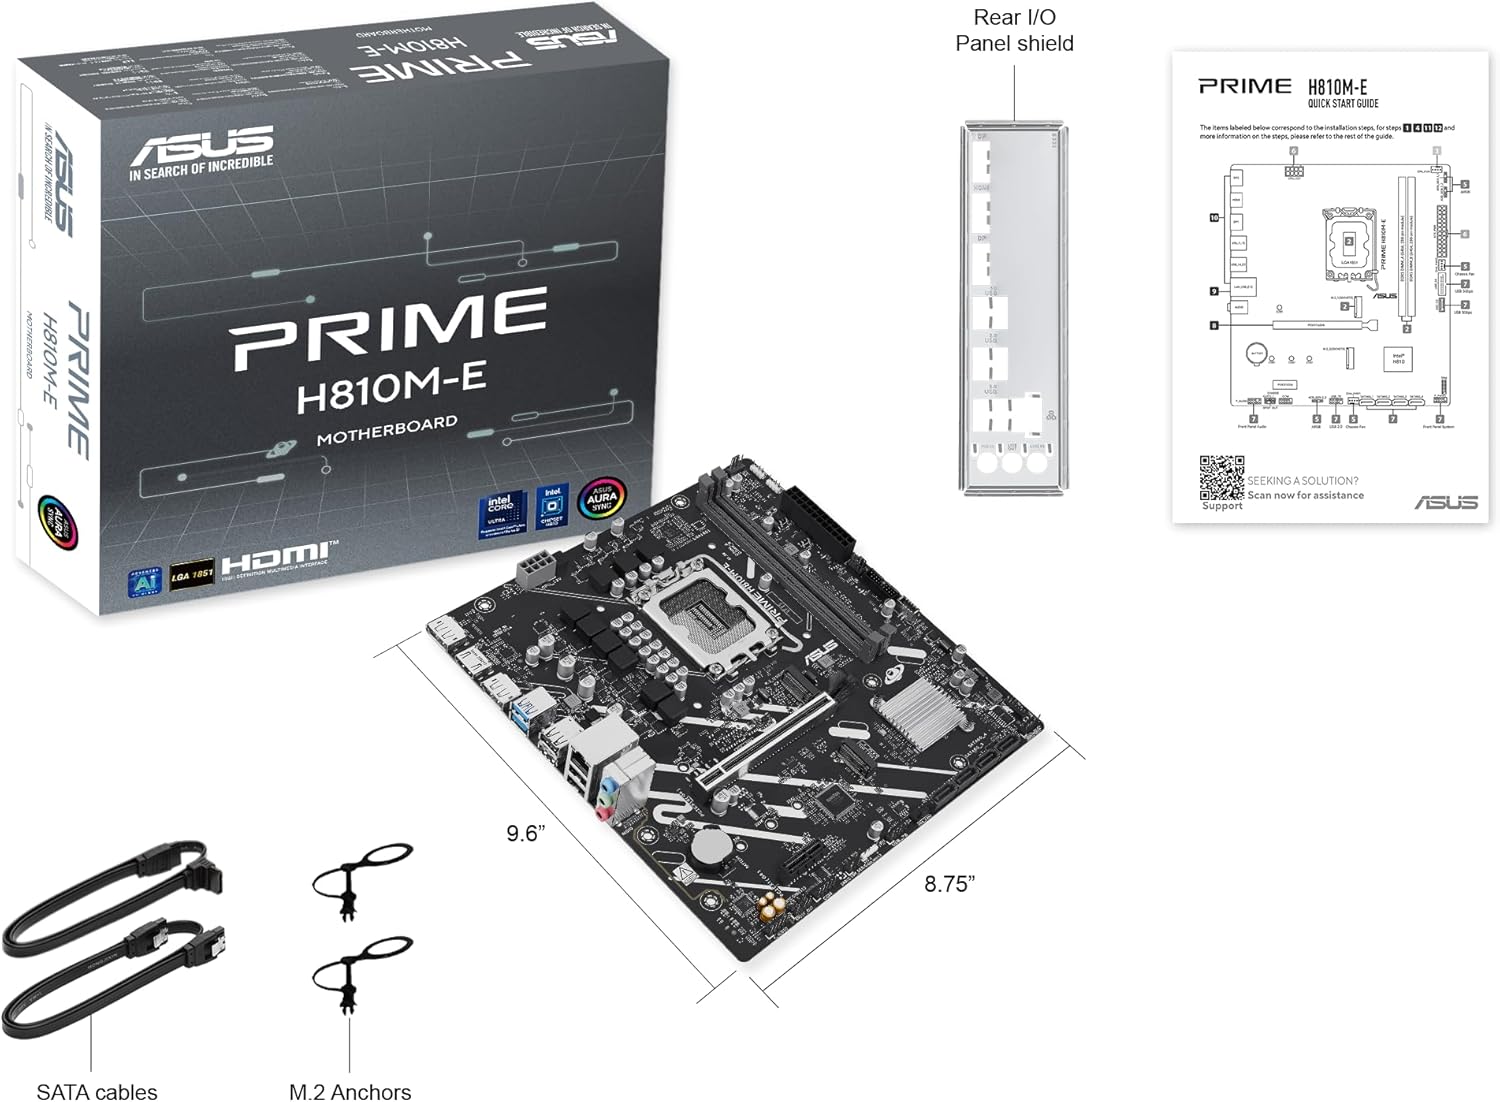
പാക്കേജ് ഉള്ളടക്കം
നിങ്ങളുടെ മദർബോർഡ് പാക്കേജിൽ എല്ലാ ഇനങ്ങളും ഉണ്ടെന്ന് ഉറപ്പാക്കുക:
- ASUS Prime H810M-E-CSM Motherboard
- SATA 6Gb/s Data Cables (2x)
- M.2 SSD Anchors (2x)
- Rear I/O Shield
- ഉപയോക്തൃ മാനുവൽ / ദ്രുത ആരംഭ ഗൈഡ്
മദർബോർഡ് ലേayട്ട്
മദർബോർഡിലെ പ്രധാന ഘടകങ്ങളും കണക്ടറുകളും പരിചയപ്പെടുക.


സജ്ജമാക്കുക
1. സിപിയു ഇൻസ്റ്റലേഷൻ
This motherboard supports Intel Core Ultra (Series 2) processors with an LGA 1851 socket.
- സിപിയു സോക്കറ്റ് ലിവർ തുറന്ന് സംരക്ഷണ തൊപ്പി നീക്കം ചെയ്യുക.
- Carefully align the CPU with the socket, ensuring the notches on the CPU match the keys on the socket.
- ബലം പ്രയോഗിക്കാതെ സിപിയു സോക്കറ്റിൽ സൌമ്യമായി വയ്ക്കുക.
- സിപിയു സുരക്ഷിതമാക്കാൻ സോക്കറ്റ് ലിവർ അടയ്ക്കുക.
- നിർമ്മാതാവിന്റെ നിർദ്ദേശങ്ങൾക്കനുസൃതമായി സിപിയു കൂളർ ഇൻസ്റ്റാൾ ചെയ്യുക.
2. മെമ്മറി (റാം) ഇൻസ്റ്റലേഷൻ
The motherboard features two DDR5 DIMM slots, supporting up to 128GB of RAM.
- DIMM സ്ലോട്ടിന്റെ രണ്ടറ്റത്തുമുള്ള ക്ലിപ്പുകൾ തുറക്കുക.
- മെമ്മറി മൊഡ്യൂൾ സ്ലോട്ടുമായി വിന്യസിക്കുക, മൊഡ്യൂളിലെ നോച്ച് സ്ലോട്ടിലെ കീയുമായി പൊരുത്തപ്പെടുന്നുണ്ടെന്ന് ഉറപ്പാക്കുക.
- ക്ലിപ്പുകൾ ശരിയായ സ്ഥാനത്ത് വരുന്നത് വരെ മെമ്മറി മൊഡ്യൂളിന്റെ രണ്ട് അറ്റങ്ങളിലും ദൃഢമായി അമർത്തുക.
3. സംഭരണ ഇൻസ്റ്റാളേഷൻ
The motherboard supports M.2 SSDs and SATA drives.
M.2 SSD ഇൻസ്റ്റലേഷൻ:
- മദർബോർഡിൽ M.2 സ്ലോട്ട് കണ്ടെത്തുക.
- സ്ലോട്ടിലേക്ക് 30 ഡിഗ്രി കോണിൽ M.2 SSD തിരുകുക.
- Gently push down the SSD and secure it with the provided M.2 anchor or screw.

SATA ഡ്രൈവ് ഇൻസ്റ്റാളേഷൻ:
- ഒരു SATA ഡാറ്റ കേബിളിന്റെ ഒരറ്റം മദർബോർഡിലെ ഒരു SATA പോർട്ടുമായി ബന്ധിപ്പിക്കുക.
- Connect the other end of the SATA data cable to your storage drive (HDD/SSD).
- Connect a SATA power cable from your power supply unit (PSU) to the storage drive.
4. പിസിഐഇ കാർഡ് ഇൻസ്റ്റാളേഷൻ
Install graphics cards or other expansion cards into the PCIe 4.0 slots.
- PCIe സ്ലോട്ടിന്റെ അവസാനം റിട്ടൻഷൻ ക്ലിപ്പ് തുറക്കുക.
- Align the expansion card with the slot and press down firmly until it is seated and the clip snaps shut.
- Secure the card to the PC case with a screw.

5. പവർ കണക്ഷനുകൾ
Connect the power supply unit (PSU) cables to the motherboard.
- 24-പിൻ ATX പവർ കണക്റ്റർ: നിങ്ങളുടെ പൊതുമേഖലാ സ്ഥാപനത്തിൽ നിന്നുള്ള പ്രധാന 24-പിൻ പവർ കേബിൾ മദർബോർഡിലെ അനുബന്ധ കണക്ടറുമായി ബന്ധിപ്പിക്കുക.
- 8-pin CPU Power Connector (EATX12V): Connect the 8-pin CPU power cable from your PSU to the connector located near the CPU socket.
6. ഫ്രണ്ട് പാനൽ കണക്ഷനുകൾ
Connect your PC case's front panel cables (power button, reset button, USB ports, audio jacks, LED indicators) to the corresponding headers on the motherboard. Refer to the motherboard diagram for exact locations.
പ്രവർത്തിക്കുന്നു
ആദ്യ ബൂട്ടും ബയോസ്/യുഇഎഫ്ഐ സജ്ജീകരണവും
നിങ്ങളുടെ സിസ്റ്റം അസംബിൾ ചെയ്ത ശേഷം, ഒരു മോണിറ്റർ, കീബോർഡ്, മൗസ് എന്നിവ ബന്ധിപ്പിക്കുക. സിസ്റ്റം ഓൺ ചെയ്യുക.
- അമർത്തുക ഇല്ലാതാക്കുക ബയോസ്/യുഇഎഫ്ഐ സജ്ജീകരണ യൂട്ടിലിറ്റിയിൽ പ്രവേശിക്കുന്നതിന് സ്റ്റാർട്ടപ്പ് സമയത്ത് കീ അമർത്തുക.
- ബൂട്ട് ഓർഡർ, സിസ്റ്റം സമയം, മറ്റ് അവശ്യ ക്രമീകരണങ്ങൾ എന്നിവ കോൺഫിഗർ ചെയ്യുക.
- മാറ്റങ്ങൾ സംരക്ഷിച്ച് ബയോസിൽ നിന്ന് പുറത്തുകടക്കുക.

Driver and Operating System Installation
Install your preferred operating system (e.g., Windows 10/11) from a bootable USB drive or DVD. After OS installation, install the latest drivers for the motherboard chipset, LAN, audio, and any other integrated components from the ASUS support webമികച്ച പ്രകടനവും സ്ഥിരതയും ഉറപ്പാക്കാൻ സൈറ്റ്.
മെയിൻ്റനൻസ്
വൃത്തിയാക്കൽ
അമിതമായി ചൂടാകുന്നതിനും ഘടകങ്ങൾ തകരാറിലാകുന്നതിനും കാരണമാകുന്ന പൊടിപടലങ്ങൾ തടയാൻ നിങ്ങളുടെ പിസി പതിവായി വൃത്തിയാക്കുക. ഹീറ്റ്സിങ്കുകൾ, ഫാനുകൾ, മറ്റ് ഘടകങ്ങൾ എന്നിവയിൽ നിന്ന് പൊടി നീക്കം ചെയ്യാൻ കംപ്രസ് ചെയ്ത വായു ഉപയോഗിക്കുക. വൃത്തിയാക്കുന്നതിന് മുമ്പ് സിസ്റ്റം ഓഫ് ചെയ്തിട്ടുണ്ടെന്നും അൺപ്ലഗ് ചെയ്തിട്ടുണ്ടെന്നും ഉറപ്പാക്കുക.
ബയോസ് അപ്ഡേറ്റുകൾ
ASUS പിന്തുണ ഇടയ്ക്കിടെ പരിശോധിക്കുക website for BIOS updates. BIOS updates can improve system stability, compatibility, and performance. Follow the instructions provided by ASUS carefully when performing a BIOS update to avoid system damage.
ട്രബിൾഷൂട്ടിംഗ്
നിങ്ങൾ നേരിട്ടേക്കാവുന്ന പൊതുവായ പ്രശ്നങ്ങളെ ഈ വിഭാഗം അഭിസംബോധന ചെയ്യുന്നു.
- No Display / No Post:
- എല്ലാ പവർ കേബിളുകളും (24-പിൻ ATX, 8-പിൻ CPU) സുരക്ഷിതമായി ബന്ധിപ്പിച്ചിട്ടുണ്ടെന്ന് ഉറപ്പാക്കുക.
- Reseat the RAM modules. Try booting with only one RAM stick.
- Verify the CPU is correctly seated and the CPU cooler is properly installed.
- Check that the graphics card is fully seated in its PCIe slot and has adequate power.
- ഇന്റഗ്രേറ്റഡ് ഗ്രാഫിക്സ് ഉപയോഗിക്കുകയാണെങ്കിൽ, നിങ്ങളുടെ മോണിറ്റർ മദർബോർഡിന്റെ വീഡിയോ ഔട്ട്പുട്ടുമായി (HDMI) ബന്ധിപ്പിച്ചിട്ടുണ്ടെന്ന് ഉറപ്പാക്കുക.
- സിസ്റ്റം അസ്ഥിരത / ക്രാഷുകൾ:
- എല്ലാ ഡ്രൈവർമാരും കാലികമാണെന്ന് ഉറപ്പാക്കുക.
- Check CPU and GPU temperatures using monitoring software.
- തകരാറുള്ള RAM പരിശോധിക്കാൻ മെമ്മറി ഡയഗ്നോസ്റ്റിക് ഉപകരണങ്ങൾ പ്രവർത്തിപ്പിക്കുക.
- PSU വാട്ട് പരിശോധിക്കുകtagഎല്ലാ ഘടകങ്ങൾക്കും e മതിയാകും.
- പെരിഫറൽ കണ്ടെത്തിയില്ല:
- പെരിഫറൽ മറ്റൊരു പോർട്ടിലേക്ക് ബന്ധിപ്പിക്കാൻ ശ്രമിക്കുക.
- Install or update drivers for the peripheral.
- പോർട്ട് പ്രവർത്തനക്ഷമമാക്കിയിട്ടുണ്ടെന്ന് ഉറപ്പാക്കാൻ ബയോസ് ക്രമീകരണങ്ങൾ പരിശോധിക്കുക.
സ്പെസിഫിക്കേഷനുകൾ
| ഫീച്ചർ | സ്പെസിഫിക്കേഷൻ |
|---|---|
| ബ്രാൻഡ് | ASUS |
| മോഡലിൻ്റെ പേര് | PRIME H810M-E-CSM |
| സിപിയു സോക്കറ്റ് | LGA 1851 |
| അനുയോജ്യമായ പ്രോസസ്സറുകൾ | Intel Core Ultra Processors (Series 2) |
| ചിപ്സെറ്റ് തരം | ഇൻ്റൽ H810 |
| റാം മെമ്മറി ടെക്നോളജി | DDR5 |
| മെമ്മറി സ്ലോട്ടുകൾ ലഭ്യമാണ് | 2 |
| Ram Memory Maximum Size | 128 ജിബി |
| ഗ്രാഫിക്സ് കാർഡ് ഇൻ്റർഫേസ് | പിസിഐ എക്സ്പ്രസ് 4.0 |
| Total PCIe Ports | 2 |
| Total SATA Ports | 4 |
| Total M.2 Slots | 1 |
| മൊത്തം USB പോർട്ടുകൾ | 11 (വിവിധ തരം) |
| Total Number of HDMI Ports | 1 |
| ഇതർനെറ്റ് പോർട്ടുകളുടെ എണ്ണം | 1 (1Gb LAN) |
| പ്രധാന പവർ കണക്റ്റർ തരം | 24-പിൻ |
| പ്ലാറ്റ്ഫോം | വിൻഡോസ് 10, വിൻഡോസ് 11 |
| ഇനത്തിൻ്റെ അളവുകൾ L x W x H | 9.6"L x 8.7"W x 1.5"H |
| ഇനത്തിൻ്റെ ഭാരം | 1.1 പൗണ്ട് |
വാറൻ്റി വിവരങ്ങൾ
The ASUS Prime H810M-E-CSM Motherboard comes with a 3 വർഷത്തെ നിർമ്മാതാവിന്റെ വാറന്റി. For detailed terms and conditions, please refer to the warranty card included in your package or visit the official ASUS support webസൈറ്റ്.
പിന്തുണ
For further assistance, technical support, driver downloads, or BIOS updates, please visit the official ASUS support webസൈറ്റ്:
You can also find additional resources and FAQs on the ASUS product page for the Prime H810M-E-CSM.