MATRIX ATHENARF-02 Console Machine

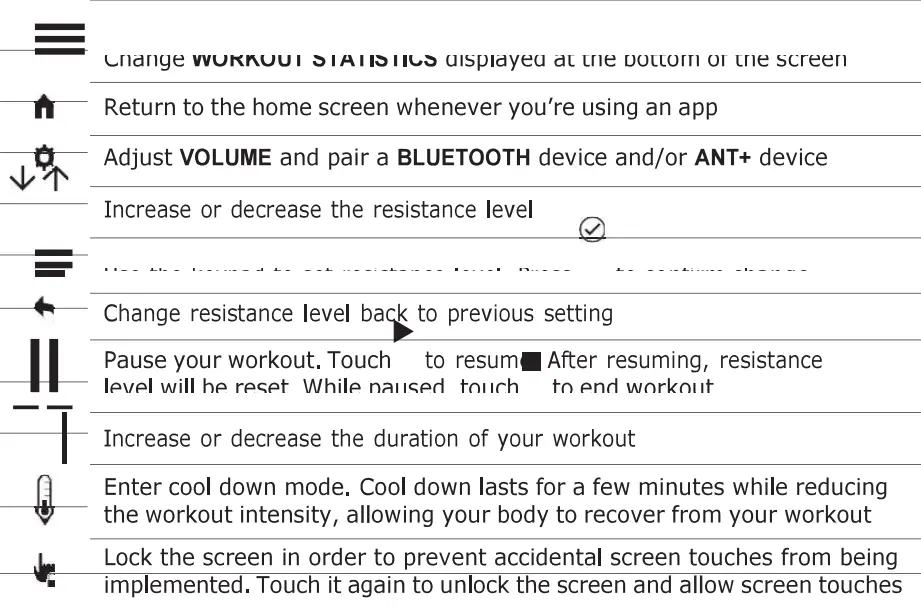
CONSOLE OPERATION
CONSOLE DESCRIPTION
The Matrix machine is inspected before it is packaged. Carefully unpack the unit and dispose of the box material. Note: There is a thin protective sheet of clear plastic on the overlay of the console that should be removed before use.
The console has a fully integrated touch screen display. All information required for workouts is explained on-screen. Exploration of the interface is highly encouraged. The information explaining how to program for various workouts will give an explanation about the contents of each screen on the console.
- A) GO: One Touch Start.
- B) PAUSE: Displayed on-screen during workout. Pauses workout. Pause duration can be set in manager or engineering mode. Press stop to end workout and show workout summary data.
- C) USB 2.0 PORT: Device charging (output rating SV =f2A), device media, and software updates.
- D) HEADPHONE JACK: Outputs audio from console to connected 3.5mm headphones.
- E) ENERGY SAVER LIGHT: Indicates if machine is in energy saver mode.
- F) MOTION SENSOR: Wave your hand over the sensor to wake the console.
- G) RFID SENSOR: Wireless login access location.
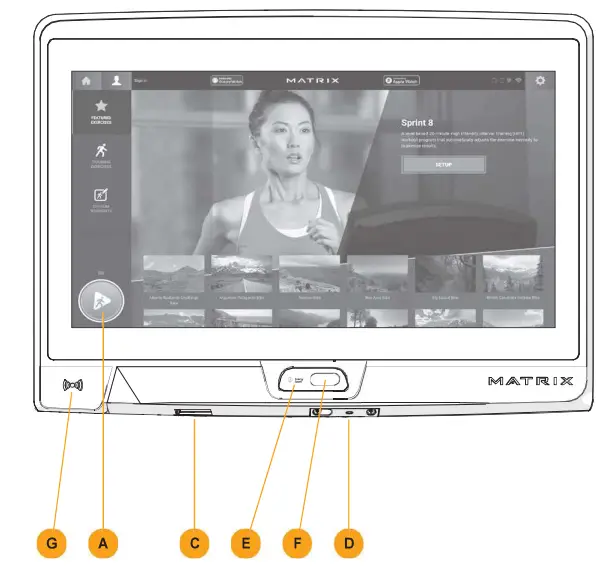
* Supported standards with carrier frequency of 13.56 MHz include; ISO 14443 A, ISO 15693, ISO 14443 B, Sony Felica, Inside Contact-less (HID iClass), and LEGIC RF.
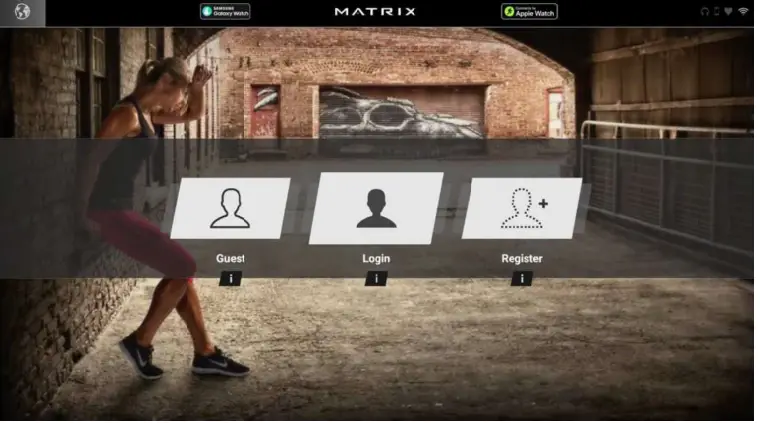
LOGIN SCREEN
- Touch the LOGIN button to sign-in with your XID.
- Touch the GUEST button to workout anonymously.
- Touch the REGISTER button to create a new XID.
- For help or more information, touch
 .
. - To change language, touch
 .
.
USER SIGN-IN
- Enter your XID and PASSCODE and touch
 .
. - To log in using RFID, touch the RFID tag to the symbol (
 ) located on the bottom left of the console.*
REGISTER A NEW USER
- Don’t have an xID account? Registration is easy.
- Follow the on-screen prompts to create your free account.
- Review your information and select the I ACCEPT THE TERMS AND CONDITIONS box to review the Terms and Conditions.
- Touch to complete registration. Your account is now active and you are signed-in.
LOGIN SCREEN
GO SCREEN
- Touch
 to begin working out immediately. Or …
 - Select a specific workout of your choice
PROGRAM SETUP
- After selecting a WORKOUT, adjust the program settings appropriately and/or begin your exercise using the default program settings.
- Adjust your program settings.
- Press START WORKOUT to begin your workout.
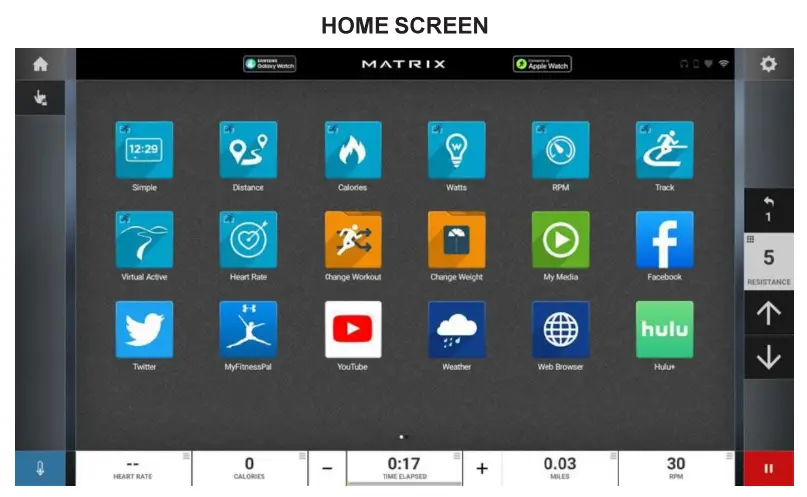


HOME SCREEN
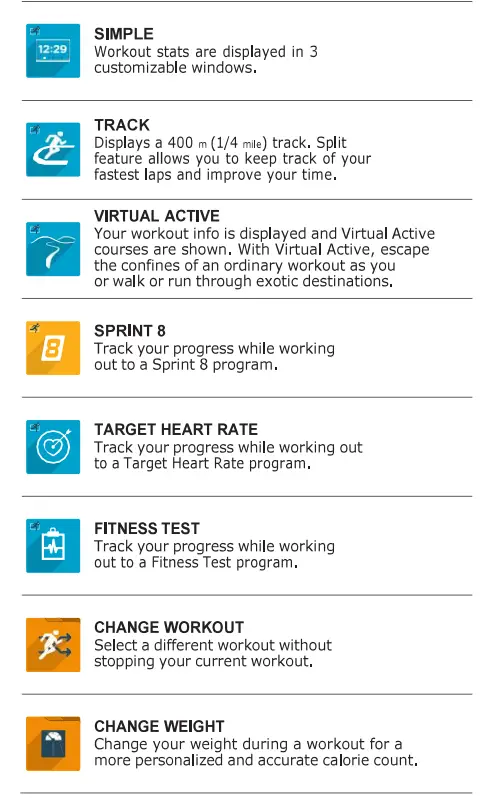
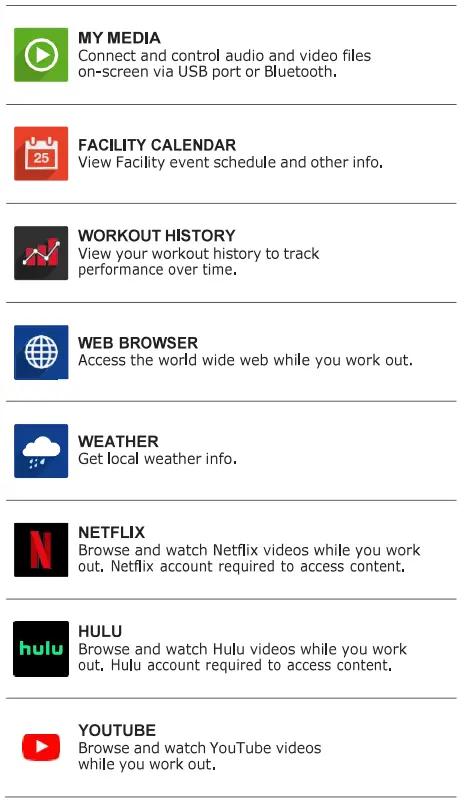
APPS AND ENTERTAINMENT
Workouts and app availability vary by model and software configuration. For the most up-to-date information, please visit matrixfitness.com

POWER ACCURACY
This bike displays power on the console. The power accuracy of this model has been tested using the test method of ISO 20957-5:2016 to ensure a power accuracy within a tolerance of ±10 % for input power ?50 W, and within a tolerance of ±5 W for input power <50 W.
BRAKING SYSTEM
This exercise bicycle uses a speed-independent braking system. The user is able to adjust the resistance of the braking system independently of the RPM of the crank axle.
USING THE HEART RATE FUNCTION
The heart rate function on this product is not a medical device. The heart rate reading is intended only as an exercise aid in determining heart rate trends in general. Please consult your physician.
When used in conjunction with a wireless chest transmitter (sold separately), your heart rate can be transmitted wirelessly to the unit and displayed on the console. Compatible with Bluetooth, ANT+ and Polar 5kHz heart rate devices.
NOTE: The chest strap must be tight and properly placed to receive an accurate and consistent readout. If the chest strap is too loose, or positioned improperly, you may receive an erratic or inconsistent heart rate readout.
WARNING!
Heart rate monitoring systems may be inaccurate. Over exercising may result in serious injury or death. If you feel faint, stop exercising immediately.
BEFORE YOU BEGIN
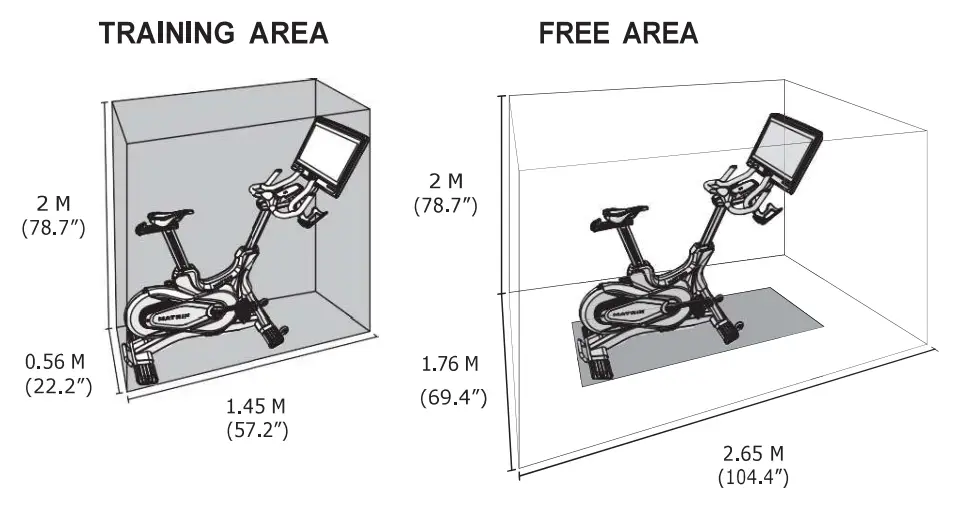
LOCATION OF THE UNIT
Place the equipment on a level and stable surface away from direct sunlight. The intense UV light can cause discoloration of the plastics. Locate your equipment in an area with cool temperatures and low humidity. Please leave a clear zone on all sides of the equipment that is at least 60 cm (23.6″). This zone must be clear of any obstruction and provide the user a clear exit path from the machine. Do not place the equipment in any area that will block any vent or air openings. The equipment should not be located in a garage, covered patio, near water or outdoors.
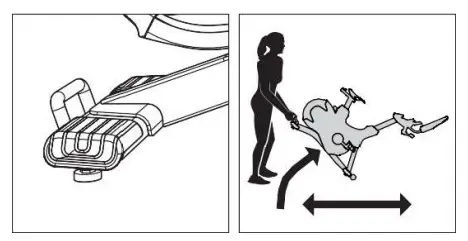
MOVING THE EQUIPMENT
Please use transport handle at base of frame when moving equipment.
Do NOT try moving equipment by pushing or pulling on the console as this may cause damage to the product.
LEVELING THE EQUIPMENT
It is extremely important that the levelers are correctly adjusted for proper operation. Turn leveling foot clockwise to lower and counter-clockwise to raise unit. Adjust each side as needed until the equipment is level. An unbalanced unit may cause belt misalignment or other issues. Use of a level is recommended. 
WARNING!
Our equipment is heavy, use care and additional help if necessary when moving. Failure to follow these instructions could result in injury.
PROPER USAGE
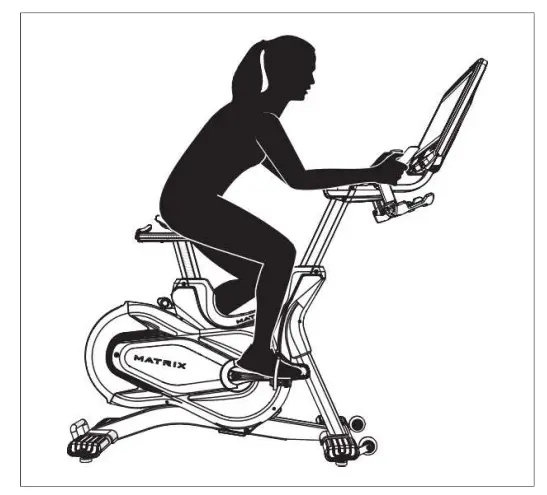
- Sit on the seat of the cycle facing the handlebars.
- To determine proper seat position, place one foot on each pedal, located on either side of the bike. Your knee should bend slightly at the furthest pedal position. You should be able to pedal without locking your knees or shifting your weight from side to side.
- If you need to adjust the seat height or fore-aft position, stand with feet on the floor, removing all weight from seat. Adjust seat as required, then remount.
- Adjust pedal straps to desired tightness.
- Set the resistance or the preferred exercise program as desired. Use your feet to rotate the pedals in a controlled manner.
- To dismount from the cycle, follow the proper usage steps in reverse.
HOW TO ADJUST THE INDOOR CYCLE
The indoor cycle can be adjusted for maximum comfort and exercise effectiveness. The instructions below describe one approach to adjusting the indoor cycle to ensure optimal user comfort and ideal body positioning; you may choose to adjust the indoor cycle differently.
SADDLE ADJUSTMENT
Proper saddle height helps ensure maximum exercise efficiency and comfort, while reducing the risk of injury. Adjust the saddle height to make sure it’s in proper position, one that keeps a slight bend in your knee while your legs are in the extended position
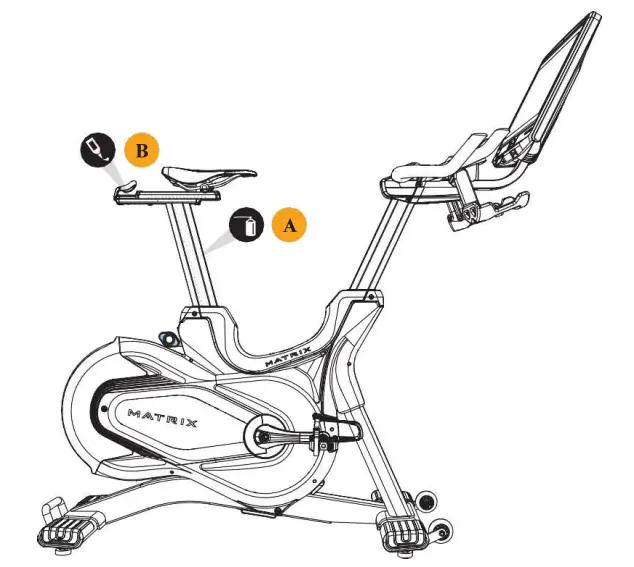
- A) SADDLE HORIZONTAL POSITION
Pull the adjustment lever down to slide the saddle forward or backward as desired. Push the lever up to lock saddle position. Test the saddle slide for proper operation. - B) SADDLE HEIGHT
Lift the adjustment lever up while sliding the saddle up and down with the other hand. Push the lever down to lock saddle position. - C) PEDAL STRAPS
Place the ball of the foot into the toe cage until the ball of the foot is centered over the pedal, reach down and pull the pedal strap up to tighten prior to use. To remove your foot from the toe cage, loosen the strap and pull out.
MAINTENANCE
- Any and all part removal or replacement must be performed by a qualified service technician.
- DO NOT use any equipment that is damaged and or has worn or broken parts.
Use only replacement parts supplied by your country’s local MATRIX dealer. - MAINTAIN LABELS AND NAMEPLATES: Do not remove labels for any reason. They contain important information. If unreadable or missing, contact your MATRIX dealer for a replacement.
- MAINTAIN ALL EQUIPMENT: Preventative maintenance is the key to smooth operating equipment as well as keeping your liability to a minimum. Equipment needs to be inspected at regular intervals.
- Ensure that any person(s) making adjustments or performing maintenance or repair of any kind is qualified to do so. MATRIX dealers will provide service and maintenance training at our corporate facility upon request.
MAINTENANCE SCHEDULE
| MAINTENANCE SCHEDULE | |
ACTION
|
FREQUENCY
AFTER EACH USE |
| Make sure that the indoor cycle is level and does not rock. | DAILY |
|
WEEKLY |
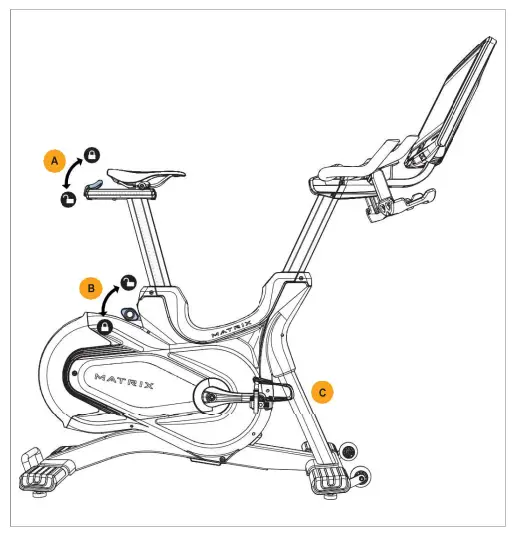
| Lubricate the saddle post (A). To do this, raise the saddle post to the MAX position, spray with maintenance spray and rub down the entire exterior surfaces with a soft cloth. Clean the saddle slide (B) with a soft cloth and if necessary apply a small amount of lithium/silicone grease. | Bl-WEEKLY |
| Inspect all assembly bolts and pedals on the machine for proper tightness. | MONTHLY |
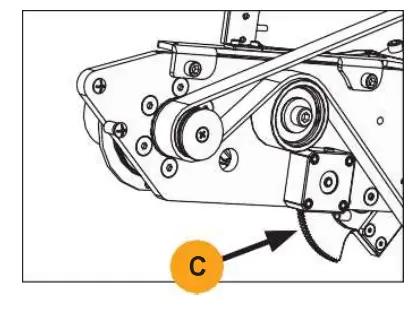
| Remove right service panel. Rotate the break assembly counterclockwise until it hits the hard stop. Clean gear of old grease and re-apply a lithium-based grease to gear teeth (C). | 12 MONTHS |
PRODUCT INFORMATION
| PRODUCT SPECIFICATIONS | |
| Console | 22″Touchscreen |
| Max User Weight | 159 kg / 350 lbs |
| User Height Range | 152 – 200.7 cm / 5’0″ – 6’7″ |
| Max Saddle Height | 130.3 cm/ 51.3″ |
| Product Weight | 69 kg/ 152.1 lbs |
| Shipping Weight | 80.5 kg/ 177.5 lbs |
| Required Footprint (L x W)* | 156.6 x 56.5 cm / 60.5″ x 22.2″ |
| Overall Dimensions (LxWxH)* | 156.6 x 56.5 x 147.8 cm/
61.7 ” X 22.2″ X 58.2″ |
* Ensure a minimum clearance width of 0.6 meters (24″) for access to and passage around MATRIX equipment. Please note, 0.91 meters (36″) is the ADA recommended clearance width for individuals in wheelchairs.
For most current owner’s manual and information, check matrixfitness.com
NOTE:
This equipment has been tested and found to comply with the limits for a Class B digital device, pursuant to part 15 of the FCC rules. These limits are designed to provide reasonable protection against harmful interference in a residential installation. This equipment generates, uses and can radiate radio frequency energy and, if not installed and used in accordance with the instructions, may cause harmful interference to radio communications. However, there is no guarantee that interference will not occur in a particular installation. If this equipment does cause harmful interference to
radio or television reception, which can be determined by turning the equipment off and on, the user is encouraged to try to correct the interference by one or more of the following measures:
- Reorient or relocate the receiving antenna.
- Increase the separation between the equipment and receiver.
- Connect the equipment into an outlet on a circuit different from that to which the receiver is connected.
- Consult the dealer or an experienced radio/TV technician for help.
Any changes or modifications not expressly approved by the party responsible for compliance could void the user’s authority to operate this equipment.
FCC RF Radiation Exposure Statement
- This Transmitter must not be co-located or operating in conjunction with any other antenna or transmitter.
- This equipment complies with FCC RF radiation exposure limits set forth for an uncontrolled environment. This equipment should be installed and operated with a minimum distance of 20 centimeters between the radiator and your body.
DOLBY TECHNOLOGY
Manufactured under license from Dolby Laboratories.
Dolby, Dolby Audio, and the double-D symbol are trademarks of Dolby Laboratories Licensing Corporation.
Documents / Resources
 |
MATRIX ATHENARF-02 Console Machine [pdf] Owner's Manual ATHENARF-02, ATHENARF-02 Console Machine, Console Machine, Machine |


