MARTEC MDCT133W Smart Ceiling Fan With WIFI Remote Control

Introduction
Thanks for choosing our Triumph DC Series ceiling fan.
We strongly recommend that you read this manual carefully before installation.

Models Parameters (Fan Only):-
MDCT133W 1320mm 3 Blade Ceiling Fan Matt White
MDCT133M 1320mm 3 Blade Ceiling Fan Matt Black
MDCT133AWN 1320mm 3 Blade Ceiling Fan Antique Bronze/Walnut
Models Parameters (Fan and LED Light):-
MDCT1333W 1320mm 3 Blade Ceiling Fan Matt White with 20W LED Light
MDCT1333M 1320mm 3 Blade Ceiling Fan Matt Black with 20W LED Light
MDCT1333AWN 1320mm 3 Blade Ceiling Fan Antique Bronze/Walnut with 20W LED Light
Part List
- Qty 1x motor assembly
- Qty 1x screw kit
- Qty 1x balancing kit
- Qty 1x hanging bracket
- Qty 1x instruction manual
- Qty 3x blades
Application

How to Assemble

WARNING Installation MUST carry out by a qualified and licensed electrician.
How to Install Blades
Fg.3 Fan only models
Attach the blade to the top of the motor using the 2 screws provided. Tighten the screws and repeat this procedure for all blades.

NB: Ensure the blades do not get damaged or bent during the installation process while the fan is on the ground. This will affect the performance and balance of the fan and this is NOT covered under warranty.
Fg.4 Fan LED Light Model
Attach the blade to the top of the motor using the 2 screws provided. Tighten the screws and repeat this procedure for all blades.

Fg.5

Place fan into hanger bracket and align ball joint slot with hanger bracket as illustrated.
Installing Receiver Remote Control
Fg.6

Wire up the receiver with quick connectors and insert it into the mounting bracket. Make sure the antenna wire has been safely folded inside the canopy cover before final assembly. (DO NOT cut the antenna wire)
Important Reminders
- The receiver must be correctly installed in the mounting bracket
- When the transmitter cannot control the receiver, please check
- has a sufficient battery in the transmitter
- any existence of similar remote-controlled products nearby that cause interference
- Replace the battery if getting low as this will affect the sensitivity of the transmitter
- Take the battery out from the transmitter when leaving used for a long time to avoid battery lea ks
- The isolation switch MUST be connected in the line
WARNING Installation MUST carry out by a qualified and licensed electrician.

After wiring is completed, attach the canopy to the hanger bracket by pushing upwards and twisting anti-clockwise. Tighten screws and ensure canopy is not touching the ball joint.
How to Install Light Plate

How to Install/ Remove the Cover

WiFi / Remote Control Pairing
Fan only model
Pairing the remote control

- Turn on the ceiling fan.
- Within the first 20 seconds, continue pressing the
 button until you hear a “beep” sound. ie. It is paired.
If you don’t hear a “beep” sound, repeat step 1 and step 2 again.
Entering WiFi Pairing mode:
- Turn on the power.
- Within the first 20 seconds, press and hold the”
 ” button until a “beep” is heard.
 - Continue step connect on your smart devices to complete the pairing.
If you don’t hear a “beep” sound, repeat the above steps.
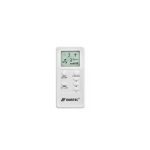
FAN OFF ![]() : to switch off the fan.
: to switch off the fan.
SLEEP MODE ![]() : Turn on the fan at an extra lower speed to create a general breeze.
: Turn on the fan at an extra lower speed to create a general breeze.
SPEED BUTTON: 1 = lowest speed. 6 = highest speed.
NATURAL WIND MODE![]() : designed for the elderly and children. 1-6 speed changes randomly to feel the breeze.
: designed for the elderly and children. 1-6 speed changes randomly to feel the breeze.
FORWARD AND REVERSAL (![]() ) : summer/winter reverse mode.
) : summer/winter reverse mode.
TIMER 1H/4H/8H: preset timer for fan and light to stop automatically. ie. if timer set at 1H and then press 4H, fan will stop at 4H. Setting default to last press.
WIFI BUTTON ![]() : Follow the instructions and press and hold for 20 seconds to enter wifi matching mode.
: Follow the instructions and press and hold for 20 seconds to enter wifi matching mode.
Fan LED Light Model

Pairing the remote control
- Turn on the ceiling fan.
- Within the first 20 seconds, continue pressing the button until you hear a “beep” sound. ie. It is paired.
If you don’t hear a “beep” sound, repeat step 1 and step 2 again.
Entering WiFi Pairing mode:
- Turn on the power.
- Within the first 20 seconds, press and hold the”
 ” button until a “beep” is heard
 - Continue step connect on your smart devices to complete the pairing.
If you don’t hear a “beep” sound, repeat the above steps.
FAN OFF ![]() : to switch off the fan.
: to switch off the fan.
SLEEP MODE![]() : Turn on the fan at an extra lower speed to create a general breeze.
: Turn on the fan at an extra lower speed to create a general breeze.
SPEED BUTTON: 1 = lowest speed. 6 = highest speed.
NATURAL WIND MODE ![]() : designed for the elderly and children. 1-6 speed changes randomly to feel the breeze.
: designed for the elderly and children. 1-6 speed changes randomly to feel the breeze.
FORWARD AND REVERSAL![]() : summer/winter reverse mode.
: summer/winter reverse mode.
TIMER 1H/4H/8H: preset timer for fan and light to stop automatically, ie. if timer set at 1H and then press 4H, fan will stop at 4H. Setting default to last press.
LIGHT ON/OFF : to switch off the light.
CCT : warm white (2700K) / netural white (4000K) /| cool white (6500K)
LED- LED+: minus “-* = reduces brightness
plus “+”= increases briahtness
6* Year Warranty
(3 Year In-Home + additional 3 Year Replacement on the motor only)
For further information please visit our website (link below) OR scan the QR code. https://www.martecaustralia.com.au/warranty-statement/

![]() WARNING
WARNING
- Installation of fans MUST follow SAA standards and meet local authority regulations.
- Installation MUST
- Fan and light MUST be earthed.
- Bracket MUST
- DO NOT mix blades from one model to another, all blades MUST be replaced if damaged.
- The warranty is VOID if product is not installed according to this installation guide.
Smart Life matching process, please follow the steps:
- Download the “Smart Life” APP on your smart devices by scanning the QR code below with camera.

- Turn on WiFi and Bluetooth on your smart devices. Ensu-re it’s connected to a 2.4GHZ WiFi.
- Open the APP, follow the steps to register new user acc-ount or login existing account.

- Follow instructions in main manual (steps can also be found on the back of the remote) to put the fan into WiFi pairing mode. If the operation is successful, go to step 5. If the fan has previously been paired or you can’t get it towork, please go to step 4 to RESET the fan.
- RESET the fan. This step is NOT necessary if the fan has successfully entered WiFi pairing mode in the last step, if not, try to RESET the fan: turn on the fan, power off after 10 seconds, power on again after 15 seconds, long press “Fan Stop” for 5 seconds, if “beep beep” are heard, the reset is successful. If “beep beep” is not heard, the reset is failed, please repeat this step.
- Once the fan has entered WiFi pairing mode, open the APP again on the smart device. Click “Add Device” in the middle or the “+” on the top right of the screen.

- The auto scan should begin automatically, and the fan should show up at the top of screen within a few seconds.
Note: If the fan is not showing up, you can add it manually by clicking and navigate to: >Add Manually >Small Home Appliance > Fan
- Follow the instructions in the APP to finish the setup.

CONTACT
E: sales@martecltd.com.au | P: 02 8778 7500 www.martecaustralia.com.au
Documents / Resources
 |
MARTEC MDCT133W Smart Ceiling Fan With WIFI Remote Control [pdf] Installation Guide MDCT133W, MDCT133M, MDCT133AWN, MD, CT1333W, MDCT1333M, MDCT1333AWN, MDCT133W Smart Ceiling Fan With WIFI Remote Control, MDCT133W, Smart Ceiling Fan With WIFI Remote Control, Fan With WIFI Remote Control, WIFI Remote Control, Remote Control, Control |