User Manual for QUSUN models including: QSF007, 2A4WH-QSF007, 2A4WHQSF007, QSF007, Wireless Call Button
Zhongshan QUSUN Electric Co., Ltd QSF007 Wireless Call Button 2A4WH-QSF007 2A4WHQSF007 qsf007
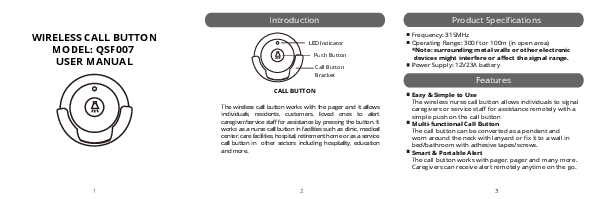
WIRELESS CALL BUTTON MODEL: QSF007 USER MANUAL
1

Introduction
LED Indicator Push Button Call Button Bracket
CALL BUTTON
The wireless call button works with the pager and it allows individuals, residents, customers, loved ones to alert caregiver/service staff for assistance by pressing the button. It works as a nurse call button in facilities such as clinic, medical center, care facilities, hospital, retirement home or as a service call button in other sectors including hospitality, education and more.
2

Product Specifications
Frequency: 315MHz Operating Range: 300 ft or 100m (in open area) *Note: surrounding metal walls or other electronic devices might interfere or affect the signal range. Power Supply: 12V23A battery
Features
Easy & Simple to Use The wireless nurse call button allows individuals to signal caregivers or service staff for assistance remotely with a simple push on the call button Multi-functional Call Button The call button can be converted as a pendant and worn around the neck with lanyard or fix it to a wall in bed/bathroom with adhesive tapes/screws. Smart & Portable Alert The call button works with pager, pager and many more. Caregivers can receive alert remotely anytime on the go.
3

Instructions

Insert Batteries into Call

Mount Call Buttons

Buttons

with

Side View

Gently pry open with

Adhsive Tape

a flathead screwdriver

to access the battery

compartment.

Front

+

12V 23A

_

Inside

Double Adhseive Tape
Top

Place double adhesive tape on back of call button and mount
to wall. 4

Mount Call Button to Wall with Bracket (Optional)

Double Adhsive
Tape (Back of Bracket)
Screw Guides

A. Wall Mount with Double Adhesive Tape The mounting brackets may be affixed to most smooth, clean surfaces with the included double stick tape.
B. Wall Mount with Screws (included) The mounting bracket may be more securely mounted to walls or headboards with screws. Use the recessed guides for screw placement on the bracket.

Lace Lanyard Strap thru Call Button (Optional)

A

Top

Lace lanyard strap thru top of call

B

button.

Wrap loop around dark blue cord and pull tight.
5

Hang call button from the strap.

This device complies with Part 15 of the FCC rules. Operation is subject to the following two conditions: 1) this device may not cause harmful interference, and 2) this device must accept any interference received, including interference that may cause undesired operation. Changes or modifications not expressly approved by the party responsible for compliance could void your authority to operate the equipment. NOTE: This equipment has been tested and found to comply with the limits for a Class B digital device, pursuant to Part 15 of the FCC Rules. These limits are designed to provide reasonable protection against harmful interference in a residential installation. This equipment generates uses and can radiate radio frequency energy and, if not installed and used in accordance with the instructions, may cause harmful interference to radio communications. However, there is no guarantee that interference will not occur in a particular installation. If this equipment does cause harmful interference to radio or television reception, which can be determined by turning the equipment off and on, the user is encouraged to try to correct the interference by one or more of the following measures: - Reorient or relocate the receiving antenna. - Increase the separation between the equipment and receiver. - Connect the equipment into an outlet on a circuit different from that to which the receiver is connected. - Consult the dealer or an experienced radio/TV technician for help.
6
Canva Canva