PHANTOM DESTROYER 6+
OPERATING INSTRUCTIONS
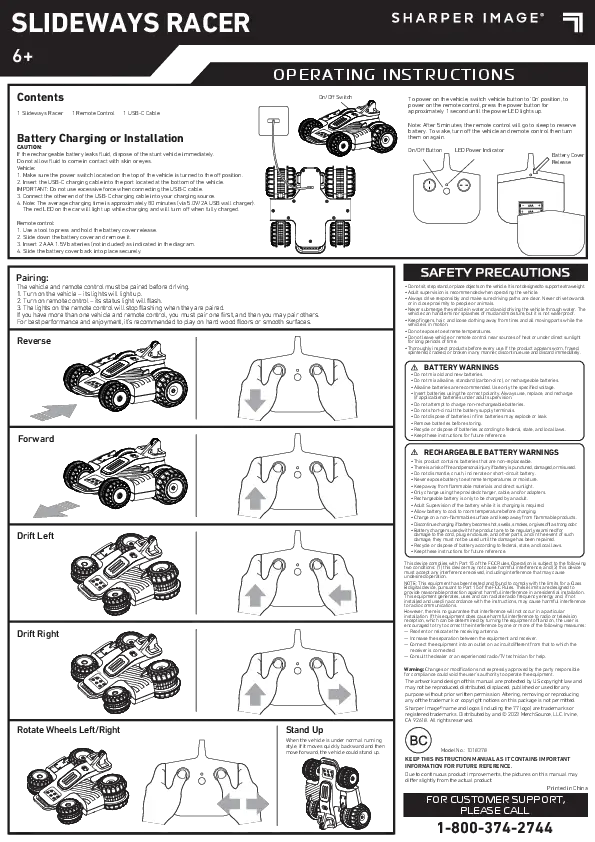
Unpacking and Battery Installation
Carefully remove items from package.
The truck requires 4 AA 1.5V batteries (not included). The controller requires one 9V battery (not included). When changing batteries, adult supervision is required. Use alkaline batteries for the best performance.
For the Truck: Locate the battery door on the bottom of the truck. Using a Phillips screwdriver, loosen the screw, pull the latch on the door, and lift up to access the battery compartment. Insert 4 AA batteries while observing the correct polarity. Replace the battery compartment door and tighten the screw.
For the Controller: Using a Phillips screwdriver, loosen the screw and remove the battery compartment door. Insert one 9V battery while observing the correct polarity. Replace the battery compartment door and tighten the screw.
Diagram Descriptions:
Truck Battery Compartment: An illustration shows the underside of the truck with a screw and battery cover labeled. Below this, a diagram shows the placement of four AA batteries within the compartment, indicating positive (+) and negative (-) terminals.
Controller Battery Compartment: An illustration shows the top of the remote control with a screw and battery cover labeled. Below this, a diagram shows the placement of a 9V battery within the compartment.
Controller Overview: An illustration of the remote control shows the On/Off Switch and the LED Power Indicator.
Operating the Car
Switch both the car and remote buttons to the "ON" position. For best results, use the car on hard surfaces such as wood or tile.
Movement Controls:
- Forward: Push the left joystick forward.
- Reverse: Pull the left joystick backward.
- Left Turn: Push the right joystick forward and left.
- Right Turn: Push the right joystick forward and right.
Diagram Descriptions:
Forward Movement: An illustration shows the remote control joystick being pushed forward, with an arrow indicating forward motion of the toy car.
Reverse Movement: An illustration shows the remote control joystick being pulled backward, with an arrow indicating backward motion of the toy car.
Left Turn: An illustration shows the remote control joystick being moved forward and to the left, with an arrow indicating a left turn of the toy car.
Right Turn: An illustration shows the remote control joystick being moved forward and to the right, with an arrow indicating a right turn of the toy car.
Wheel Alignment
If the car does not drive straight, use the Wheel Alignment dial located on the underside of the car. Adjust the dial until the car drives straight.
Diagram Description:
Wheel Alignment Dial: An illustration shows the underside of the toy car with the wheels angled. A dial labeled "OFF ON" is visible, with an arrow indicating its adjustment for steering alignment.
SAFETY PRECAUTIONS
- Do not operate during thunderstorms or rain.
- Avoid water, sand, and snow when operating the car.
- Do not submerge the truck or controller in water.
- Never operate your truck on the street or highway.
- Never operate your truck in a confined or crowded area, and do not use people or animals as obstacles.
- Do not run your truck into furniture, objects, or hard surfaces, as this will cause damage to both the objects and your car.
- Keep fingers, hair, and loose clothing away from the tires, gears, and motor while the car is switched to "ON".
- Do not leave the truck or remote control near a heat source or under direct sunlight for long periods of time.
- Do not leave the truck or remote control outside overnight. Dampness is harmful to interior components.
- Remove all batteries when not in use to avoid accidental operation.
- Adult supervision is recommended when operating this car.
BATTERY WARNING
- Do not mix old and new batteries.
- Do not mix alkaline, standard (carbon-zinc), or rechargeable batteries.
- Insert batteries using the correct polarity.
- Do not short-circuit the supply terminal.
- Remove batteries when not in use. Recycle or dispose of exhausted batteries according to federal, state, and local laws. Do not dispose of batteries in a fire – they may leak or explode.
- Only use manufacturer-specified battery(ies), charger(s), and/or adapter, if applicable.
- Always use, replace, and recharge (if applicable) batteries under adult supervision.
- Keep these instructions for future reference.
Important Notes and Compliance
Warning: Changes or modifications to this unit not expressly approved by the party responsible for compliance could void the user's authority to operate the equipment.
FCC Compliance: This equipment has been tested and found to comply with the limits for a Class B digital device, pursuant to Part 15 of the FCC Rules. These limits are designed to provide reasonable protection against harmful interference in a residential installation. This equipment generates, uses, and can radiate radio frequency energy and, if not installed and used in accordance with the instructions, may cause harmful interference to radio communications.
However, there is no guarantee that interference will not occur in a particular installation. If this equipment does cause harmful interference to radio or television reception, which can be determined by turning the equipment off and on, the user is encouraged to try to correct the interference by one or more of the following measures:
- Reorient or relocate the receiving antenna.
- Increase the separation between the equipment and receiver.
- Connect the equipment into an outlet on a circuit different from that to which the receiver is connected.
- Consult the dealer or an experienced radio/TV technician for help.
Manual Information: Keep this instruction manual as it contains important information for future reference. Due to continuous product improvements, the pictures on this manual may differ slightly from the actual product.
The artwork and design of this manual are protected by US copyright law and may not be reproduced, distributed, displaced, published, or used for any purpose without prior written permission. Altering, removing, or reproducing any of the trademark or copyright notices on this package is not permitted.
© 2018 Sharper Image. Sharper Image® name and logo are registered trademarks. All rights reserved.
© 2018 MerchSource, LLC. Irvine, CA 92618. All rights reserved. Distributed by MerchSource, LLC, Irvine, CA 92618.
FOR TECHNICAL SUPPORT, PLEASE CALL
1-800-374-2744