LUTRON RadioRA 3 Wireless Processor

Specifications
- Model: RRKE-PROC3
- Power: 48V, 100mA
- LED Indicators: Green (Normal operation), Blue (Firmware upgrade in process), Red (Error), Yellow (No Internet connection/access)
- Program Button: Used for factory reset and system association
Product Usage Instructions
Step 1 – Choose a Location to Install
- The wireless processor should be centrally located within a maximum distance of the wireless devices. Keep it at least 2m away from interference sources like microwaves or WAPs. Do not run PoE wiring outdoors or install in metallic enclosures.
Step 2 – Select the Mounting Adapter
- Choose the appropriate mounting adapter based on your installation type. Available adapters include shelf-mount, recess-mount, and junction box mount.
Step 3 – Provide Opening for Adapter
- If using the recess-mount or junction box mount adapter, ensure the opening size is between 83mm to 89mm in diameter and 8mm to 30mm in depth.
Step 4a – Installation using Recess-Mount Adapter
- Ceiling or wall installation depending on preference
- Attach processor to PoE-enabled network switch or injector via Ethernet cable
Step 4b – Installation using Junction Box Mount Adapter
- Mount the processor on the ceiling or wall
- Connect processor to PoE-enabled switch/injector with Ethernet cable
Step 4c – Installation using Shelf-Mount Adapter
- Mount the processor on a horizontal or vertical surface
- Connect to PoE-enabled switch/injector and WiFi router
Step 5 – System Setup
- Refer to the Getting Started Guide for detailed setup instructions.
Product Overview

This RadioRA 3 wireless processor works with compatible wireless devices, including standard and hybrid keypads, Pico controls, Radio Powr Savr sensors, RF dimmer and switch modules, plug-in dimmers, and Triathlon, Sivoia QS wireless and Palladiom wire free shades. Other products may also be compatible; see individual product spec sheets for details on system compatibility.
This wireless processor must be powered by an IEEE 802.3af, IEEE 802.3at or IEEE 802.3bt compliant LPS / SELV PoE or PoE+ power supply.
Additional Components
Note: Mounting adapter must be purchased separately. Available mounting adapters are: L-SMNT-WH shelf-mount, L-CMNT-WH recess-mount, and L-JMNT-WH junction box mount
Included in RRKE-PROC3-KIT1
- PoE injector and region-specific plugs P/N: L-POEI-G-BL

- 1 m Ethernet cable

- 1.8 m Ethernet cable

Included in RRKE-PROC3-CW
- Recess-mount adapter P/N: L-CMNT-WH

- Junction box mount adapter P/N: L-JMNT-WH

Components (not included)
Plaster ring

Tools You May Need
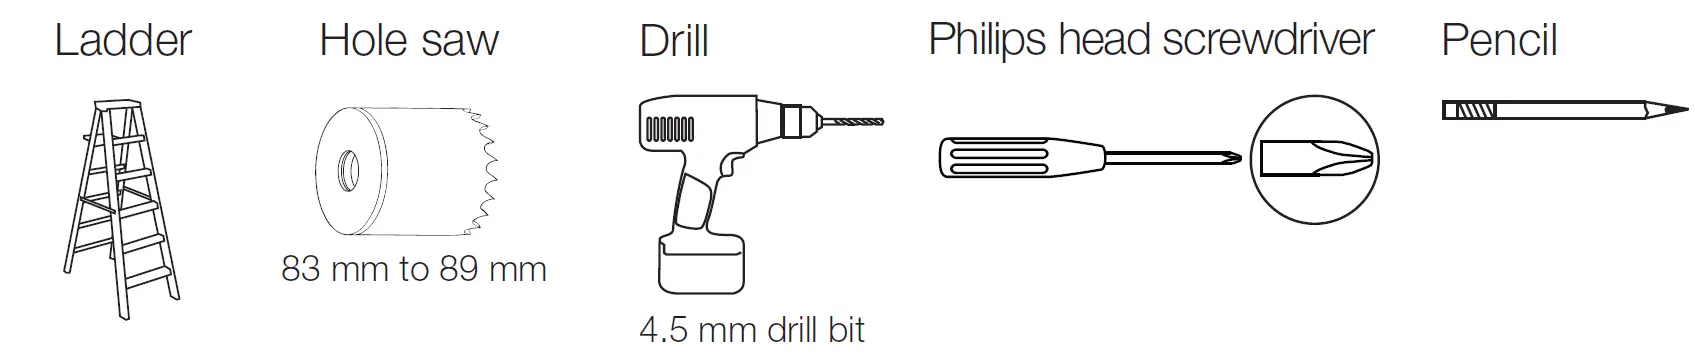
Installation Steps
Step 1 — Choose a Location to Install
Reliability of Clear Connect wireless communication requires that the wireless processor be centrally-located and within a maximum distance of the specific wireless devices in the system. Wireless processors must be mounted 2 m away from wireless interference sources like microwaves, Wireless Access Points (WAPs), etc. PoE wiring must be kept internal to the building. Do not run PoE wiring outdoors or install the processor in metallic enclosures.
Distances for Wireless Devices
Clear Connect – Type A Devices (in-line RF dimming and switching modules and plug-in lamp dimmers, Pico wireless controls, Sivoia QS wireless shades, etc.)
- Each device must be within 9 m of a repeater or wireless processor.
- Repeaters can be spanned up to 18 m apart from other repeaters to create the network.
Clear Connect – Type X Devices
- All devices associated with the wireless processor must be within a 23 m radius of the processor.
- There must be a minimum of two devices within 6 m of the wireless processor.
- Each Clear Connect – Type X device should have two or more non-battery powered Type X devices within 6 m of another compatible Clear Connect – Type X device. Using more than two devices is ideal for creating an ultra high-performance mesh network. Groups or clusters of Clear Connect – Type X devices must not be separated by more than 6 m.
For more information, please refer to the Wireless Setup Guide which can be found in the RA3 Support Center: www.lutron.com/RA3support
For myLutron users, please see Application Note 842 for additional information on Clear Connect – Type X Best Practices at www.lutron.com/europe
Step 2 — Select the Mounting Adapter for your Installation
RRKE-PROC3-CW comes with a recess-mount adapter and a junction box mount adapter. For model RRKE-PROC3-KIT1, the mounting adapters are
sold separately. Available mounting adapters are: L-SMNT-WH shelf-mount, L-CMNT-WH recess-mount, and L-JMNT-WH junction box mount
Step 3 — Provide Opening for Adapter
(recess-mount and junction box mount adapter ONLY)

Step 4a — Installation using the Recess-Mount Adapter

Plug in Ethernet cable and attach processor to PoE-enabled network switch or PoE injector

Step 4b — Installation using the Junction Box Mount Adapter

Plug in Ethernet cable and attach processor to PoE-enabled network switch or PoE injector

Step 4c — Installation using the Shelf-Mount Adapter
(P/N: L-SMNT-WH, sold separately)
- • Hold the adapter to the wall in the desired location
- Using a pencil, mark the location of the screw holes
- If using drywall, prep for anchors
- Partially drive two (2) screws at least 6.3 mm into the wall or the drywall anchors
- Feed right-angle connector of the 1.8 m Ethernet cable through the adapter BEFORE tightening screws
- Tighten screws
- Plug in Ethernet cable and attach processor to PoE-enabled network switch or PoE injector
- Attach processor to adapter

Step 5 — System Setup
- For more information, please refer to the Getting Started Guide, which can be found in the RA3 Support Center: www.lutron.com/RA3support
LED Diagnostics
| Mode / Error | LED Pattern Description |
| Normal Operation | Status LED blinks green every 10 seconds |
| Software Update | Status LED blinks blue |
| Error | Status LED remains solid red |
| Processor Identify | Status LED blinks green rapidly |
| Processor has no Internet access | Status LED blinks yellow every 5 seconds |
Troubleshooting
| Symptom | Probable Cause |
| Unit does not power on | A PoE switch is not being used or is not configured as a PoE switch |
| The other end of the Ethernet cable is not connected to a PoE switch | |
| Unit cannot be found in software | The Ethernet cable is not connected to the same LAN as the wired processor |
| Model is not supported (Athena / myRoom vs. HomeWorks) | |
| Ethernet run is longer than the supported 100 m and a PoE extender is needed | |
| Unit does not control surrounding lights | Lights are out of range of the wireless processor |
| Processor lost power / Ethernet wire run too long and PoE booster is required | |
| LED on unit is blinking yellow every 5 seconds | Processor does not have Internet connectivity. Verify that the processor is connected to a network configured for internet access. Wait for up to 1 minute after implementing any corrective actions. |
| Refer to the Application note #760 (048760) at www.lutron.com/europe for network troubleshooting details | |
| LED on unit is solid red | Contact Lutron Tech Support only if maintained more than 30 seconds or if it occurs periodically. |
For additional troubleshooting information, please see www.lutron.com/RA3support
EU declaration of conformity
Hereby, Lutron Electronics Co. Inc declares that the radio equipment type RRKE-PROC3 is in compliance with Directive 2014/53/EU. The full text of the EU declaration of conformity is available at the following internet address: www.lutron.com/cedoc
Controlling this HomeKit®-enabled accessory automatically and away from home requires a HomePod®, Apple® TV, or iPad® set up as a home hub. It is recommended that you update to the latest software and operating system.
Communication between iPhone®, iPad®, Apple Watch®, HomePod®, or Mac® and the HomeKit®- enabled RadioRA 3 processor is secured by HomeKit® technology. Use of the Works with Apple® badge means that an accessory has been designed to work specifically with the technology identified in the badge and has been certified by the developer to meet Apple® performance standards. Apple® is not responsible for the operation of this device or its compliance with safety and regulatory standards.
The Lutron logo, Lutron, Athena, Clear Connect, HomeWorks, myRoom, Palladiom, Pico, RadioRA 3, Radio Powr Savr, Sivoia QS, and Triathlon and are trademarks or registered trademarks of Lutron Electronics Co., Inc. in the US and/or other countries. Apple, Apple Watch, HomeKit, HomePod. iPad, iPhone, and Mac are trademarks of Apple Inc., registered in the U.S. and other countries. All other product names, logos, and brands are property of their respective owners. ©2024 Lutron Electronics Co., Inc.
Limited Warranty
For warranty information, please scan the code below with a smartphone.

Contact
Customer Assistance
For questions concerning the installation or operation of this product, please visit www.lutron.com/RA3support

FAQ
- Q: Can I install the processor outdoors?
- A: No, PoE wiring must be kept internal to the building and the processor should not be installed in metallic enclosures.
- Q: How far should the processor be from wireless interference sources?
- A: The processor should be at least 2m away from sources like microwaves or Wireless Access Points (WAPs).
Documents / Resources
 |
LUTRON RadioRA 3 Wireless Processor [pdf] User Guide RRKE-PROC3, 044411, RadioRA 3 Wireless Processor, RadioRA 3, Wireless Processor, Processor |