![]() W452AS Series Wired Floodlight Security Camera
W452AS Series Wired Floodlight Security Camera
User Manual
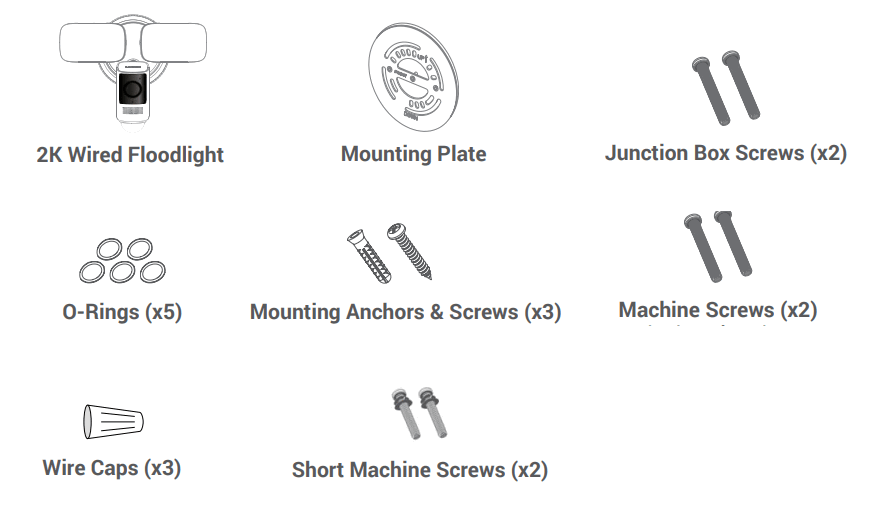
Package Contents
 Tools Needed
- Drill
- Screwdriver
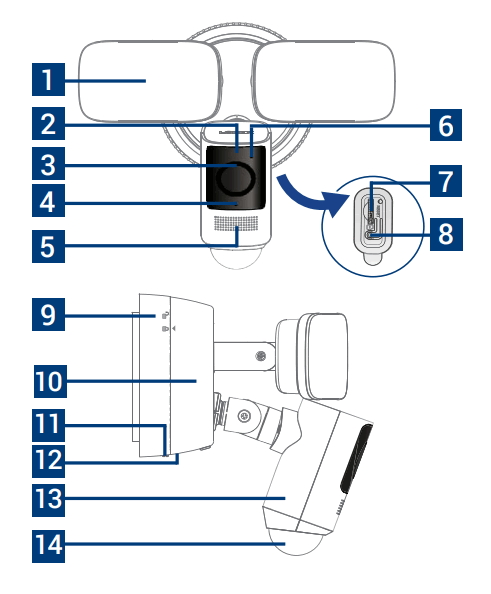
Overview
- LED Panel
- IR Light
- Camera
- Microphone
- Speaker
- Status Indicator
- MicroSD Card Slot
- Reset Button*
- Mounting Bracket
- Floodlight Housing
- Security Screw
- Rubber Plug
- QR Code
- PIR Sensor
Status Indicator
| Device Ready | |
| Ready for network connection | |
| Pairing to the Lurex Home app | |
| Network connection failed* / Factory reset* | |
| Firmware updating |
- Press and hold the reset button until you hear the audio prompts.
WARNING
![]() TURN OFF THE POWER RUNNING TO YOUR EXISTING CIRCUIT AT THE BREAKER
TURN OFF THE POWER RUNNING TO YOUR EXISTING CIRCUIT AT THE BREAKER![]() If you are unsure of which breaker controls the circuit, then turn off the main power switch.
If you are unsure of which breaker controls the circuit, then turn off the main power switch.
If you do not know where your breaker is or how to turn off power, consult a licensed electrician.
Make sure the supply voltage is correct. 100-240 VAC 50/60Hz is required.
DO NOT connect the floodlight to a dimmer or timer.
Mounting Setup
![]() If you are not replacing a light fixture, you will need to run power cabling to the install location, and purchase a UL listed junction box for a licensed electrician to install.
If you are not replacing a light fixture, you will need to run power cabling to the install location, and purchase a UL listed junction box for a licensed electrician to install.
- Remove the existing light fixture and bracket from the wall, and then disconnect the wires.
Tip! Bend the power cables so they do not fall through the wall. - Run the existing wires through the middle of the Mounting Plate.
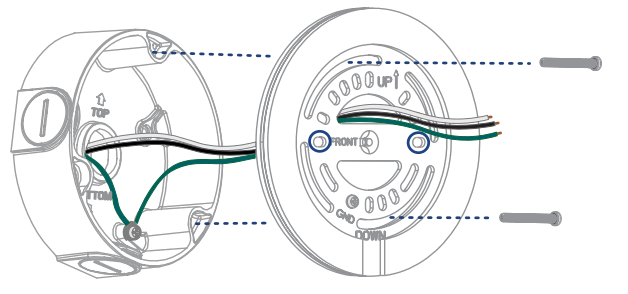
- Place and align the Mounting Plate with the
 arrow up. Make sure the 2 horizontal holes are level.
 - Secure the Mounting Plate to the Junction Box using the included Junction Box screws.
 Tip!
Tip!
For additional installation instructions, visit: help.lorex.com/W452ASSeries
Wiring & Installation
![]() WARNING
WARNING
Power wire colors in your home may be different. In such a case, consult a licensed electrician.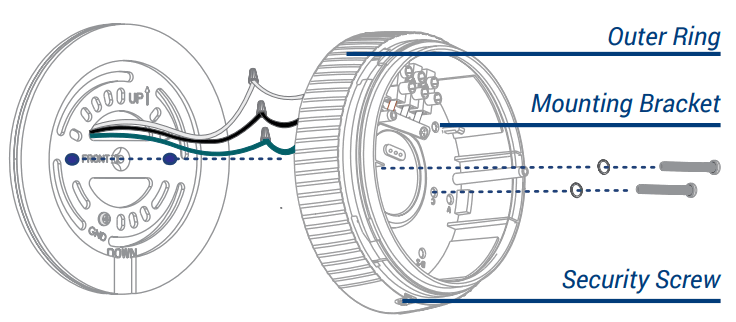
- Use the Wire Caps to connect the wires.
a. Twist the Ground wire (green) to the ground wire.
b. Twist the Live wire (black) to the live wire.
c. Twist the Neutral wire (white) to the neutral wire. - Carefully fit the wires back into the Junction Box.
- Slide the O-Rings onto the Machine Screws, and then use a Phillips-head screwdriver to secure the Mounting Bracket to the Plate.
- Ensure the Outer Ring is completely rotated counter-clockwise.
- Align the 2 grooves inside the Floodlight to the 2 posts on the inner sides of the Bracket, and then push the Floodlight into place.
Ensure there are no gaps around the perimeter between the Floodlight and Bracket.
Tip! Align the to
to  the symbol on the sides.
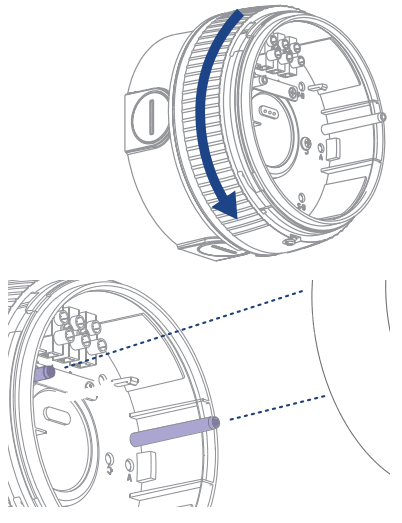
- Twist the Outer Ring clockwise until the and the symbols align.
- Tighten the pre-installed locking screw at the bottom of the Mounting Bracket.
- Remove the Rubber Plug at the bottom of the Floodlight.
- Adjust the camera and LED Panels to the desired position by loosening / tightening the screws on the LED panel arms and the camera.
- Turn the power ON at the breaker. If the status indicator does not turn on, check that the wiring is correct.
- Add the Floodlight to the Lurex Home app.

Device App Setup
- Download
 https://app.lorex.com/home/download
 - Tap
Need help?
For the additional mounting and support material, scan the below QR code or visit:

Register your product
Please see our full Terms of Service and Limited Hardware Warranty Policy at: orex.com/pages/warranty
Copyright © 2022 Lurex Technology Inc
As our products are subject to continuous improvement, Lurex reserves the right to modify product design, specifications and prices, without notice and without incurring any obligation. E&OE. All rights reserved.
![]() This device complies with part 15 of the FCC Rules. Operation is subject to the following two conditions: (1) This device may not cause harmful interference, and (2) This device must accept any interference received, including interference that may cause undesired operation.
This device complies with part 15 of the FCC Rules. Operation is subject to the following two conditions: (1) This device may not cause harmful interference, and (2) This device must accept any interference received, including interference that may cause undesired operation.![]()
Documents / Resources
 |
LOREX W452AS Series Wired Floodlight Security Camera [pdf] User Manual W452AS Series Wired Floodlight Security Camera, W452AS Series, Wired Floodlight Security Camera, Floodlight Security Camera, Security Camera, Camera |


