1. ຜະລິດຕະພັນເກີນview
The HIKVISION Elite 7 Touch Portable SSD is a secure and high-performance external solid-state drive designed for reliable data storage and protection. It features a fingerprint encryption function, robust construction, and high-speed data transfer capabilities.

ຮູບ 1.1: ດ້ານຫນ້າ view of the HIKVISION Elite 7 Touch Portable SSD, showcasing its sleek black design and illuminated HIKVISION logo.
ຄຸນນະສົມບັດທີ່ສໍາຄັນ:
- ປະສິດທິພາບຄວາມໄວສູງ: Utilizes USB 3.2 Gen2 with NVMe solution for transfer speeds up to 1060MB/s.
- Fingerprint Security: Integrated fingerprint sensor for secure data access and encryption.
- ການອອກແບບທົນທານ: All-aluminum alloy body with IPX7 waterproof rating.
- ຊຸດຊອບແວ: Includes Hi Backup for data backup and Hi Security for enhanced data protection.
- ຄວາມເຂົ້າກັນໄດ້ຢ່າງກວ້າງຂວາງ: Supports TV, PS4, Xbox, Windows, Mac, Linux, and Android devices.
2. ເນື້ອໃນຊຸດ
ກ່ອນທີ່ຈະສືບຕໍ່ການຕັ້ງຄ່າ, ກະລຸນາກວດສອບວ່າລາຍການທັງຫມົດແມ່ນມີຢູ່ໃນຊຸດ:
- 1 x HIKVISION Elite 7 Touch Portable SSD
- 1 x ສາຍ Type-C ຫາ Type-C
- 1 x Type-C ຫາ Type-A Cable
- 1 x ຄູ່ມືຜູ້ໃຊ້ (ເອກະສານນີ້)

Figure 2.1: Contents of the HIKVISION Elite 7 Touch Portable SSD package, including the SSD unit, two types of USB cables, and the user manual.
3. ຄູ່ມືການຕິດຕັ້ງ
3.1 ການເຊື່ອມຕໍ່ SSD
- Select the appropriate cable: Use the Type-C to Type-C cable for devices with a USB-C port, or the Type-C to Type-A cable for devices with a standard USB-A port.
- Connect the Type-C end of the cable to the HIKVISION Elite 7 Touch Portable SSD.
- Connect the other end of the cable to an available USB port on your computer, gaming console, or compatible device.

ຮູບທີ 3.1: ໄລຍະໃກ້ view of the Type-C interface on the HIKVISION Elite 7 Touch Portable SSD, indicating its high-speed data transfer capability.
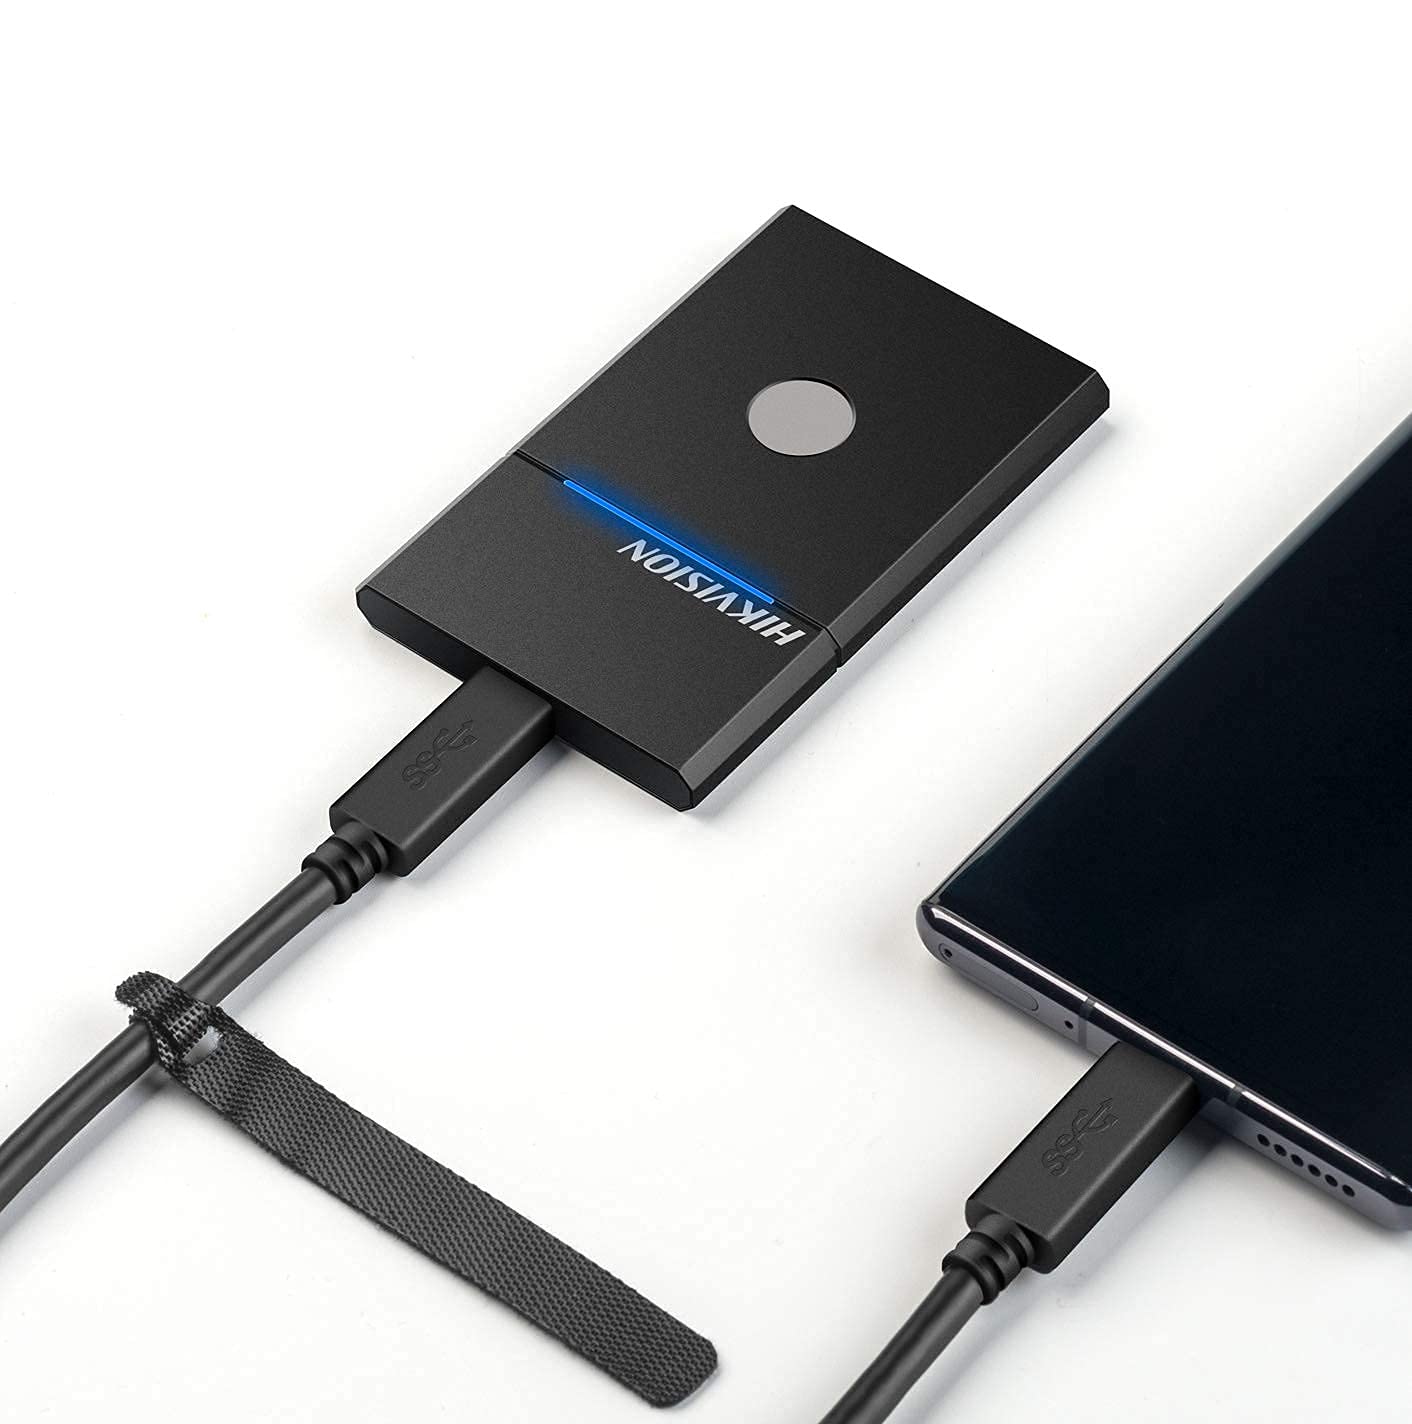
Figure 3.2: The HIKVISION Elite 7 Touch Portable SSD connected to a laptop via a USB-C cable, ready for data transfer.

Figure 3.3: The HIKVISION Elite 7 Touch Portable SSD connected to a smartphone, demonstrating its compatibility with mobile devices.
3.2 Initial Formatting (If Required)
For optimal compatibility with your specific device (TV, PS4, Xbox, Windows, Mac, Linux, Android), it may be necessary to format the SSD to the required file system. Refer to your device's operating system instructions for formatting external storage devices. ໝາຍເຫດ: Formatting will erase all data on the drive. Back up any important data before proceeding.
3.3 Software Installation (Hi Backup & Hi Security)
The HIKVISION Elite 7 Touch comes with pre-loaded software for enhanced data management and security. Connect the SSD to a computer and locate the installer files for 'Hi Backup' and 'Hi Security'. Follow the on-screen instructions to install these applications.
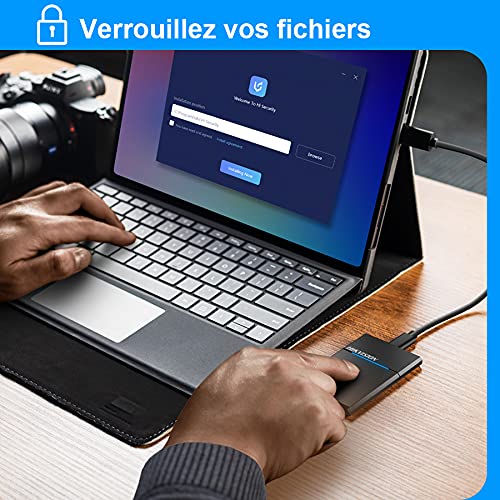
Figure 3.4: Screenshot of the 'Hi Security' software interface on a laptop, illustrating the setup process for data protection.
4. ຄໍາແນະນໍາການດໍາເນີນງານ
4.1 ການໂອນຂໍ້ມູນ
Once connected and recognized by your device, the SSD will appear as an external storage drive. You can drag and drop files, copy and paste, or use your operating system's file management tools to transfer data to and from the SSD.
4.2 Fingerprint Unlocking and Security
The Elite 7 Touch features a fingerprint sensor for secure access to your data. After installing the 'Hi Security' software, you can register your fingerprints. The SSD can be configured to require fingerprint authentication for unlocking, creating separate private storage areas.
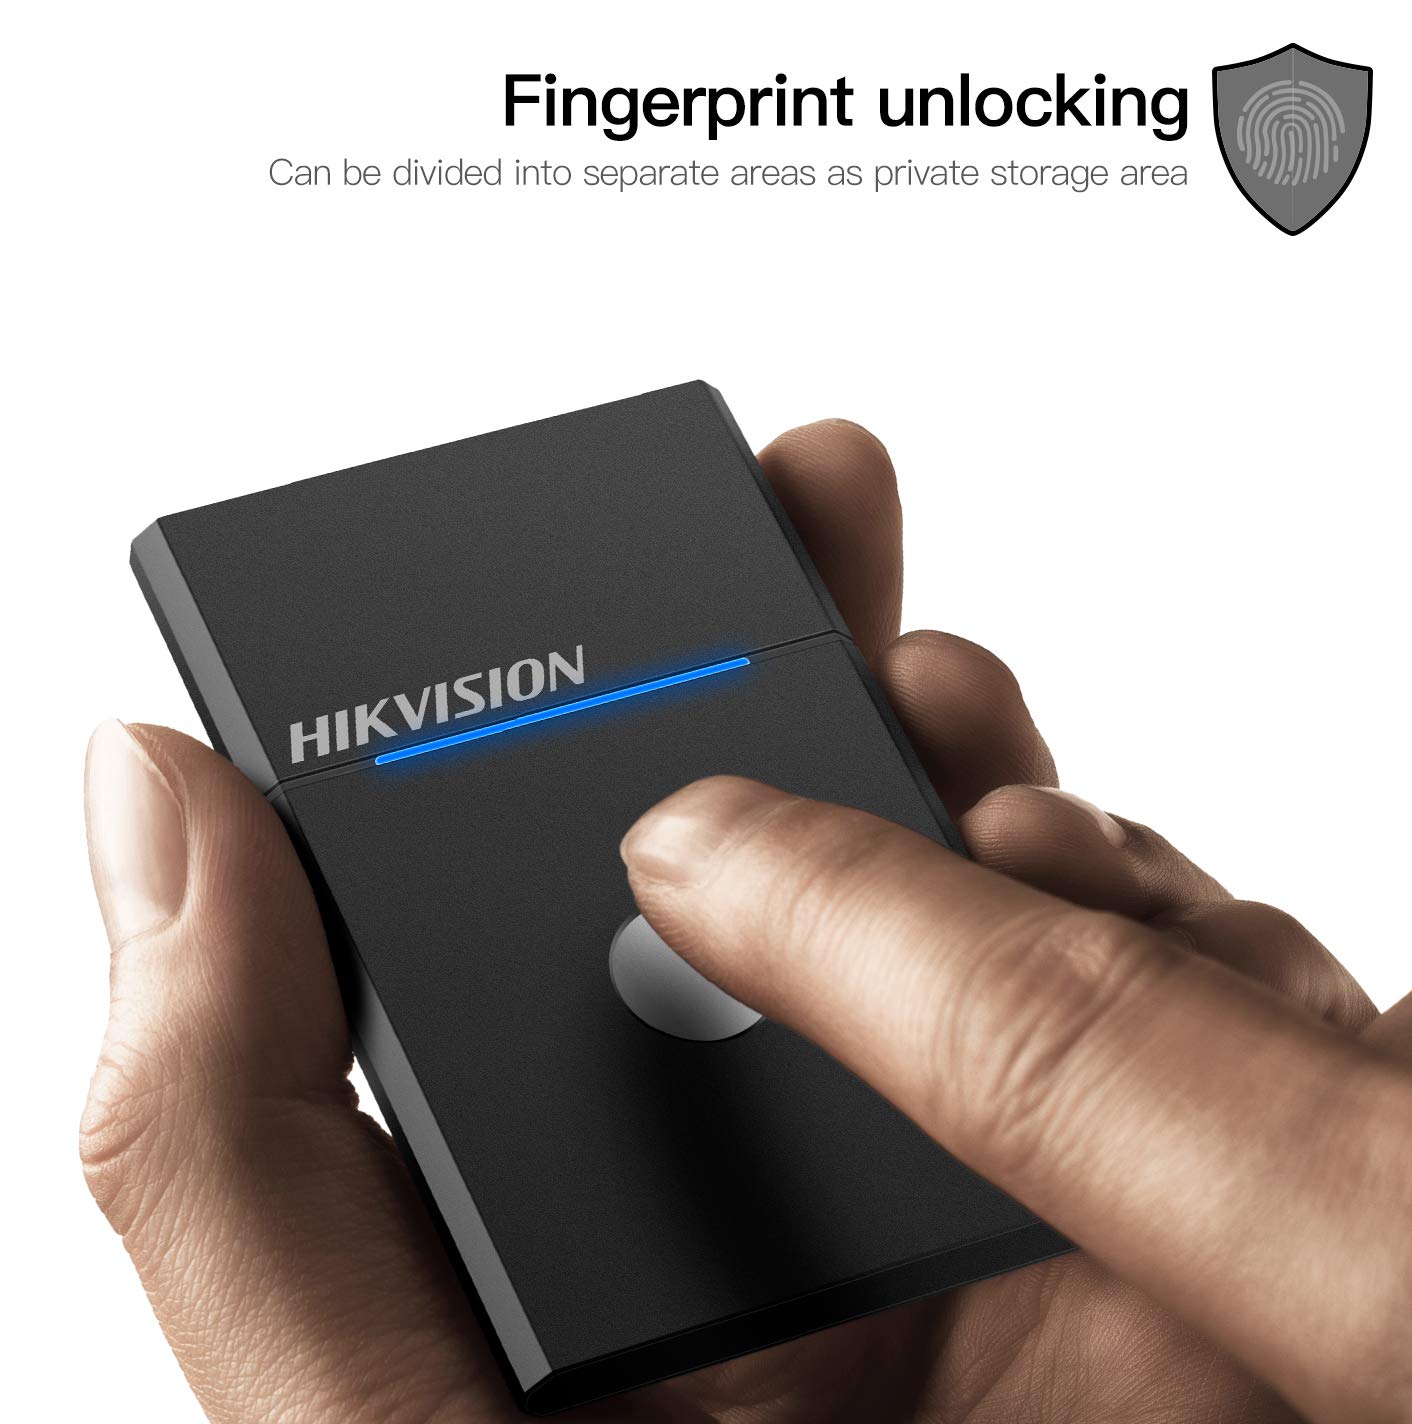
Figure 4.1: The HIKVISION Elite 7 Touch Portable SSD highlighting its fingerprint unlocking capability, allowing for secure access to data.

Figure 4.2: A user's hand interacting with the fingerprint sensor on the HIKVISION Elite 7 Touch Portable SSD to unlock the device.
4.3 Using Hi Backup Software
The 'Hi Backup' software allows you to create backups of your important files. Follow the software's interface to configure backup schedules, select files for backup, and manage your backup history. This software can also be integrated with cloud storage services for additional data redundancy.
5. ບໍາລຸງຮັກສາ
5.1 ການເບິ່ງແຍງທົ່ວໄປ
- Keep the SSD clean by wiping it with a soft, dry cloth.
- Avoid exposing the SSD to extreme temperatures or direct sunlight for prolonged periods.
- Ensure the USB port is free from dust and debris before connecting the cable.
5.2 Waterproof Feature (IPX7)
The Elite 7 Touch Portable SSD is designed with an IPX7 waterproof rating, meaning it can withstand immersion in water up to 1 meter for 30 minutes. While this provides protection against accidental spills or submersion, it is not recommended for continuous underwater use. Always ensure the USB port is dry before connecting to a device.
6. ການແກ້ໄຂບັນຫາ
- SSD ບໍ່ກວດພົບ:
- ໃຫ້ແນ່ໃຈວ່າສາຍ USB ໄດ້ເຊື່ອມຕໍ່ກັບທັງ SSD ແລະອຸປະກອນຂອງທ່ານຢ່າງແໜ້ນໜາແລ້ວ.
- ລອງໃຊ້ພອດ USB ອື່ນໃນອຸປະກອນຂອງທ່ານ.
- ລອງໃຊ້ສາຍ USB ອື່ນ.
- ປິດເປີດຄອມພິວເຕີ ຫຼືອຸປະກອນຂອງທ່ານຄືນໃໝ່.
- Check your device's disk management utility to see if the drive is recognized but unformatted.
- ຄວາມໄວການໂອນຊ້າ:
- Ensure you are using a USB 3.2 Gen2 compatible port on your device for optimal performance.
- ກວດສອບວ່າໄດຣເວີຂອງອຸປະກອນຂອງທ່ານໄດ້ຮັບການອັບເດດແລ້ວ.
- ປິດແອັບພລິເຄຊັນທີ່ບໍ່ຈຳເປັນໃດໆທີ່ເຮັດວຽກຢູ່ໃນພື້ນຫຼັງ.
- ເຊັນເຊີລາຍນິ້ວມືບໍ່ຕອບສະໜອງ:
- ໃຫ້ແນ່ໃຈວ່ານິ້ວມືຂອງທ່ານສະອາດແລະແຫ້ງ.
- Re-register your fingerprints through the 'Hi Security' software.
- Ensure the 'Hi Security' software is running and properly configured.
- Data Access Issues:
- If using fingerprint security, ensure the correct fingerprint is used.
- Check if the drive requires formatting for your specific operating system (refer to Section 3.2).
7. ຂໍ້ມູນຈໍາເພາະ

Figure 7.1: Diagram illustrating the compact dimensions of the HIKVISION Elite 7 Touch Portable SSD: 84mm length, 53mm width, and 8mm thickness.
| ຄຸນສົມບັດ | ຂໍ້ມູນຈໍາເພາະ |
|---|---|
| ຍີ່ຫໍ້ | HIKVISION |
| ຕົວແບບ | Elite 7 Touch (HS-ESSD-Elite 7 Touch) |
| ຄວາມອາດສາມາດ | 1TB (1024 GB) |
| ການໂຕ້ຕອບ | USB 3.2 Gen2 ປະເພດ -C |
| ຄວາມໄວການໂອນສູງສຸດ | ສູງສຸດ 1060MB/ວິນາທີ |
| ຂະໜາດ (LxWxH) | 8.35 x 5.35 x 0.79 ຊມ (3.29 x 2.10 x 0.31 ນິ້ວ) |
| ນ້ຳໜັກ | 280 ກຣາມ (0.62 ປອນ) |
| ການປະເມີນກັນນ້ໍາ | IPX7 |
| ເວທີຮາດແວ | Mac, Windows, Linux, Android, Gaming Consoles |
| ສີ | ດຳ |
8. ການຮັບປະກັນແລະການສະຫນັບສະຫນູນ
8.1 ການຮັບປະກັນຂອງຜູ້ຜະລິດ
The HIKVISION Elite 7 Touch Portable SSD comes with a ການຮັບປະກັນຂອງຜູ້ຜະລິດ 3 ປີ ຈາກວັນທີ່ຊື້. ການຮັບປະກັນນີ້ກວມເອົາຂໍ້ບົກພ່ອງຂອງວັດສະດຸແລະການເຮັດວຽກພາຍໃຕ້ການນໍາໃຊ້ປົກກະຕິ. ກະລຸນາຮັກສາຫຼັກຖານການຊື້ຂອງທ່ານສໍາລັບການຮຽກຮ້ອງການຮັບປະກັນ.
8.2 ສະຫນັບສະຫນູນດ້ານວິຊາການ
For technical assistance, troubleshooting beyond this manual, or warranty inquiries, please contact HIKVISION customer support through their official webເວັບໄຊ ຫຼືຂໍ້ມູນການຕິດຕໍ່ທີ່ສະໜອງໃຫ້ກັບເອກະສານຜະລິດຕະພັນຂອງທ່ານ.


