![]() Smart LED BULB
Smart LED BULB
User Manual![]()

Adding the Device to the App
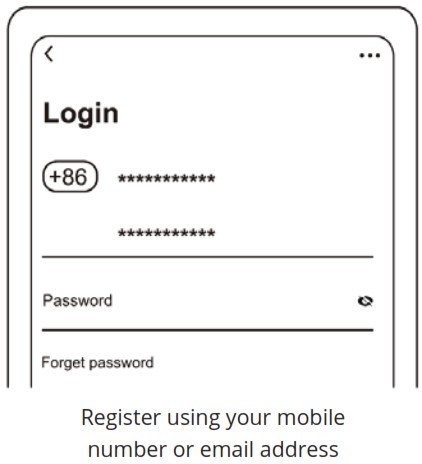
1 DOWNLOAD THE APP
Scan the provided QR code to download the app on your smartphone. Available for Android and iOS.

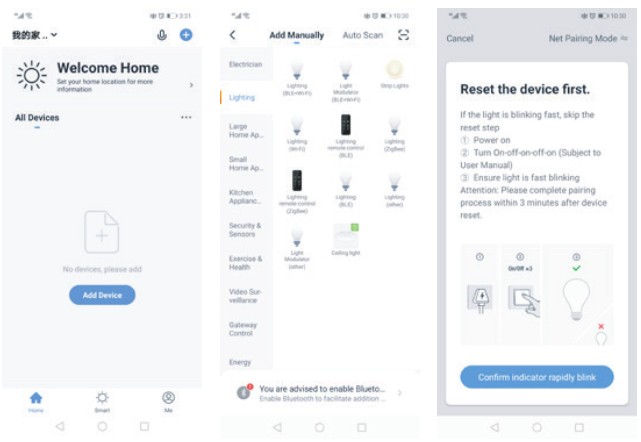
2 ADD DEVICE
a. Ensure that the smart bulb is installed properly and switched on.
b. The light bulb will start to blink as default when it is lit for the first time. Ensure that the light bulb is rapidly blinking (2 times per second).
c. Click ‘Add Device’ or ‘+’, choose ‘Add Manually’.
d. Click ‘Lighting (BLE+Wi-Fi)’, location and Bluetooth access needed.
e. If light is not blinking or blinking slowly (1 time every 3 seconds), click ‘help’ to view operation processes or follow the instructions regarding ‘How to set light to blinking mode?’
3 ADD DEVICE – ENTER WI-FI PASSWORD
a. Select the Wi-Fi which your phone is connected to.
b. Please enter the Wi-Fi password and confirm the connection.
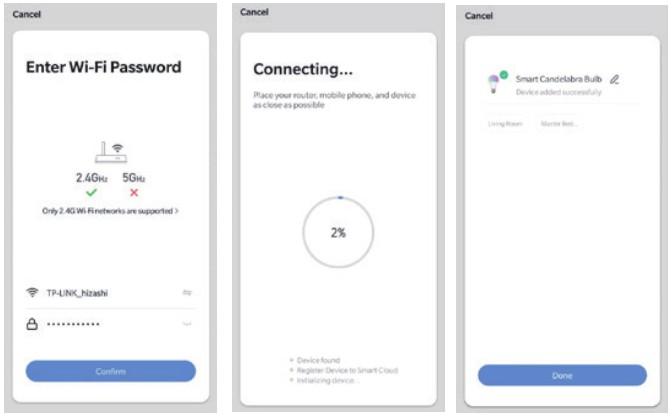
Network Connection Process
If the smart bulb is connecting to the network the app will show that the smart bulb is connecting. Once the smart bulb successfully connects to the network, the app will show that the connection is successful. (See pictures).
Note: If the app cannot discover the bulb automatically, please switch it On/Off for five times: On-Off-On-Off-On-Off until the light begins to blink quickly into reset mode. You can now automatically add the bulb again. If the bulb stops blinking, please turn On/Off the bulb five times and repeat.
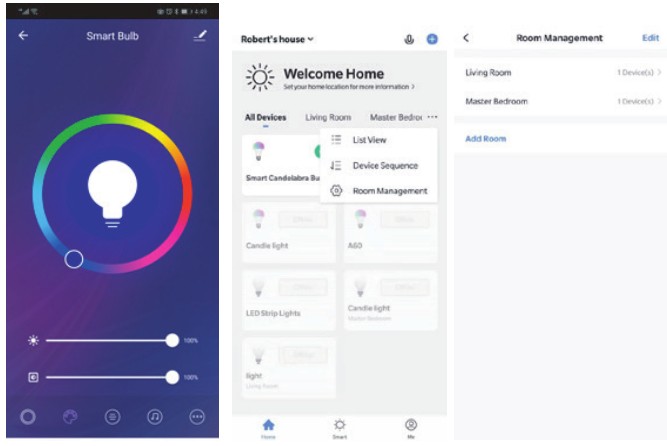
4 CONTROLLING THE DEVICE
Once the bulb is successfully connected, rename the bulb as you prefer then find the smart bulb in the home page of the app. Click the bulb icon to have full control of the bulbs.
Note:
a. When the device is online, it supports shortcut operations on the lighting home page.
b. When the device is offline, it displays “Offline” and cannot be controlled.
c. Multiple bulbs can be connected at one time and grouped easily.
Remarks:
a. The pictures used in this manual are from the Android version of the app. The iOS version may be slightly different.
b. The product and its software update periodically. The number and app interface in this manual are for examples only. The interface may change without notice.
Linking Your Account to Echo
- Click ‘Skills & Games’ on the menu. Search ‘Smart Life’. Select ‘Smart Life’ and click to ‘Enable’ the Smart Life skill.
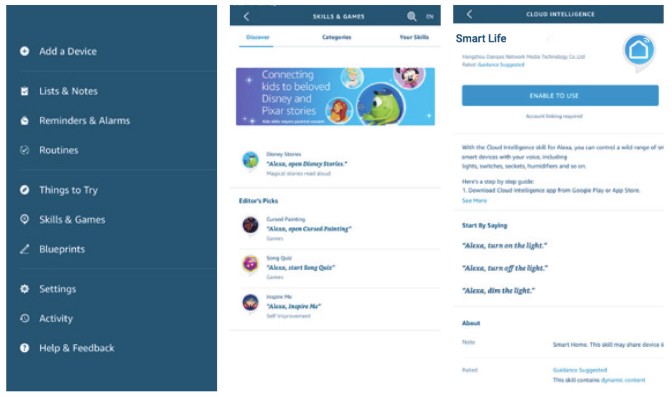
- You will be redirected to the account link page. Input your Smart Life account and password. Don’t forget to select the country and region. Click ‘Link Now’ to link your Smart Life account.

- Discover your devices. Echo needs to discover your smart devices before controlling them. You can say ‘Alexa, discover devices.’ to Echo. Echo will discover devices which have already been added in the Smart Life app.
You can also click ‘Add devices’ to find smart devices. Discovered devices will be displayed in the list.
 Note: Every time you change the device name on the Smart Life app, Echo must rediscover them before controlling them.
 - You can now control your smart devices through Echo. Speak to Echo like this:
• Alexa, turn on/off the bedroom light.
• Alexa, set the bedroom light to 50 percent.
• Alexa, brighten the bedroom light.
• Alexa, dim the bedroom light.
Linking Your Account to Google Home
Make sure you have successfully set up Google Home.
- Click ‘+’ on the menu of the Google Home app home page then click ‘Set up device’ and select ‘Works with Google’.

- Select ‘Smart Life’ from the list, select your region, input your account and password, and then click ‘Link Now’. After assigning rooms for your devices, your devices will be listed in the Home Control page.

- You can now control your smart devices through Google Home. Speak to Google with the following commands:
• OK Google, turn on/off the bedroom light.
• OK Google, set the bedroom light to 50 percent.
• OK Google, brighten the bedroom light.
• OK Google, dim the bedroom light.
• OK Google, set the bedroom light to red.
Safety Instructions
TURN POWER OFF BEFORE INSPECTION, INSTALLATION, OR REMOVAL. SUITABLE FOR DAMP LOCATIONS BUT NOT DIRECTLY EXPOSED TO WATER OR WEATHER. THIS DEVICE IS NOT INTENDED FOR USE WITH EMERGENCY EXIT FIXTURES OR EMERGENCY EXIT LIGHTS.
WARNING: THIS PRODUCT OPERATES AT A FREQUENCY WHICH MAY NOT BE SUITABLE FOR PHOTOSENSITIVE EPILEPSY.
WARNING: RISK OF ELECTRIC SHOCK. DISCONNECT THE MAIN POWER AT THE FUSE OR CIRCUIT BEFORE INSTALLATION OR SERVICING THE FIXTURE.
Specifications
| Connection: | Wi-Fi |
| Standby Power: | <0.5W |
| Wi-Fi Frequency: | 2.4 GHz – 2.48 GHz |
| Color Temperature: | 2700 – 6500K + RGB |
| Working Temperature: | -40˚C to 40˚ |
| Power Supply: | AC 100 – 240V, 50/60Hz |
| Wi-Fi to Device Range: | 70m outdoors, 20m indoors |
![]()
Documents / Resources
 |
LIDEKA Smart LED Bulb [pdf] User Manual Smart LED Bulb, LED Bulb, Bulb |


