![]()
Quick Start Guide
SPDR
Stereo Compact Digital Audio Recorder

![]()
microSDHC Logo is a trademark of SD-3C, LLC

| Fill in for your records: | This guide is intended to assist with the initial setup and operation of your Lectrosonics product. |
| Serial Number: | For a detailed user manual, download the most current version at: |
| Purchase Date: | www.lectrosonics.com |
Quick Start Steps
- Install batteries (or connect to external power) and turn the power on (see below).
- Insert a microSDHC memory card and format it with the SPDR (p. 3).
- Jam to a timecode source, if needed. (p. 7).
- Connect a microphone or audio source (p. 4).
- Set input type and level of the analog source (p. 7).
- Select record mode (p. 11).
- Set output level (HP Volume p. 10).
- Begin recording (p. 6).
SPDR Power
Battery Installation
The audio recorder is powered by two AA Quantum (recommended) or Lithium batteries.
Push outward on the battery compartment door and lift it to open.
Insert the batteries according to the markings on the backside of the housing.

Power Input Connector
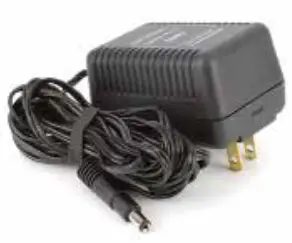 The SPDR is designed to be used with the CH12 external (or equivalent) power source. The nominal voltage to operate the unit is 12 VDC, although it will operate at voltages as low as 6 VDC and as high as 17 VDC. External power sources must be able to supply 200 mA continuously.
NOTE: There is an automatic switch over to internal batteries if power is interrupted.
microSDHC memory card

Insert the card with the contacts facing the control panel side of the recorder.
Formatting the SD Card
New microSDHC memory cards come pre-formatted with a FAT32 file system which is optimized for good performance. The PDR relies on this performance and will never disturb the underlying low-level formatting of the SD card. When the PDR “formats” a card, it performs a function similar to the Windows “Quick Format” which deletes all files and prepares the card for recording. The card
can be read by any standard computer but if any write, edit, or deletions are made to the card by the computer, the card must be re-formatted with the PDR to prepare it again for recording. The PDR never low-level formats a card and we strongly advise against doing so with the computer.
To format the card with the PDR, select Format Card in the menu and press MENU/SEL on the keypad.
NOTE: An error message will appear if samples are lost due to a poor-performing “slow” card.
WARNING: Do not perform a low-level format (complete format) with a computer. Doing so may render the memory card unusable with the PDR recorder.
With a windows based computer, be sure to check the quick format box before formatting the card.
With a Mac, choose MS-DOS (FAT) if the card is 32 GB or smaller, exFAT if the card is 64 GB or larger.
IMPORTANT
The formatting of the PDR SD card sets up contiguous sectors for maximum efficiency in the recording process. The file format utilizes the BEXT (Broadcast Extension) wave format which has sufficient data space in the header for the file information and the time code imprint.
The SD card, as formatted by the PDR, can be corrupted by any attempt to directly edit, change, format, or view the files on a computer.
The simplest way to prevent data corruption is to copy the .wav files from the card to a computer or other Windows or OS formatted media FIRST. Repeat – COPY THE FILES FIR_STI
Do not rename files directly on the SD card.
Do not attempt to edit the files directly on the SD card.
Do not save ANYTHING to the SD card with a computer (such as the take log, note files, etc) – it is formatted for PDR use only.
Do not open the files on the SD card with any third-party program such as Wave Agent or Audacity and permit a save. In Wave Agent, do not IMPORT -you can OPEN and play it but do not save or Import – Wave Agent will corrupt the file.
In short – there should be NO manipulation of the data on the card or addition of data to the card with anything other than a PDR. Copy the files to a computer, thumb drive, hard drive, etc that has been formatted as a regular OS device FIRST – then you can edit freely.
iXML HEADER SUPPORT
Recordings contain industry-standard iXML chunks in the file headers, with the most commonly used fields filled in.
Compatibility with microSDHC memory cards
Please note that the PDR and SPDR are designed for use with the microsDHC memory cards. There are several types of SD card standards (as of this writing) based on capacity (storage in GB).
SDSC: standard capacity, up to and including 2 GB — DO NOT USE!
SDHC: high capacity, more than 2 GB and up to and including 32 GB — USE THIS TYPE.
SDXC: extended capacity, more than 32 GB and up to and including 2 TB —DO NOT USE!
SDUC: extended capacity, more than 2TB and up to and including 128 TB —DO NOT USE!
The larger XC and UC cards use a different formatting method and bus structure and are NOT compatible with the SPDR recorder. These are typically used with later generation video systems and cameras for image applications (video and high resolution, high-speed photography).
ONLY the microSDHC memory cards should be used. They are available in capacities from 4GB to 32GB. Look for the Speed Class 10 cards (as indicated by a C wrapped around the number 10), or the UHS Speed Class I cards (as indicated by the numeral 1 inside a U symbol). Also, note the microSDHC Logo.
If you are switching to a new brand or source of the card, we always suggest testing first before using the card on a critical application.
The following markings will appear on compatible memory cards. One or all of the markings will appear on the card housing and the packaging.

Features and Controls
The audio input circuitry is essentially the same as on Lectrosonics SM and L Series transmitters. Any microphone wired as Lectrosonics “compatible” or “servo bias” will work with the SPDR.
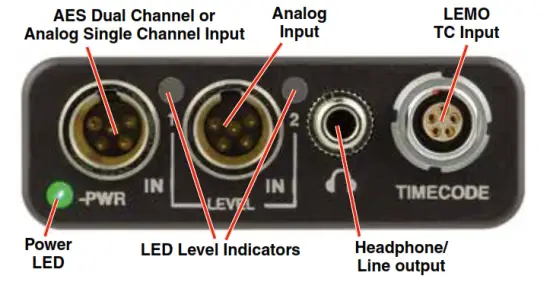
The Power LED is green when the SPDR is running on battery power. When recording, the light will blink green. Once battery power is low (30 minutes remaining), the LED will turn red. Once the red LED begins flashing, the SPDR can die at any moment.
The Power LED is blue when the SPDR is running on external power. When recording, the light will blink blue. If both batteries and external power are connected to the PDR, it will run on external power and the LED will be blue.
The Power LED will briefly blink blue rapidly on receiving a successful time code jam.
Settings
Settings are accessed by pressing MENU/SEL on the keypad, and then using the UP and DOWN arrow buttons and BACK button to navigate through the menu items and select functions. The buttons also provide alternate functions as labeled by the soft buttons (or icons) on the LCD. The Main Window is shown below:

Soft buttons in each corner of the LCD define the alternate functions of the adjacent buttons on the keypad. For example, in the preceding screen, recording is started
by pressing the UP arrow button on the keypad, in which case, the display will switch to Recording.
The main functions of SPDR, Record, Stop Recording, Playback are indicated by the status indicator. Both the status indicator and soft buttons change to accommodate the current SPDR function.

In Playback Mode, the soft buttons on the LCD change to provide the functions needed during playback. There are three variants of playback
- active playback
- paused playback in the middle of the recording
- paused playback at the end of the recording
The soft buttons in the corners of the LCD and the status indicator will change depending on the status of the playback. (See page 16 for examples.)
Powering On
Press and hold the Power Button until the Lectrosonics logo appears on the LCD.
Powering Off
Power can be turned off by holding the Power Button in and waiting for the countdown. The Power Button will not work while the unit is recording (stop recording first before powering down) or if the SPDR has been locked (unlock the recorder first).
If the power button is released before the countdown reaches 3, the unit will remain turned on and the LCD will return to the same screen or menu that was displayed previously.
Locking and Unlocking Settings
The LOCKED mode protects the recorder from accidental changes to its settings. When locked, menu navigation is possible, but any attempt to alter settings will prompt a ”LOCKED/can use the menu to unlock” message. The unit can be unlocked using the Lock/Unlock setup screen or by removing the batteries. The PDRRemote app will still work.
Recording Screens
While recording, the screen provides a view of the battery status, timecode, and input audio level. Soft buttons in the four corners of the screen provide access to the Menu, Info (available recording time if microSDHC memory card installed, SPDR info if no card in unit), and the REC (record start) and LAST(play last clip) functions. These functions are invoked by pressing the adjacent keypad button as shown on the previous page.

To start recording, press the REC soft button in the top right corner of the screen using the UP arrow. The status indicator will switch to the Recording function.

About the “Slow Card” Warning:
If any samples are lost during recording, a warning screen will appear displaying “slow card.” Typically the lost audio is less than 10 milliseconds and is barely noticeable.
The unit will still be recording while this screen appears. Press the BACK button (OK) to return to the recording screen.
When this happens, there will be no “gap” or brief silence in the recording.
Instead, the audio and timecode will simply jump forward. If this happens repeatedly during the recording, it is best to replace the card.
 |
 |
Timecode
 When TC Jam is selected, JAM NOW will blink on the LCD and the unit is ready to be synced with the timecode source. Connect the timecode source and the sync will take place automatically. When the sync is successful, a message will be displayed to confirm the operation.
NOTE: The headphone output will be muted when entering the TC Jam page. Audio will be restored when the cable is removed.
Timecode defaults to zero at power-up if no timecode source is used to jam the unit. A timing reference is logged into the BWF metadata.
Frame Rate
The frame rate affects the embedding of the timing reference in the BWF file metadata and display of timecode. The following options are available:
| • 30 • 29.97 • 25 • 24 |
• 23.976 • 30DF • 29.97DF |
NOTE: While it is possible to change the frame rate, the most common use will be to check the frame rate which was received during the most recent timecode jam. In rare situations, it might be useful to alter the frame rate here, but be aware that audio tracks may not line up correctly with mismatched frame rates.
Use Clock
Choose to use the clock provided in the SPDR as opposed to a timecode source. Set the clock in the Settings Menu, Date & Time on page 12.
NOTE: The SPDR time clock and calendar (RTCC) cannot be relied on as an accurate time code source. Use Clock should only be used in projects where there is no need for the time to agree with an external time code source.
Inputs
Input Level
Press MENU/SEL to select which input to adjust. Adjust the input gain with the UP and DOWN arrow buttons.
Input Type
Based on the input source, choose Analog or Digital.
Stereo Mode
Linked:
The limiters on both channels operate together to preserve the balance of the stereo image. Both red LEDs will come on at the same time, along with the “L” block on the LCD, even when limiting is only required on one channel, but the audio bar graph meters will operate independently.
Independent:
Use this mode if you are recording two separate sounds/voices, and each input will have a separate limiter.
NOTE: Input Level and LF Rolloff screens have one control in Linked Mode and two controls in Independent Mode.
LF Rolloff
Press MENU/SEL to select which input to adjust. Adjust with the UP and DOWN arrow buttons.
HP Volume
Select HPVolume in Main Menu and use UP and DOWN arrows to adjust.
Scene & Take
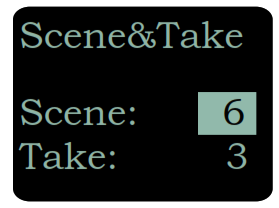
Each time a recording is started, the SPDR automatically increments the Take number. Scene and Take numbers can be manually updated. Takes can run up to 999 and scene numbers can run up to 99.
The progressive scene and take automatically catalogs each time a recording is begun. Scene numbers are entered manually. Take numbers increment automatically.
For example S01T001.WAV. The initial ‘S’ is meant to suggest “Scene” but also serves as the overwrite prevention character, decrementing to ‘R’, ‘Q’, etc. as needed to avoid a naming conflict. The “01” after the ‘S’ is the scene number. ‘T’ means take, and the “001” is the take number. An eighth character is used only for the second and subsequent (4 GB) segments for very large recordings.
SD Card
Format Card
This item deletes all files on the microSDHC memory card and prepares the card for recording.
WARNING: Previous files are not securely deleted from the card during the formatting process.
Files/Play
 Choose to play the files based on their name. Use the arrows to scroll, MENU/SEL to select the file, and the DOWN arrow to play.
Takes/Play
 Choose to play the files based on scene and take. Use the arrows to scroll, MENU/SEL to select the file, and the DOWN arrow to play.
File Naming
File naming can be set as Sequence, Clock Time, or Scene/Take. Use the arrows to scroll, MENU/SEL to choose.
About Card
View information about the microSDHC memory card. See storage used, storage capacity, and available recording time.

NOTE: Press BACK from the Main Window to display About Card. Any button returns to the Main Window.
Settings
Record Mode
Two record modes are available:
HD Stereo: Records a stereo audio track
Split Gain: Records two stereo pairs, for a total of four tracks, one of each pair at the normal level and another at -18 dB as a “safety” track that can be used in place of the normal track in the event that overload distortion (clipping) has occurred on the normal track.
Sample Rate
Use the arrows to scroll, MENU/SEL to choose one of two sample rate options available; 48 kHz is an industry-standard rate and should be suitable for nearly all purposes. At 96 kHz, the microSDHC memory card will be used up twice as fast but will have slightly less phase distortion near the top end of the audible spectrum (close to 20 kHz).
Date & Time
To set the date and time, use the MENU/SEL button to toggle through the fields and the UP and DOWN arrow buttons to choose the appropriate number.
Lock/Unlock
Choose Yes to lock the functions of the recorder to prevent accidental changes.
Backlight
The LCD backlight can be set to turn off after either 5 minutes or 30 seconds or to stay on continuously.
Bat Type
Choose either Alkaline (recommended) or Lithium AA battery type. The voltage of the installed batteries will be shown at the bottom.
Remote
The recorder can be configured to respond to “tweedle tone” signals from the PDRRemote smartphone app or to ignore them. Use the arrow buttons to toggle between “yes” (remote control on) and “no” (remote control off). (See Using A Remote Control App.)
About SPDR
The SPDR’s firmware version and serial number are displayed.
Default
To return the recorder to its factory default settings, use the UP and DOWN arrow buttons to choose Yes. SPDR default settings:
| Frame Rate | 30 | File Sequence Number | 1 |
| Input Level | 22 both sides | File Naming | Sequence |
| Input Type | Analog | Record Mode | HD Stereo |
| Stereo Mode | Linked | Sample Rate | 48 kHz |
| LF Rolloff | 70 Hz on both sides | Backlight Mode | Always On |
| Headphone Volume | 60% of the way up | Battery Type | Alkaline |
| Scene | 1 | Remote Control | Disabled |
| Take | 1 |
Operating Instructions
Recording in Analog Mode
- Connect microphone or audio source.
- Set Input Type to Analog:
When the Input Type is set to Analog, this menu item will allow you to adjust the input gain. The two tricolor audio level indicator LEDs on the top of the SPDR provide a visual indication of each analog audio signal level entering the recorder. The LEDs will glow either red or green to indicate audio levels, as shown in the following table.
Signal Level LED Less than -20 dB  Off
Off-20 dB to +0 dB  Green
Green+0 dB and up  Red
Red - Set Input Level.
When setting the input level in Analog Input Type, it is best to go through the following procedure before recording.
1) With fresh batteries in the SPDR, power the unit on.
2) Prepare the signal source(s). Position microphone(s) the way it will be used in actual operation and have the user speak or sing at the loudest level that will occur during use, or set the output level of the instrument or audio device to the maximum level that will be used.
3) Press MENU/SEL to select which input to adjust. Adjust the input gain with the UP and DOWN arrow buttons so that the input LED glows green during the loudest peaks in the audio. The LED will turn red if the peak is being limited in the preamp. - Set Stereo Mode.
Linked:
The limiters on both channels operate together to preserve the balance of the stereo image. Both red LEDs will come on at the same time, along with the “L” block on the LCD, even when limiting is only required on one channel, but the audio bar graph meters will operate independently.
Independent:
Use this mode if you are recording two separate sounds/voices, and each input will have a separate limiter.

- Set LF Rolloff:
Low-frequency audio content may be desirable or distracting, so the point at which the roll-off takes place can be set to 35, 50, 70, 100, 120, or 150 Hz.

-
Set HP (headphone) Volume.
-
Begin recording.Return to the Main Window and press the UP arrow to start recording (see page 6).
Recording in Digital Mode
- Connect microphone or audio source (p. 4).
- Set Input Type to Digital:
When the Input Type is set to Digital, the two tricolor audio level indicator LEDs on the top of the SPDR will be blue for a signal above -40 and off otherwise. In Digital mode, the input is AES 3 compatible. In this configuration, pin 4 is +, and pin 1 is -.

- Set Stereo Mode.
Linked:
The limiters on both channels operate together to preserve the balance of the stereo image. Both red LEDs will come on at the same time, along with the “L” block on the LCD, even when limiting is only required on one channel, but the audio bar graph meters will operate independently.
Independent:
Use this mode if you are recording two separate sounds/voices, and each input will have a separate limiter. - Set LF Rolloff:
Low-frequency audio content may be desirable or distracting, so the point at which the roll-off takes place can be set to 35, 50, 70, 100, 120, or 150 Hz.

- Set HP (headphone) Volume.
- Begin recording.
Return to the Main Window and press the UP arrow to start recording (see page 6).
Browsing/Playing Back Recordings
Soft buttons in the Playback function provide the common button functions used for playback on a recording device. The soft buttons will change depending on the status of the playback: active playback paused in the middle or paused at the end.

Users can choose to play the files based on their name or based on scene and take.
Files/Play Choose to play files by the filename. Filenames of the recordings contain industry-standard iXML chunks in the file headers, with the most commonly used fields filled in. File naming can be set as:
- Sequence: a progressive sequence of numbers
- Clock Time: the time of the internal clock at the beginning of the recording; recorded as DDHHMMA.WAV. DD is the day of the month, HH is hours, MM is minutes, A is the overwrite-prevention character, incrementing to ‘B’, ‘C’, etc. as needed to avoid a naming conflict A final character serves as the segment identifier, being absent in the first segment, ‘2’ in the second segment, ‘3’ in the third and so on.
- Scene/Take: the progressive scene and take automatically cataloged each time a recording is begun; S01T001.WAV. The initial ‘S’ is meant to suggest “Scene” but also serves as the overwrite prevention character, decrementing to ‘R’, ‘0’, etc. as needed to avoid a naming conflict. The “01” after the ‘S’ is the scene number. ‘T’ means take, and the “001” is the take number. An eighth character is used only for the second and subsequent (4 GB) segments for very large recordings. Scene numbers are entered manually. Take numbers increment automatically.
Takes/Play Choose to play the files based on scene and take. Scene and take numbers can be manually entered, and are embedded in the filenames and iXML headers of recordings. Take number automatically increments each time the record button is pressed. When browsing by scene and take, recordings that span multiple files are listed singly and played as one long recording.
 The status indicator will alert you if there is no microSDHC memory card in the SPDR.

Using a Remote Control App
PDRRemote By New Endian LLC
The convenient remote control is provided by a phone app available on AppStore and Google Play. The app uses audio tones (“tweedle tones”) played through the phone’s speaker that is interpreted by the recorder to make changes:
- Record Start/Stop
- Mic Gain Level Adjustments
- Lock/Unlock
The SPDR tones are unique to the SPDR, and the recorder will not react to “tweedle tones” meant for Lectrosonics transmitters.
The screens appear differently for iOS and Android phones but perform the same functions.
For Best Results
The following conditions are required:
- The microphone must be within a few inches.
- The recorder must be configured to enable remote control activation. See Remote the menu.
Please be aware this app is not a Lectrosonics product. It is privately owned and operated by New Endian LLC, www.newendian.com.
LIMITED ONE YEAR WARRANTY
The equipment is warranted for one year from the date of purchase against defects in materials or workmanship provided it was purchased from an authorized dealer. This
warranty does not cover equipment that has been abused or damaged by careless handling or shipping. This warranty does not apply to used or demonstrator equipment.
Should any defect develop, Lectrosonics, Inc. will, at our option, repair or replace any defective parts without charge for either parts or labor. If Lectrosonics, Inc. cannot
correct the defect in your equipment, it will be replaced at no charge with a similar new item. Lectrosonics, Inc. will pay for the cost of returning your equipment to you.
This warranty applies only to items returned to Lectrosonics, Inc. or an authorized dealer, shipping costs prepaid, within one year from the date of purchase.
This Limited Warranty is governed by the laws of the State of New Mexico. It states the entire liability of Lectrosonics Inc. and the entire remedy of the purchaser for any
breach of warranty as outlined above. NEITHER LECTROSONICS, INC. NOR ANYONE INVOLVED IN THE PRODUCTION OR DELIVERY OF THE EQUIPMENT SHALL BE LIABLE FOR ANY INDIRECT, SPECIAL, PUNITIVE, CONSEQUENTIAL, OR INCIDENTAL DAMAGES ARISING OUT OF THE USE OR INABILITY TO USE THIS EQUIPMENT EVEN IF LECTROSONICS, INC. HAS BEEN ADVISED OF THE POSSIBILITY OF SUCH DAMAGES. IN NO EVENT SHALL THE LIABILITY OF LECTROSONICS, INC. EXCEED THE PURCHASE PRICE OF ANY DEFECTIVE EQUIPMENT.
This warranty gives you specific legal rights. You may have additional legal rights which vary from state to state.
Documents / Resources
 |
LECTROSONICS SPDR Stereo Compact Digital Audio Recorder [pdf] User Guide SPDR, Stereo Compact Digital Audio Recorder, SPDR Stereo Compact Digital Audio Recorder |


