![]()
LEADWISE PICK GUARDIAN SERVE MACHINE GEN-1 USER MANUAL
 Product model: LWAPL25C
Important: As products are subject to continuous improvement, the final product may differ slightly from the illustrations provided. Please refer to the actual product as your primary reference
SAFETY INSTRUCTIONS
- SAFETY FIRST
Keep all bystanders, especially children and pets, away from the ball exit area during operation to prevent accidental injury. - POWER OFF BEFORE MAINTENANCE
Always switch off the power before performing any maintenance or troubleshooting to avoid electric shock or other safety hazards. - CHARGING PRECAUTIONS
Do not operate the machine while it is charging. Doing so may damage the equipment or pose safety risks. - FOLLOW OPERATING GUIDELINES
Strictly adhere to all safety and operational procedures outlined in this manual. Failure to comply may void the product warranty, and the manufacturer will not be held responsible for any resulting consequences. - KEEP DOCUMENTATION SAFE
Retain this manual and all related documents for future reference. - CUSTOMER SUPPORT
For any questions or assistance, please contact your local customer service center or authorized dealer. - RIGHT OF FINAL INTERPRETATION
The final interpretation of the contents of this manual belongs to the company. Please read and fully understand this manual before using the product.
PRODUCT STRUCTURE

BUILT-IN POWER SUPPLY DESCRIPTION
Independent Power Supply Design
This device features a built-in battery, allowing operation without the need to connect an external power cord to the host. This design enhances convenience and portability.
- Battery Capacity: 6800mAh
- Battery Life: Approximately 4 to 4.5 hours (depending on usage frequency and intensity)
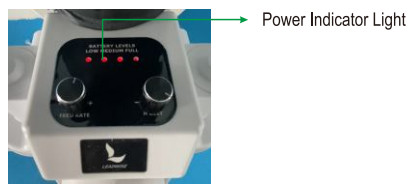
Power Indicator
- Displays the current power status of the machine.
- When the battery level is low, the indicator light will flash to remind the user to recharge.
Charging Instructions
Connection Sequence
To ensure safe operation, connect the charger in the following order
A.Plug the input end of the charger into a power socket.
B. Connect the output end of the charger to the device battery.
Failure to follow this sequence may cause electric sparks or other safety hazards.
Charging Method:
- Insert the charger plug into the DC charging port on the device.
- While charging, the charger’s indicator light will appear red.
- Once fully charged, the indicator will turn green, indicating that charging is complete.
Battery Precautions:
- Use Only the Original Charger:
Always use the original charger provided with the device. - Do Not Use Third-Party Chargers:
The use of chargers from other brands or types is strictly prohibited. Doing so may result in: - Battery damage
- Abnormal charging behavior
- Serious safety risks
Packing List
| Part Name Details | Quantity |
| Net | 1 |
| Stand | 4 |
| Tube | 8 |
| Host | 1 |
| Remote Control | 1 |
| Backpack | 1 |
| Product Certificate | 1 |

Installation Instructions
Welcome to scan the code to watch instructional videos, which will help you get started more easily.

https://www.yitulu.com/t/portfolio/51yZFfyp
PB RANGER Video installation and usage tutorial..
1. Unpacking and Inspection
- Carefully open the packaging and remove all components.
- Refer to the Packing List to verify that all parts are present and undamaged.
- Check for any signs of defects or shipping damage. If any issues are found, contact customer service immediately.
- Once confirmed, it is recommended to sort, label, and arrange the parts as shown in the diagram below to simplify the installation process.

2. Install the Bracket
Insert the four brackets into the corresponding interfaces at the bottom of the host unit:
- Short brackets go in the front.
- Long brackets go in the rear,

Installation Steps:
- Press the connection button and insert the bracket plug into the socket.
- Release the button once inserted; it should pop back out and lock into the interface hole.
- Gently pull the bracket to confirm it is securely attached.
The illustration below shows Step 1 of the installation process.

3. Connect the Support Tubes
- Insert the two A tubes into the rear long brackets.
- Insert the two B tubes into the front short brackets.
After inserting, gently pull each tube to ensure a firm and secure connection.

The illustration below shows Step 2 of the installation process.

4. Fix the Bottom of the Net
Confirm the net’s orientation before installation:
- Short side faces forward [aligns with B tubes).
- Long side faces backward (aligns with A tubes).

- Attach the four bottom ropes of the net to the tops of the A and B tubes.
- While installing or adjusting components:
- Step on the lower bracket to stabilize the unit,
- This makes adjustments easier, safer, and more secure.
- Confirm that the bottom of the net is tight and secure, with no slack.

5. Install the Side Sleeves of the Net
- Insert the D rods along both vertical edges of the net to form a rigid frame.
- Then insert the C tubes into the tops of the rear A tubes.

6. Fix the Top of the Net
- Secure the two top ropes of the net to the tops of the side sleeves.
- Tighten the ropes to ensure the net remains evenly tensioned and stable.

Tip for Easy Installation:
For easier operation, lay the ball machine flat on the ground, attach the two top ropes of the net to the C tubes, and then carefully lift the ball machine back to an upright position.
7. Fix the Black Pipe Mouth Cover
- Align the black pipe mouth cloth cover with the main unit’s ball exit port.
- Pull the cloth cover down completely to fully cover the port.
- Use the Velcro (magic sticker) to secure it tightly and prevent slipping.

Remote Control Panel Functions

Instructions for Using the Ball Machine

1.Powering On
Using the Ball Machine (Host) Directly:
- Press the power switch on the ball machine. The power indicator will light up.
- Press any adjustment button and hold for up to 3 seconds.
- After approximately 30 seconds, the machine will automatically begin serving balls.
- Using the Remote Control:
- Press the power switch on the ball machine and ensure the power indicator is on.
- Press the “Serve” button on the remote control.
- Wait about 3 seconds, and the ball machine will begin serving balls.
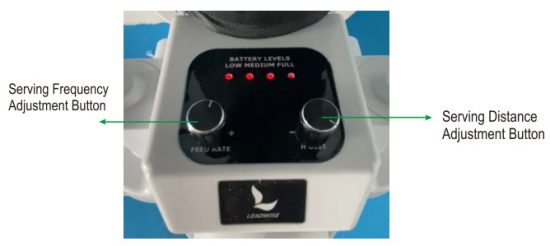
2. Adjustment of serving distance and serving frequency

(1) Adjusting Serving Distance and Frequency On the Host:
To Adjust Serving Distance:
- Turn the distance adjustment knob clockwise to increase the serving distance.
- Turn the knob counterclockwise to decrease the serving distance,
- Each rotation adjusts one gear level.
![]() Note: When reaching the maximum (5th gear) or returning to 1st gear, the device will emit a “beep” sound to confirm the setting.
Note: When reaching the maximum (5th gear) or returning to 1st gear, the device will emit a “beep” sound to confirm the setting.
(2) To Adjust Serving Frequency:
- Turn the frequency adjustment knob clockwise to increase the serve frequency.
- Turn the knob counterclockwise to decrease the serve frequency.
- Each rotation adjusts one gear level.
![]() Note: When reaching the maximum (3rd gear) or returning to 1st gear, the device will emit a “di” sound as a gear confirmation.
Note: When reaching the maximum (3rd gear) or returning to 1st gear, the device will emit a “di” sound as a gear confirmation.
(3) Using the Remote Control:
- Press the appropriate adjustment buttons on the remote control to change the serving distance or frequency.
- Each press will trigger the corresponding adjustment.
- Some functions will emit a “di” sound as confirmation.
- For button locations and usage, please refer to the Remote Control Button Diagram.
3. Host Angle Adjustment
Description:
This ball machine features a side rail adjustment structure that allows you to set the serving angle within a range of 0° to 35°, providing flexibility for different training scenarios.
How to Use:
- Adjusting the Angle:
Rotate the silver knob on the adjustment rail clockwise to raise or lower the serving angle based on your training needs. - Locking the Angle:
Once the desired angle is set, rotate the knob counterclockwise to lock it in place, This ensures the angle remains fixed and stable, preventing deviation during use.

![]() Tip: Always make sure the angle is securely locked before operating the machine to ensure consistent performance and user safety.
Tip: Always make sure the angle is securely locked before operating the machine to ensure consistent performance and user safety.
Product Size and Weight
Net Weight: 215.17 oz
Machine Dimensions: 63*27*83 in
Backpack Dimensions:

Precautions
Weather Conditions
- Do not use the device on rainy days or when the ground is wet.
- Moisture can cause balls to become wet, leading to jams or potential damage to the machine.
Safety Distance
- Never stand in front of the ball serving port or close to the fence during operation,
- This prevents accidental injury or collisions caused by unexpected ball launches.
Cleaning Instructions
- Always turn off the power before cleaning the device.
- This ensures user safety and prevents electrical hazards.
Battery Maintenance
- Charge the device after each use,
- If not used for extended periods, charge regularly to prevent over-discharge, which may shorten battery life.
Ball Condition
- Do not use wet, dirty, or deformed balls.
- For optimal performance, use balls of the same size and specification every time.
Long-Term Storage
- If the machine won’t be used for a while, turn off the power and store it in a dry, safe location.
- This helps prevent battery drain and component aging.
Usage Space Requirements
- Do not operate the device in small spaces or rooms with low ceilings.
- Ensure adequate space for safe serving and to avoid potential safety hazards.
COMMON FAULTS AND SOLUTIONS
Ball Jamming
Possible Causes:
- The net mouth is blocked,
- A ball is stuck inside the machine,
Solution:
- Avoid placing more than 10 balls in the machine at a time.
- Use balls of uniform size and condition to reduce the chance of jamming.
Ball Not Serving Properly
Possible Causes:
- A ball is stuck near the paddle.
- The device battery is low,
Solution:
- Turn off the power immediately to ensure safety.
- Gently remove the stuck ball and restart the machine.
- If the issue is due to low power, fully recharge the machine before resuming use.
This product comes with a one-year warranty from the date of purchase.
During the warranty period, if any parts are damaged or the device experiences abnormal performance (not caused by human misusel, please contact the customer service center or an authorized dealer promptly.
Eligible parts will be repaired or replaced free of charge in accordance with the warranty policy.
![]() Important: Please keep your purchase receipt as proof of purchase to access after-sales service and warranty support.
Important: Please keep your purchase receipt as proof of purchase to access after-sales service and warranty support.
Warning:
Changes or modifications to this unit not expressly approved by the party responsible for compliance could void the user’s authority to operate the equipment.
NOTE:
This device complies with part 15 of the FCC Rules. Operation is subject to the following two conditions: (1) This device may not cause harmful interference, and (2) this device must accept any interference received, including interference that may cause undesired operation.
FCC Statement:
This equipment has been tested and found to comply with the limits for a Class B digital device, pursuant to part 15 of the FCC Rules. These limits are designed to provide reasonable protection against harmful interference in a residential installation. This equipment generates, uses and can radiate radio frequency energy and, if not installed and used in accordance with the instructions may cause harmful interference to radio communications. However, there is no guarantee that interference will not occur in a particular installation. If this equipment does cause harmful interference to radio or television reception, which can be determined by turning the equipment off and on, the user is encouraged to try to correct the interference by one or more of the following measures:
- Reorient or relocate the receiving antenna.
- Increase the separation between the equipment and receiver.
- Connect the equipment into an outlet on a circuit different from that to which the receiver is connected.
- Consult the dealer or an experienced radio/TV technician for help.
![]() COMPANY WEBSITE
COMPANY WEBSITE
http://www.leadwisesport.com/
U.S. CUSTOMER SERVICE
Phone:+1(812)286-2680
WhatsApp:+1(847)815-9302
WeChat: LEADWISE-USA
Email: admin@LEADWISE.BEST
MALAYSIA CUSTOMER SERVICE
Phone/ WhatsApp: +601127195113
Email: Leadwisemy@gmail.com
CHINA CUSTOMER SERVICE
Phone: +86 131-2858-8097
WhatsApp: Leadwise Pickleball
Email: 3922544814@qq.com
SINGAPORE CUSTOMER SERVICE
Email: Leadwisesg@gmail.com
WhatsApp:+65 97683277
Documents / Resources
 |
LEADWISE LWAPL25C Gen 1 Pick Guardian Serve Machine [pdf] User Manual 2BP64-LWAPL, 2BP64LWAPL, LWAPL25C Gen 1 Pick Guardian Serve Machine, LWAPL25C, Gen 1 Pick Guardian Serve Machine, Pick Guardian Serve Machine, Guardian Serve Machine, Serve Machine, Machine |