 SK201 Wireless U Net Touch Keypad
User Manual
General Introduction
The SK201 is a wireless keypad for the SC109 alarm system. It serves as a user interfacedevice, in the absence of smartphone app, to display system status and to relay key inputfrom user to controller.
Main features:
- Battery operated
- Touch button keys
- Shows arm/disarm status of alarm controller
- Shows Zone number, Fault number indicator
- Panic key combination
- Buzzer for beeps, siren and key tone press
- Automatically turns on when user approach.
- Self adjust LED brightness according to environment
Product Layout
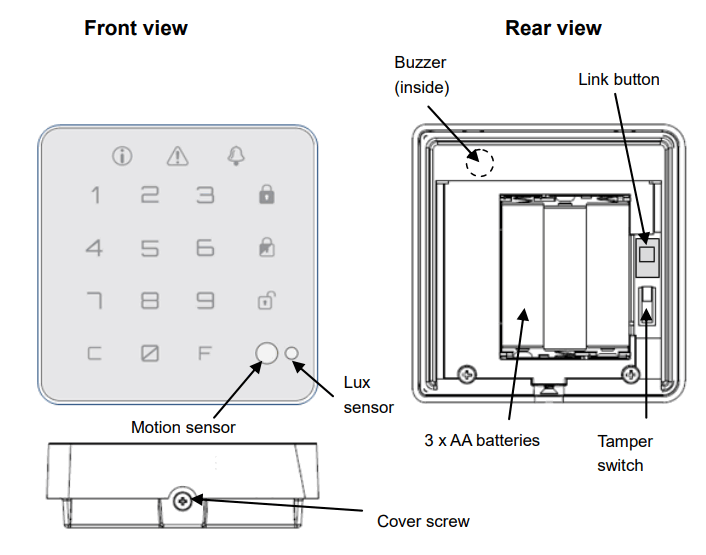 Pairing to Controller
- Set the Controller into binding mode. (Refer to the user manual of the Controller).
- Insert 3 AA batteries into the keypad.
- Press and hold the Link button for more than 3 seconds then release, and a 30-second countdown will start. The indicator will start blinking.
- Pairing will complete when the indicator stops blinking.
Mounting the Keypad
The Keypad should be mounted in a position close to the main entrance door so that the access codes can be entered easily.
Ensure that the position selected for the Keypad is within the effective range of the Controller.
Note: Do NOT fix the Keypad to metalwork or locate the unit within 1 meter of metalwork (i.e. radiators, water pipes, etc) as this could affect its radio range.
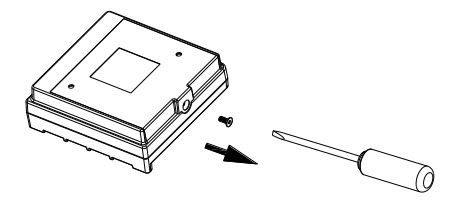
- Undo and remove the cover screw from the bottom edge of the Keypad and remove the wall mounting plate (Figure 2).
- Using the mounting plate as a template, mark the positions of the two fixing holes on the wall.
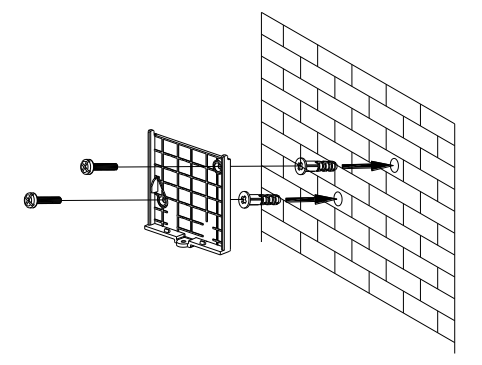
- Fix the mounting plate to the wall using the screws and wall plugs provided. Do not over-tighten the fixing screws as this may distort or damage the mounting plate.
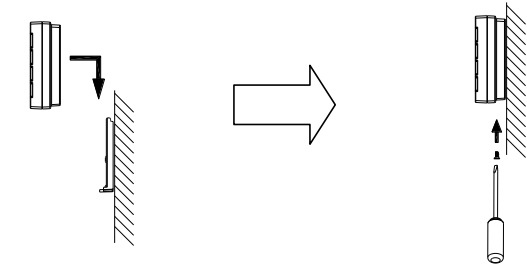
- With batteries installed inside, slide the keypad into its wall mounting plate and screw the fixing screw to secure it in place. Do not over-tighten the screw.
Operation
The keypad serves as user interface to present the Controller’s status to user and to relay input from user back to the Controller.
All the current status of the system (Arm, Disarm, Alarm, Faults, etc.) are derived from the Controller, the keypad does not keep track of the status, nor the PIN code of the user. As such, when inputting PIN code, the keypad merely passes the PIN information to the Controller for verification. 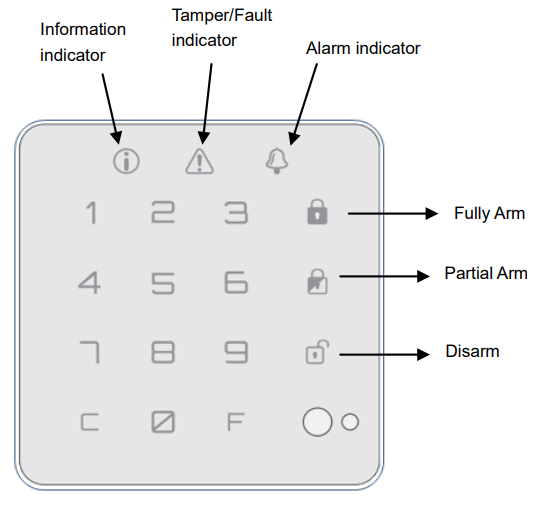
| Key icon | Name | Function as input | Function as indicator |
| [0, 1,…9] | Number keypad | To input: 1. PIN code 2. Partition no. 3. Bypass Zone no. 4. Fault code |
Shows: 1. Door open Zone no. 2. Fault code 3. Triggered Zone no. 4. Panic device no. 5. Tamper code |
| [C] | Cancel Key | 1. Cancel, if enter wrong PIN) 2. Exit/Quit 3. Acknowledge alerts 4. See next warning |
Keypad is locked |
| [F] | Function Key | To proceed with: 1. Zone bypass 2. Low battery bypass |
None. |
| Mode icon | Name | Function as input | Function as indicator |
| Fully Arm, Partial Arm, Disarm | To activate Fully Arm, Partial Arm, Disarm | On: System is in the current mode. Blink: System is entering into that mode. (e.g. if Disarm is blinking, system is getting ready to Disarm) |
|
| Status | Name | Function as input | Function as indicator |
| Pending information | N/A | Indicates there are other information waiting to display. | |
|
|
Tamper/ Fault | N/A | Indicator for Tamper and Fault events |
| Alarm | N/A | Indicator for Intruder and Panic events |
[ ] : notations used in this manual to represent the icon.
Since the keypad runs on battery, it will remain mostly in sleep state. When woken up from sleep by motion detection or by user press, it will sync with the Controller to retrieve the latest status.
The following section describes the user operation at various stages of the alarm system.
- Disarm
Possible status:Feedback from Controller Indicator display Mode ⚠ [0, 1,…9] Buzzer Standby, ready to Arm [D]:ON Fault [D]:ON ON *Fault code *Fault code: refer to Events section.
If multiple Faults occur, press [C] to see next Fault item. - To Arm :
For Fully Arm: Input [PIN code] then press [A].
For Partial Arm: Input [PIN code], followed by *Alarm Mode number, e.g. [5], then press [P].
*Refer to VIAS app for Alarm mode number. To cancel, press [C].
2.1 Possible result: SuccessFeedback from Controller Indicator display Mode ⚠ [0, 1,…9] Buzzer Success proceed to Exit delay [A]: Blink Starts beeping 2.2 Possible result: PIN Error
Feedback from Controller Indicator display Mode ⚠ [0, 1,…9] Buzzer PIN Error Blink Beep-beep To exit, press [C] 2.3 Possible result: Bypass required
Feedback from Controller Indicator display Mode ⚠ [0, 1,…9] Buzzer Zone open [A]: Blink Blink Zone no. Fault reminder [A]: Blink Blink Fault code* Choice of actions to take:
Action Press Indicator display C or F [0, 1,…9] ⚠ Buzzer Quit, return to Disarm mode C Beep Zone bypass F Zone no. ON Fault override F Fault number ON e.g. to bypass Zone 2, press [F] [0] [2] e.g. to override fault 5, press [F] [5] 2.4 Possible result ; Keypad low battery warning
Feedback from Controller Indicator display Mode ⚠ [0, 1,…9] Buzzer Keypad low battery [A]: Blink ON [9] To acknowledge, press [F] to proceed.
2.5 Possible result : RF connection cannot be establishedFeedback from Controller Indicator display Mode ⚠ [0, 1,…9] Buzzer RF signal lost [A]: Blink Blink [8] System cannot Arm, press [C] to quit.
-
Exit delay
Possible status:Feedback from Controller Indicator display Mode ⚠ [0, 1,…9] Buzzer Exit delay in progress [A]: Blink Slowbeep,then fast beep Arm complete ON Fail toArm(notified by Controller) [D];ON Blink Beep Note: Exit delay duration is determined by Controller.
To cancel Exit delay before it expires, press [C]. - Entry delay
Status:Feedback from Controller Indicator display Mode ⚠ [0, 1,…9] Buzzer Entry delay started [A]:ON Slow beep, then fast beep Note: Entry delay duration is determined by Controller
- To Disarm : Input [PIN code] then press [D].
Possible results:Feedback from Controller Indicator display Mode ⚠ [0, 1,…9] Buzzer Disarm success [D]: ON Long beep PIN Error [D]: Blink Blink All ON Beep-beep - To Restore: Keypad displays alert information and wait for user to restore.
Possible status:Feedback from Controller Indicator display Mode ⚠ [0, 1,…9] Buzzer Alert type: Intruder [D] : ON ON ON Zone no., Blink Alert type:, Tamper [D] : ON ON Blink ON *Tamper code, ON Alert type: Fault [D] : ON ON ON *Fault code, ON *Tamper and Fault codes: refer to Events section
To restore an alert, press [C] and the next alert will be displayed. Repeat until the icon turns off, indicating there are no more pending alerts to restore. - Panic : To activate Panic, press and hold keys [1] and [3] for over 3 secs. The keypad siren will sound.
Events
When events occur, the keypad will display as follows:
| Event notified by Controller | Indicator display | |||||
| ⚠ | [C] | [0, 1,…9] | Buzzer | |||
| Intruder Alarm occur | Blink | Zone no. | Siren sound 1 | |||
| Panic occur | Blink | Panic device number | Siren sound 2 | |||
| Tamper occur | Blink | ON | *Tamper code | Siren sound 1 | ||
| Fault occur | ON | *Fault code | ||||
| Keypad locked | ON | |||||
*Tamper and Fault codes; refer to table below.
Note:
- Alarm duration is determined by Controller
- Siren sound 2 has distinct sound that is different from Sound 1.
- Keypad lock condition (no. of times tried, lock period) is determined by Controller
Tamper code
| Tamper source | [0, 1,…9] |
| Keypad/Controller | [1]: ON |
| Detector | [2]: ON |
| Siren | [3]: ON |
| RF jam | [4]: ON |
| RF Supervision | [5]: ON |
Fault code
| Fault source | [0, 1,…9] |
| Detector fault | [1]: ON |
| AC power | [2]: ON |
| Low battery, detector | [3]: ON |
| Interconnections | [4]: ON |
| ATS | [5]: ON |
| Siren | [6]: ON |
| ATP (Opt) | [7]: ON |
| RF signal lost | [8]: ON |
| Low battery, keypad | [9]: ON |
Troubleshooting
The troubleshooting table lists some possible causes and solutions. Please contact your original retailer or nearest service center if the below solutions cannot solve your problem.
| Symptom | Possible Cause | Recommendation |
| Indicators do not light up | No power. | Check if batteries are inserted correctly or replace with new ones. |
| The ⚠ icon flashes 3 times | The keypad cannot communicate with the controller. It may be out of range. | Place the keypad closer to the controller. |
Reset to Factory Settings
- Press and hold the link button for 3 or more seconds, and the icon will start to flash.
- Press and hold the link key for 6 or more seconds within 30 seconds until the icon turns off. Release the Link key.
- The icon will blink slowly meaning the device is now reset back to factory mode
Specifications
| Battery | 3 x AA battery |
| Operating Temperature | -10°C to 45°C |
| Motion sensor PIR range | Est.1m |
| Humidity range | Up to 85% RH |
| Dimension | 95 mm x 93 mm x 29mm |
| Operating Frequency | 868MHz Band range (EU) 923MHz Band range (US) |
| FCC ID | FU5SK201-2 |
| IC | 23210-SK2012 |
** Specifications are subject to change and improvement without notice.
![]()
WARNING:
Do not dispose of electrical appliances as unsorted municipal waste, use separate collection facilities.
Contact your local government for information regarding the collection systems available.
If electrical appliances are disposed of in landfills or dumps, hazardous substances can leak into the groundwater and get into the food chain, damaging your health and well-being.
When replacing old appliances with new ones, the retailer is legally obligated to take back your old appliance for disposal at least for free of charge.
CAUTION:
RISK OF EXPLOSION IF BATTERY IS REPLACED BY AN INCORRECT TYPE. DISPOSE OF USED BATTERIES ACCORDING TO THE INSTRUCTIONS
Federal Communication Commission Interference Statement
FCC warning:
Any Changes or modifications not expressly approved by the party responsible for compliance could void the user’s authority to operate the equipment.
Note: This equipment has been tested and found to comply with the limits for a Class B digital device, pursuant to part 15 of the FCC Rules. Operation is subject to the following two conditions:
- This device may not cause harmful interference
- this device must accept any interference received, including interference that may cause undesired operation.
These limits are designed to provide reasonable protection against harmful interference in a residential installation. This equipment generates uses and can radiate radio frequency energy and, if not installed and used in accordance with the instructions, may cause harmful interference to radio communications. However, there is no guaranteethat interference will not occur in a particular installation. If this equipment does cause harmful interference to radio or television reception, which can be determined by turning the equipment off and on, the user is encouraged to try to correct the interference by one or more of the following measures:
-Reorient or relocate the receiving antenna.
- Increase the separation between the equipment and receiver.
- Connect the equipment into an outlet on a circuit different from that to which the receiver is connected.
- Consult the dealer or an experienced radio/TV technician for help.
This equipment complies with FCC radiation exposure limits set forth for an uncontrolled environment.
Industry Canada statement:
This device complies with Industry Canada licence-exempt RSS standard(s). Operation is subject to the following two conditions:
- This device may not cause interference, and
- This device must accept any interference, including interference that may cause undesired operation of the device.
![]() www.everspring.com
www.everspring.com
50 Sect. 1 Zhonghua Rd Tucheng
NewTaipeiCity 236 Taiwan
Documents / Resources
 |
EVERSPRING SK201 Wireless U Net Touch Keypad [pdf] User Manual SK201-2, SK2012, FU5SK201-2, FU5SK2012, SK201 Wireless U Net Touch Keypad, SK201, Wireless U Net Touch Keypad, U Net Touch Keypad, Touch Keypad, Keypad |
 |
EVERSPRING SK201 Wireless U Net Touch Keypad [pdf] User Guide SK201, SK201 Wireless U Net Touch Keypad, Wireless U Net Touch Keypad, U Net Touch Keypad, Touch Keypad |


